• About
  • Online Card Classes
  • Card Making Ideas
  • Stampin' Up! Catalogs
  • Card Tutorials
  • Contact
  • Shopping Rewards
  • Shop
  • Join Stampin' Up!
ON Y GO! STAMPING
  • About
  • Online Card Classes
  • Card Making Ideas
  • Stampin' Up! Catalogs
  • Card Tutorials
  • Contact
  • Shopping Rewards
  • Shop
  • Join Stampin' Up!

Busy Shaker Bees

2/17/2020

0 Comments

 
Picture
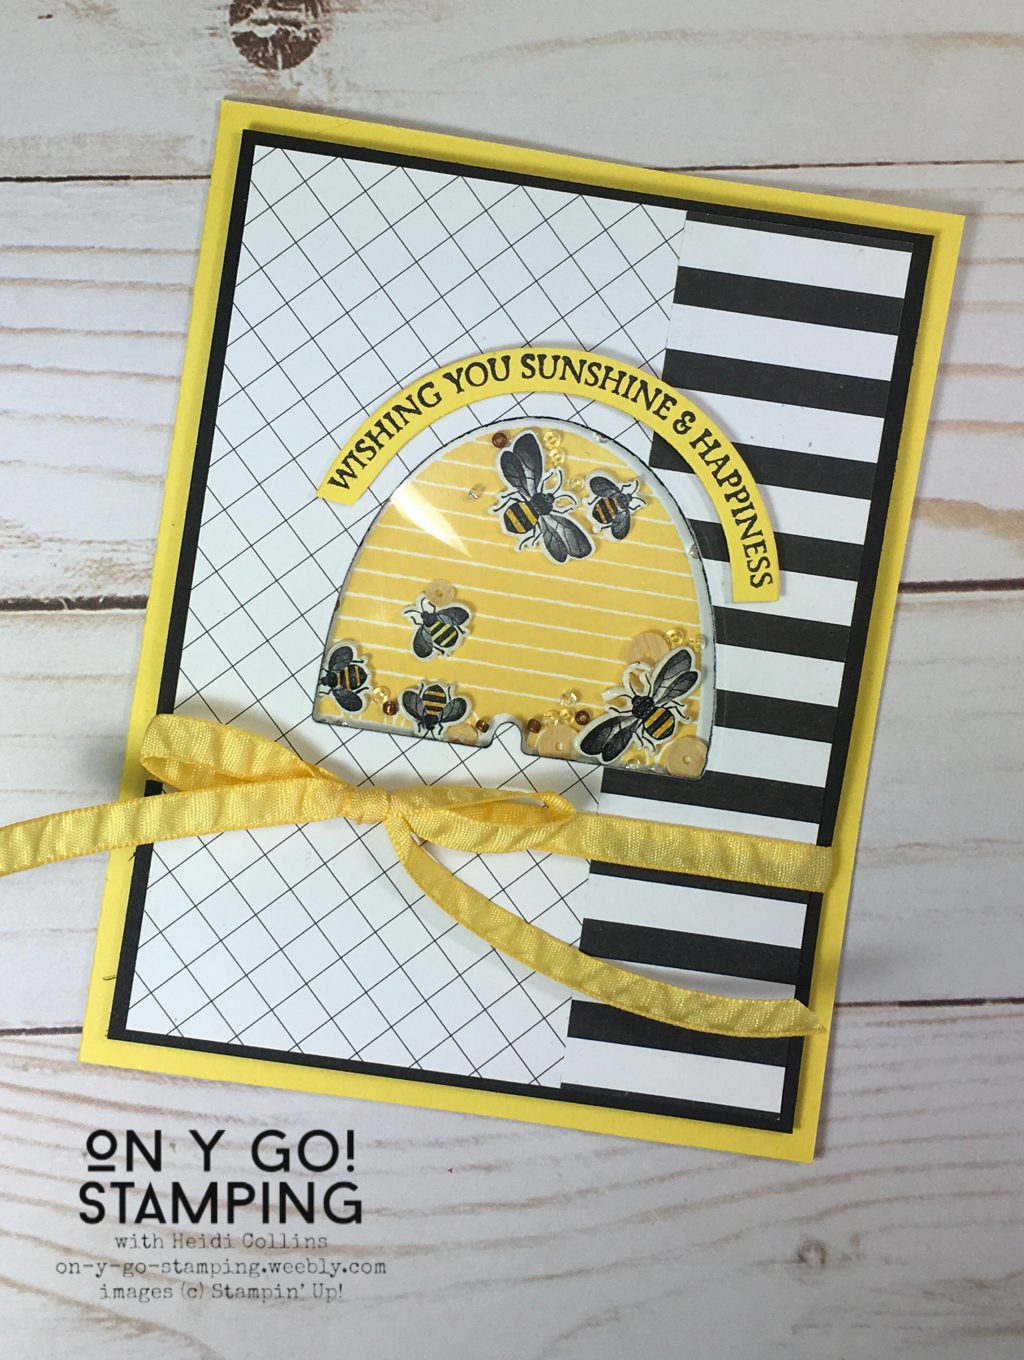
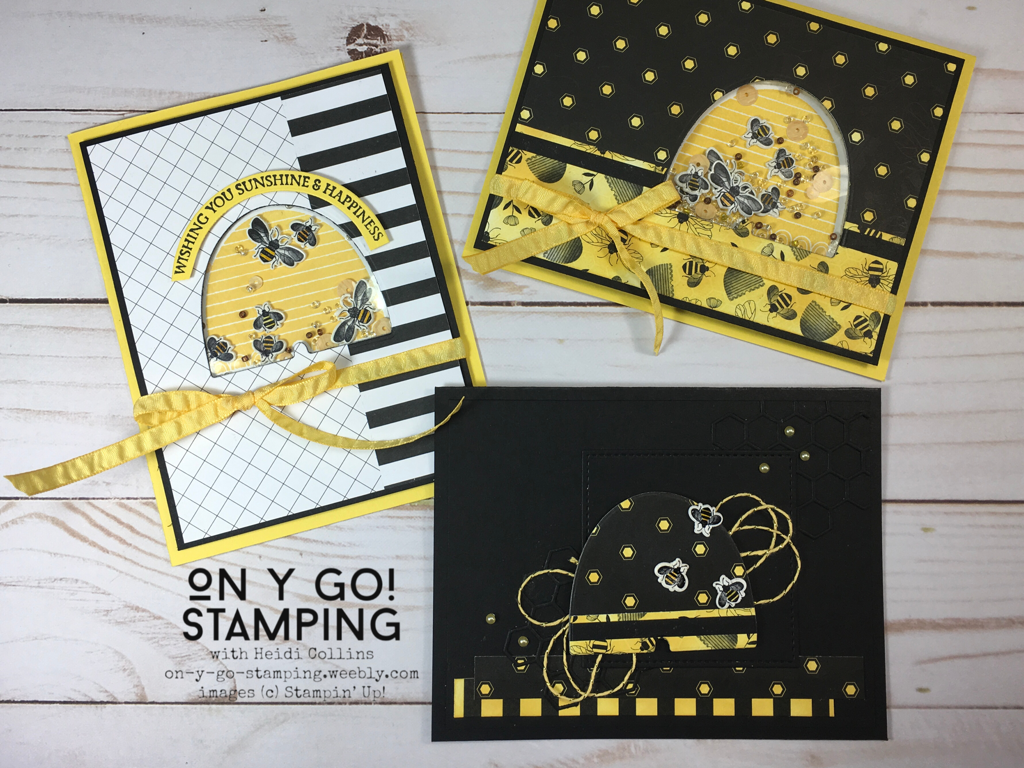
Do you remember shrinky dinks? Those plastic images that you could color and then shrink in your oven? They're just as much fun as a grown-up as they were when I was a kid! 

Stampin' Up! used to carry shrink plastic years and years ago. I still have a partial package in my drawer and the Honey Bee stamp set from the 2020 January-June mini catalog was just begging to be stamped and shrunk. While SU! doesn't carry it anymore, you can still find it in craft stores and online. 

I stamped the bees using Jet Black Stazon ink on white shrink plastic. Usually, you don't use Stampin' Blends with Stazon ink because the alcohol markers will make the Stazon ink run. So, normally, you should Memento ink with the Stampin' Blends. However, I found that the Memento ink just didn't give a nice impression on the shrink plastic. So, I used Stazon and very, very carefully colored the bees' bodies with Daffodil Delight Dark Stampin' Blend. I was careful not to color over the stamped lines to avoid causing the Stazon ink to run.

The shrunken bees are the perfect size for the interior of a shaker card! So I made two shaker cards with the bees trapped inside. 
Picture

I adhered the patterned paper from the Golden Honey DSP to a piece of Basic Black cardstock. Then, I used the beehive die from the Detailed Bee dies to cut a hole through this card front. I used sticky strip to attach a piece clear plastic to the back of the card front. Years ago, I bought a package of overhead projector (remember those?!) sheets on clearance. I use these for shaker cards, but you can also purchase window sheets.

On a separate piece of Whisper white cardstock, I stamped the beehive in Daffodil Delight ink. When you purchase SU! cling stamps, they come still stuck in the full sheet of rubber and you have to punch them out. I have some of these saved and used some for the foam between the card front and the beehive. I simply peeled the red rubber off the foam cushion and used adhesive to attach it carefully around the edges of the beehive that I had stamped on Whisper White cardstock. I was very careful not to leave any holes, but I also tried to stay fairly close to the edge because I didn't want all my bling to wind up outside the frame where you couldn't see it.

I put the shrinky dink bees, some seed beads in clear and a golden brown, and a few sequins on top of the bee hive. Then I put more adhesive on the top of the foam and adhered the card front over the beehive so that the opening aligned with the stamped beehive. This created an enclosed compartment filled with bling that shakes. 

Finally, I added a piece of Daffodil Delight ribbon and adhered the card front to a Daffodil Delight card base. I stamped the greeting on Daffodil Delight cardstock and used two circle dies to cut it out before adhering it to my card front to finish the card.
Picture

​I created my second shaker card in much the same way. For this card, I used a sponge dauber and Daffodil Delight ink to rub yellow ink onto the patterned paper from the Golden Honey DSP. This made the paper yellow and black instead of black and white. 
My final card is not a shaker card. But, I had a few more shrinky dink bees and decided to use them as an accent on this card front. Plus, I wanted to use the beehive that I cut out for the window on the previous card. I adhered the bees using glue dots. I finished the front with a black on black effect. I added a square of Basic Black cut with the Stitched Shape dies as well as pieces of honey comb cut with the Detailed Bee dies. I added Metallic Baker's Twine and some colored pearls as accents. 
Picture

Supplies:
Cardstock:
  • Basic Black
  • Daffodil Delight
  • Golden Honey (Sale-A-Bration freebie!)
Inks:
  • Jet Black Stazon
  • Daffodil Delight
Accessories:
  • Daffodil Delight Dark Stampin' Blend
  • Metallic Baker's Twine and Sequins combo pack (Sale-A-Bration freebie!
  • Detailed Bee dies
  • Stitched Shapes dies
  • Window sheets
  • Foam
  • Shrink plastic
0 Comments

Birthday Bonanza Versatility

2/14/2020

0 Comments

 
Picture
I love the Bonanza Buddies stamp set, dies, and coordinating Designer Series Paper! They are so much fun and the animals are adorable. Best off all, the stamp set contains lots of shapes that can be used in different ways. I love shapes! And you can buy it all bundled together with ribbon and pom-poms or just the stamps and dies at a 10% discount. 

Despite all its possibilities, I've heard people say that they wouldn't use it much because they don't know very many young children. I find the set to be amazingly versatile and great for ages 0-99. So, I thought I would share 4 cards made with the set that don't use the lion, koala, or toucan at all.
​
Purchase Supplies
Picture
Picture
Picture
Falling Confetti
This card might be my favorite of the bunch! I simply stamped the circle (meant to be a balloon) in Grapefruit Grove, Terracotta Tile, Mango Melody, and Daffodil Delight. I stamped the circles closer together towards the bottom to make it feel as though the falling balls were accumulating at the bottom of the card. I also stamped twice each time to create even more color variation.

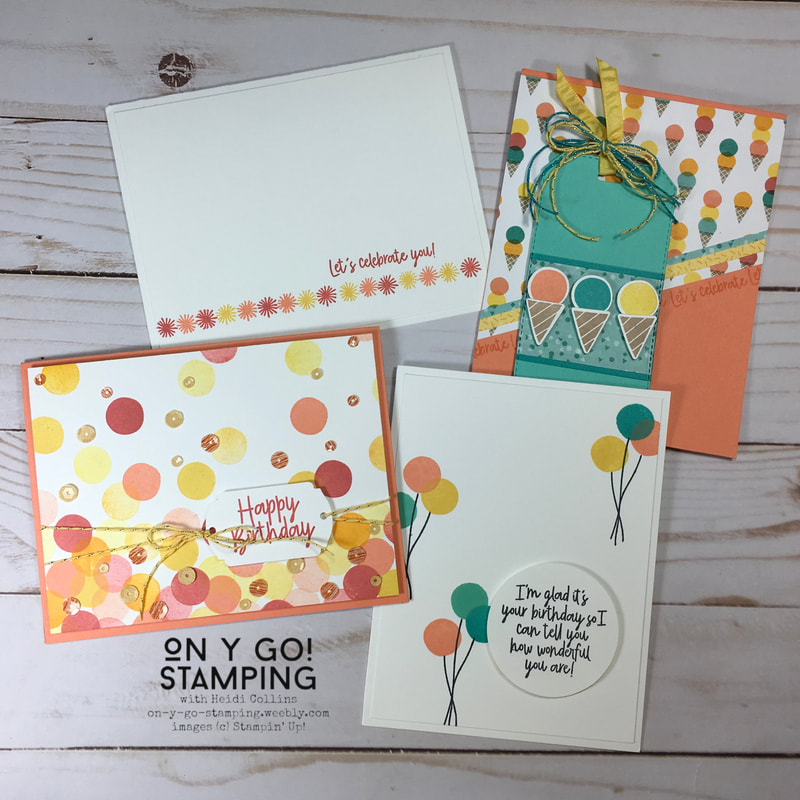
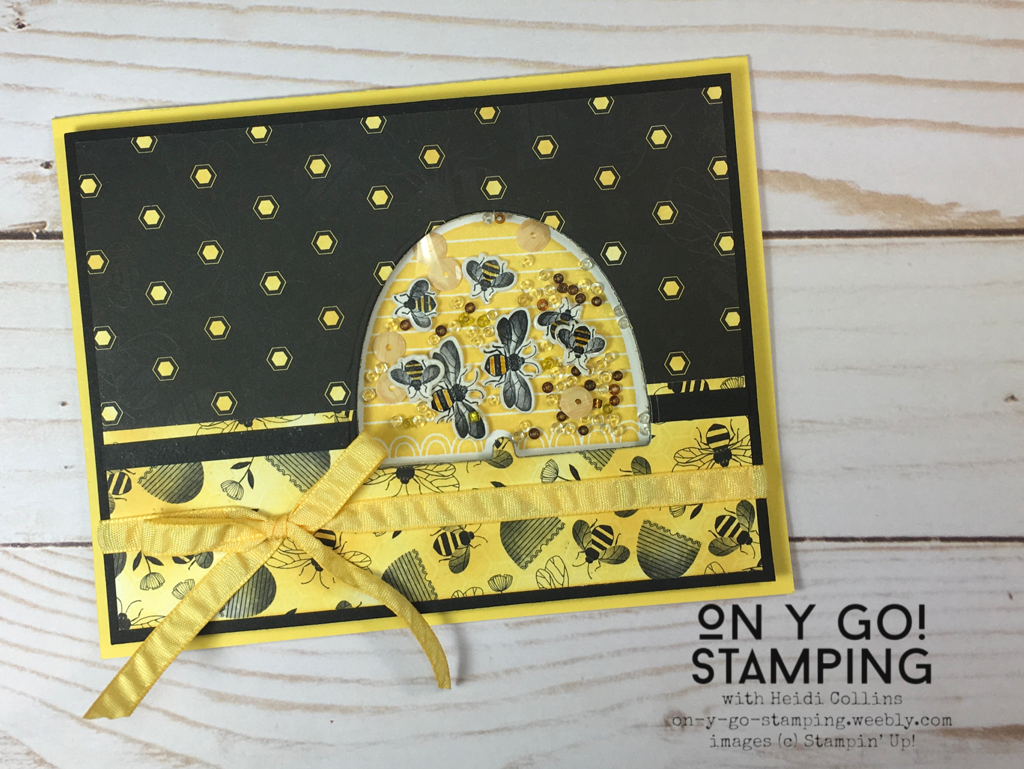
I used the colors from the Birthday Bonanza Designer Series Paper which coordinates well with the Metallic Baker's Twine and Sequins combo pack available FREE during Sale-A-Bration. The colors aren't technically the same, but they could be! That's how well they match. 
Cardstock:
  • Grapefruit Grove: 8 1/2" x 5 1/2" folded in half
  • Whisper White: 5 5/16" x 4 1/16", plus scraps
Ink:
  • Grapefruit Grove
  • Terracotta Tile
  • Mango Melody
  • Daffodil Delight
Accessories:
  • Label Me Fancy Punch
  • Metallic Baker's Twine and Sequins Pack from Sale-A-Bration
​
Celebrate Simply:
This card is so quick and easy but elegant in its simplicity. I simply stamped the little pom-pom stamp in Terracotta Tile, Grapefruit Grove, and Daffodil Delight along the bottom edge of a piece of Whisper White cardstock. I laid down a piece of washi tape along the bottom of my cardstock before stamping. This gave me an easy guide to help line up my stamping. When I was finished, I just peeled the washi tape off. 

Picture
The layering of Whisper White on Whisper White adds that little extra touch to take this card from basic to elegant.
Cardstock
: 
  • Whisper White: 8 1/2" x 5 1/2", folded in half, 5 5/16" x 4 1/16"
Ink:
  • Terracotta Tile
  • Grapefruit Grove
  • Daffodil Delight
Picture
Ice Cream Bonanza:
Using the Designer Series Paper as inspiration, I turned the circle and the triangle from the stamp set (more often used as a balloon and party hat) into ice cream cones! When inking up the "Let's celebrate you!" stamp, I only inked "Let's celebrate" which would allow this card to be used for all sorts of occasions or as an invitation to a party. 

For the tag, I adhered the DSP and Bermuda Bay cardstock to the piece of Coastal Cabana cardstock before cutting the tag using the Bonanza dies. This way the "stitching" continues all the way around the tag.

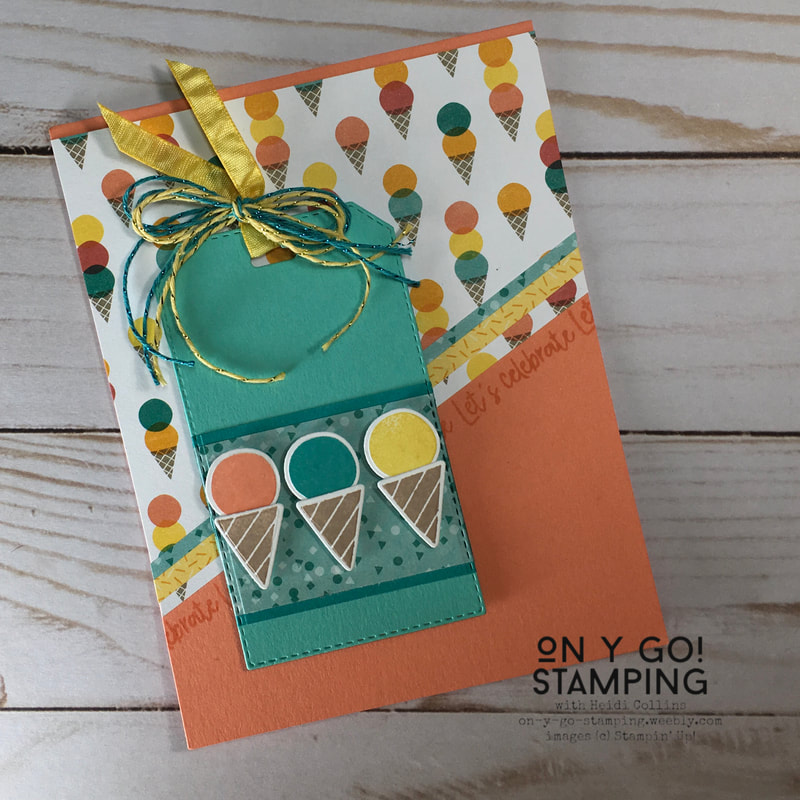
For the diagonal cut on the DSP, I simply took a piece of the ice cream DSP that was 4 1/4" x 5" then I sliced off the end at a diagonal that looked good. I then laid 1/4" strips along the angle cut and trimmed the sides to create the stripes at the bottom.
Cardstock:
  • Grapefruit Grove: 8 1/2" x 5 1/2" folded in half
  • Coastal Cabana, at least 2 1/4" x 3 3/4" piece cut with the tag die from the Bonanza dies
  • Bermuda Bay: 1 11/16" x  2 1/4"
  • DSP: 1 1/2" x 2 1/4", 4 1/4" x 4 3/4", 1/4" x 5" (2 of these)
  • Whisper White: scraps
Inks:
  • Grapefruit Grove
  • Bermuda Bay
  • Daffodil Delight
  • Crumb Cake
Accessories:
  • Bonanza dies
  • Metallic Baker's Twine & Sequin Combo from Sale-A-Bration
  • Daffodil Delight 1/4" Ruched Ribbon
Simply Balloons:
This is another quick and easy but elegant card. Again, I used Whisper White on Whisper White cardstock to give this card that little something extra.

Cardstock:
  • Whisper White: 8 1/2 x 5 1/2" folded in half, 5 5/16" x 4 1/16", scrap at least 2" x 2"
Inks:
  • Bermuda Bay
  • Coastal Cabana
  • Daffodil Delight
  • Grapefruit Grove
  • Jet Black Stazon
Picture

Accessories:
  • ​2" Circle Punch

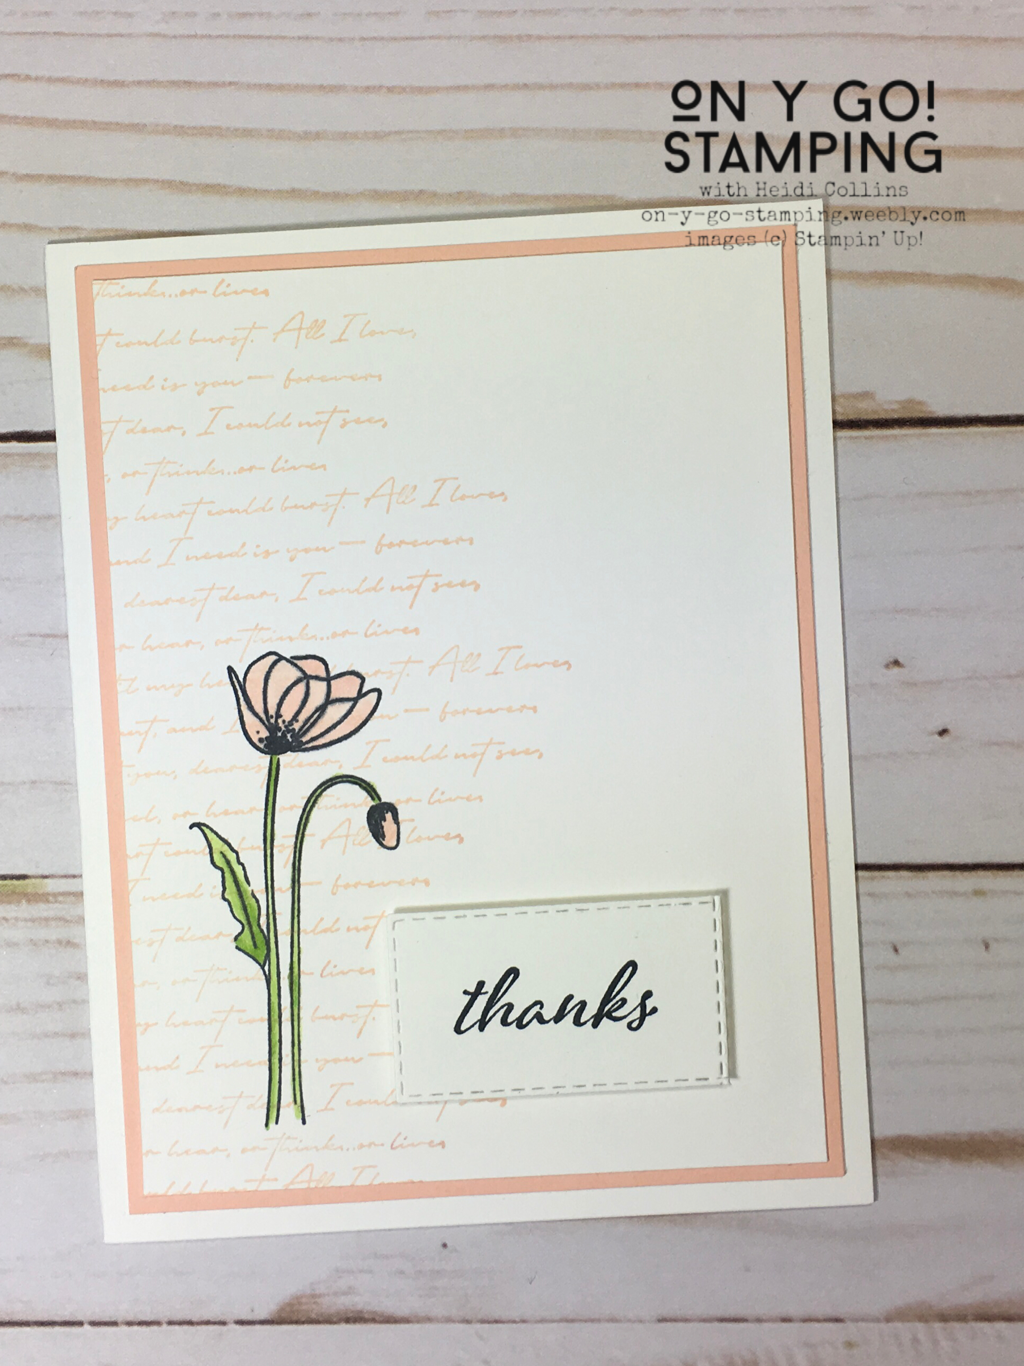
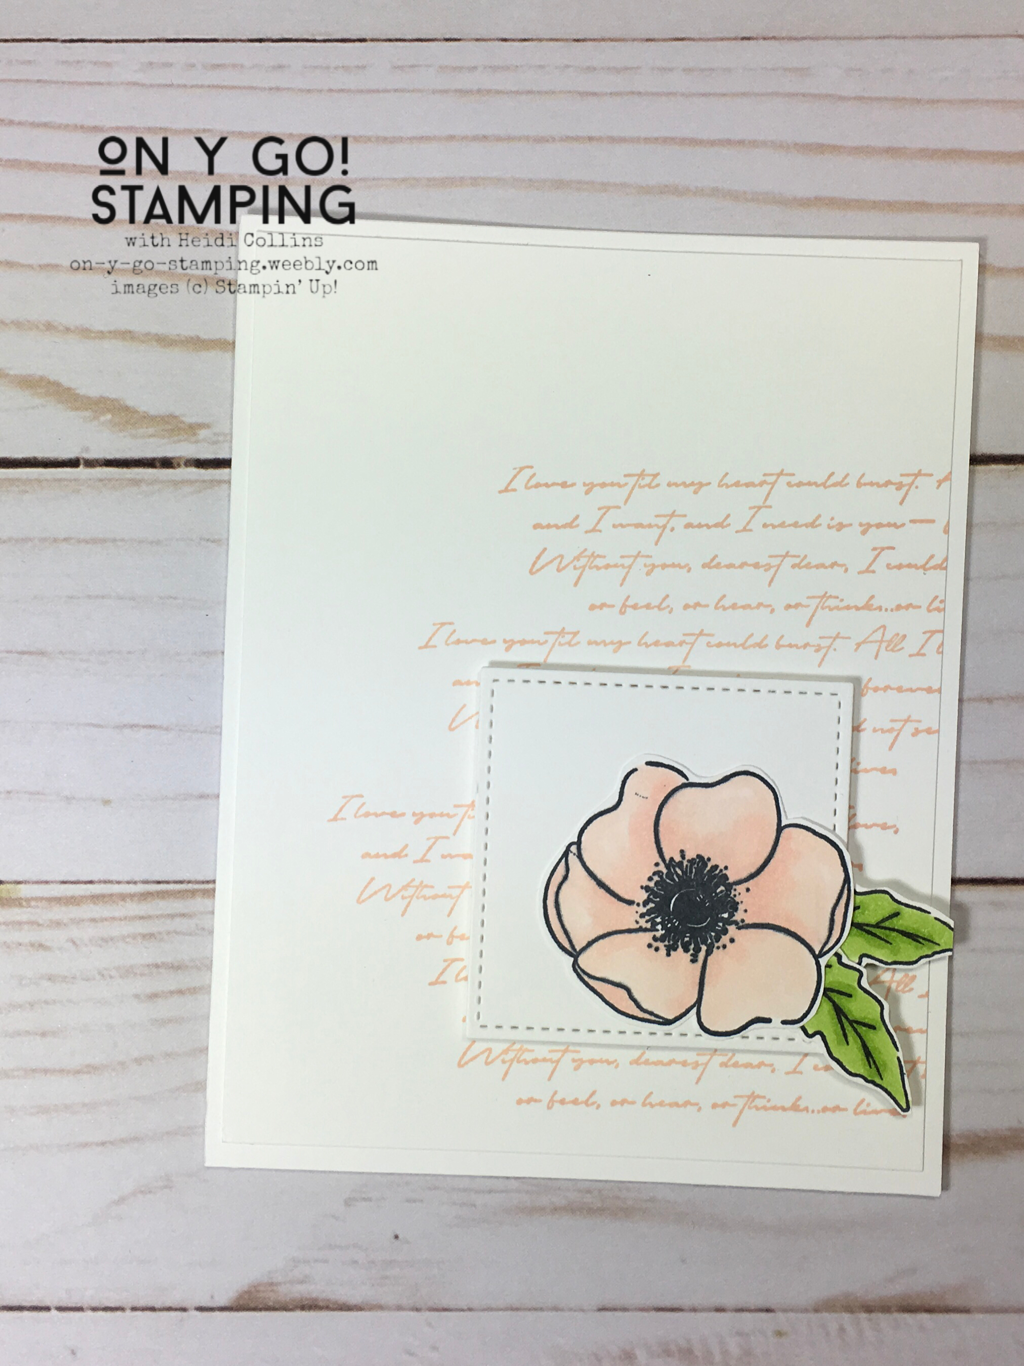
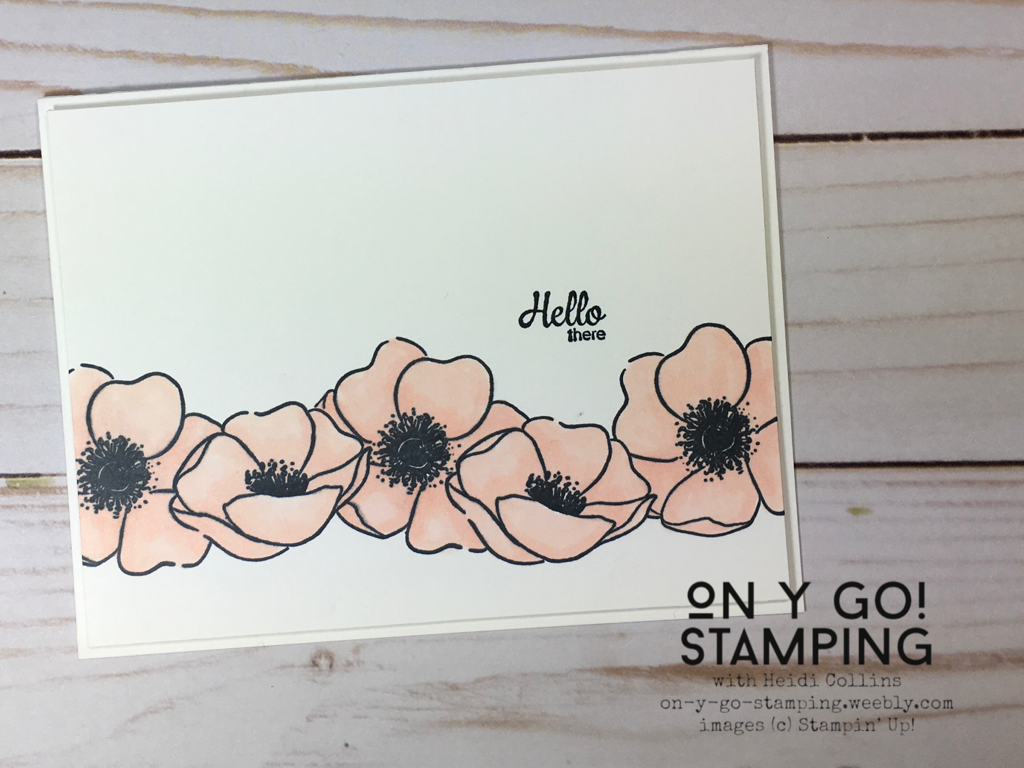
This Bonanza Buddies stamp set is so much fun and has so many possibilities, that I'm sure you'll see a couple more blog posts focused on different ways to use it in the coming weeks!
0 Comments

Poppy Elegance

2/10/2020

0 Comments

 
Picture
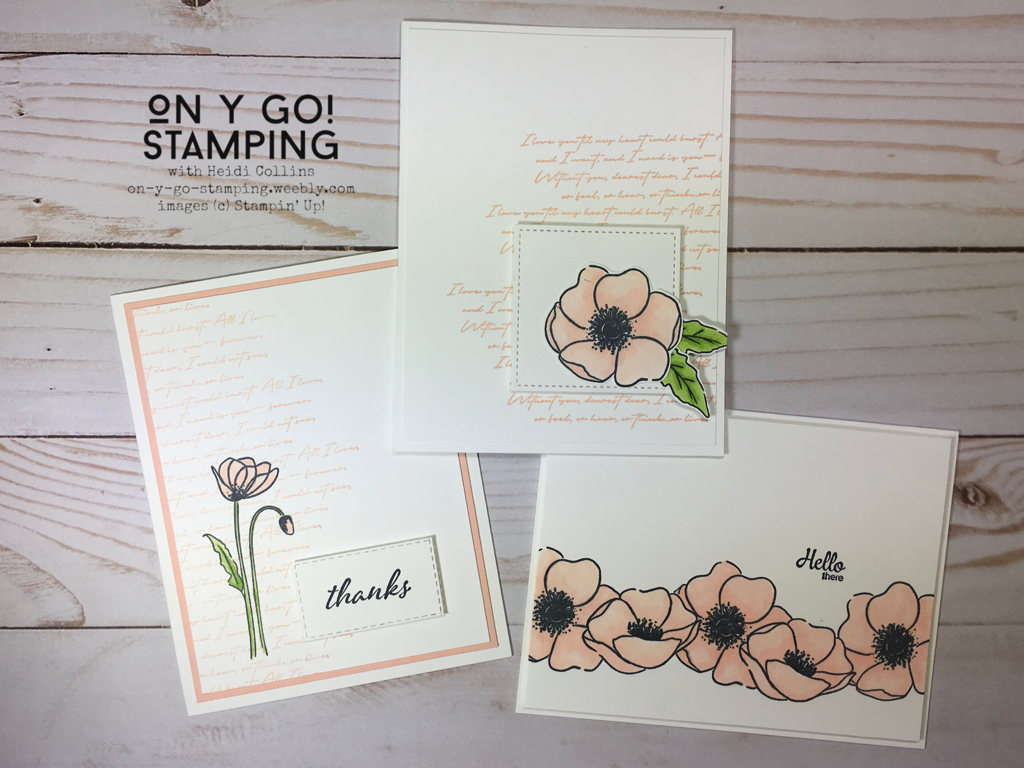
When I think of poppies, the red poppies in the fields in France come to mind. But these light pink poppies exude elegance. Paired with a primarily white on white color scheme, these cards are stunning in their simplicity. Not only that, but they were quick and easy to put together too! 

All of these cards use the following supplies:
Inks:
  • Tuxedo Black Memento
  • Petal Pink
Stampin' Blends: 
  • Light & Dark Petal Pink
  • Light & Dark Granny Apple Green
Stamps:
  • Painted Poppies
  • Parisian Beauty
  • Here's a Card
Dies:
  • Stitched Rectangles
  • Stitched Shapes
Order Supplies
Picture
Thanks
These beautiful poppies are stamped on a greeting from the Parisian Beauty stamp set stamped in Petal Pink. 

Cardstock:
  • Whisper White: 8 1/2" x 5 1/2" folded in half, 5" x 3 3/4", scrap
  • Petal Pink: 5 3/16" x 3 15/16"
Tips:
When stamping the words on the left of the card front, stamp off on a piece of scrap paper first. Then, stamp onto the card front. 

The "thanks" is cut using a Stitched Rectangle die, however it was too long for the words. So, after cutting it, I lined the edge of the die along where I wanted the end cut off and ran it back through my Big Shot.
Poppy in a Square
This card uses only Whisper White cardstock. White is layered on white to create a subtly layered card front.

Cardstock:
  • Whisper White: 8 1/2" x 5 1/2" folded in half, 5 5/16" x 4 1/16", scraps
Tips:
Stamp the poppy and leaves on scraps of cardstock. Color them and then cut around them carefully leaving a small border.

The words in the background are from the Parisian Beauty stamp set. Vary the placement of the stamp front left to right to create the varied edges on the left and right.
Picture
Picture
Hello There
This card has only two layers. This card is so quick and easy, but still absolutely elegant.

Cardstock:
  • Whisper White: 8 1/2" x 5 1/2" folded in half, 5 5/16" x 4 1/16"
Tips:
This card uses the masking technique. I stamped profile poppy on two post-it notes and cut them out on the outline. Then, I stamped two of these profile poppies on the card front. I covered them with the cut-out ones on sticky notes. I then stamped the other poppies over top of the post-it notes. Finally, I removed the sticky notes to reveal the line of poppies. 
​​
0 Comments

The Gang’s All Meer for Some Quick Cards

2/6/2020

4 Comments

 
Picture
I love these little meerkats! They remind me of my actually cat standing up against the sliding glass door, begging to come in or out. They're just so stinkin' cute! And the little lizard with his tongue out? Yup, I just can't get enough of him. Did you know that you can get this stamp set for FREE?!? Now through the end of March, you can choose The Gang’s All Meer as your free item with a $50 order as part of the Sale-A-Bration promotion. 

All of these cards use the following supplies:
Ink: Tuxedo Black Memento
Stampin' Blends: 
  • Crumb Cake Light & Dark
  • Soft Suede Light & Dark
  • Flirty Flamingo Light & Dark
  • Old Olive Light & Dark
  • Color Lifter
Linen Thread
Layering Circle Dies
​Stitched Shapes Dies
Order Supplies
Each of these cards uses a technique called masking to create layered images. Start by stamping the image on a sticky note. Then carefully cut along the image's outline. (It's ok to cut off the meerkats' ears and hair and the pricky bits of the cacti.) Then, stamp the image you want to be in the front on your card. Usually this image is lower than the one you want in back. Then layer your cut out post-it note image over the stamped image on the card. Stamp another image that you want behind the first image. Peel off the sticky note to reveal your layered images.
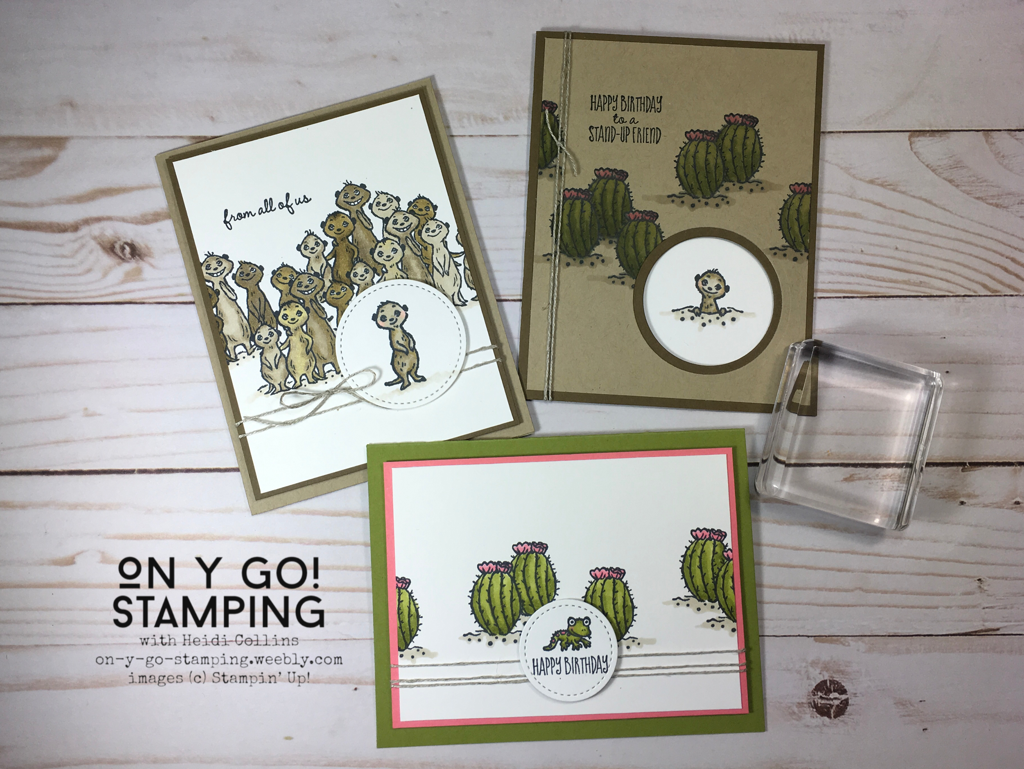
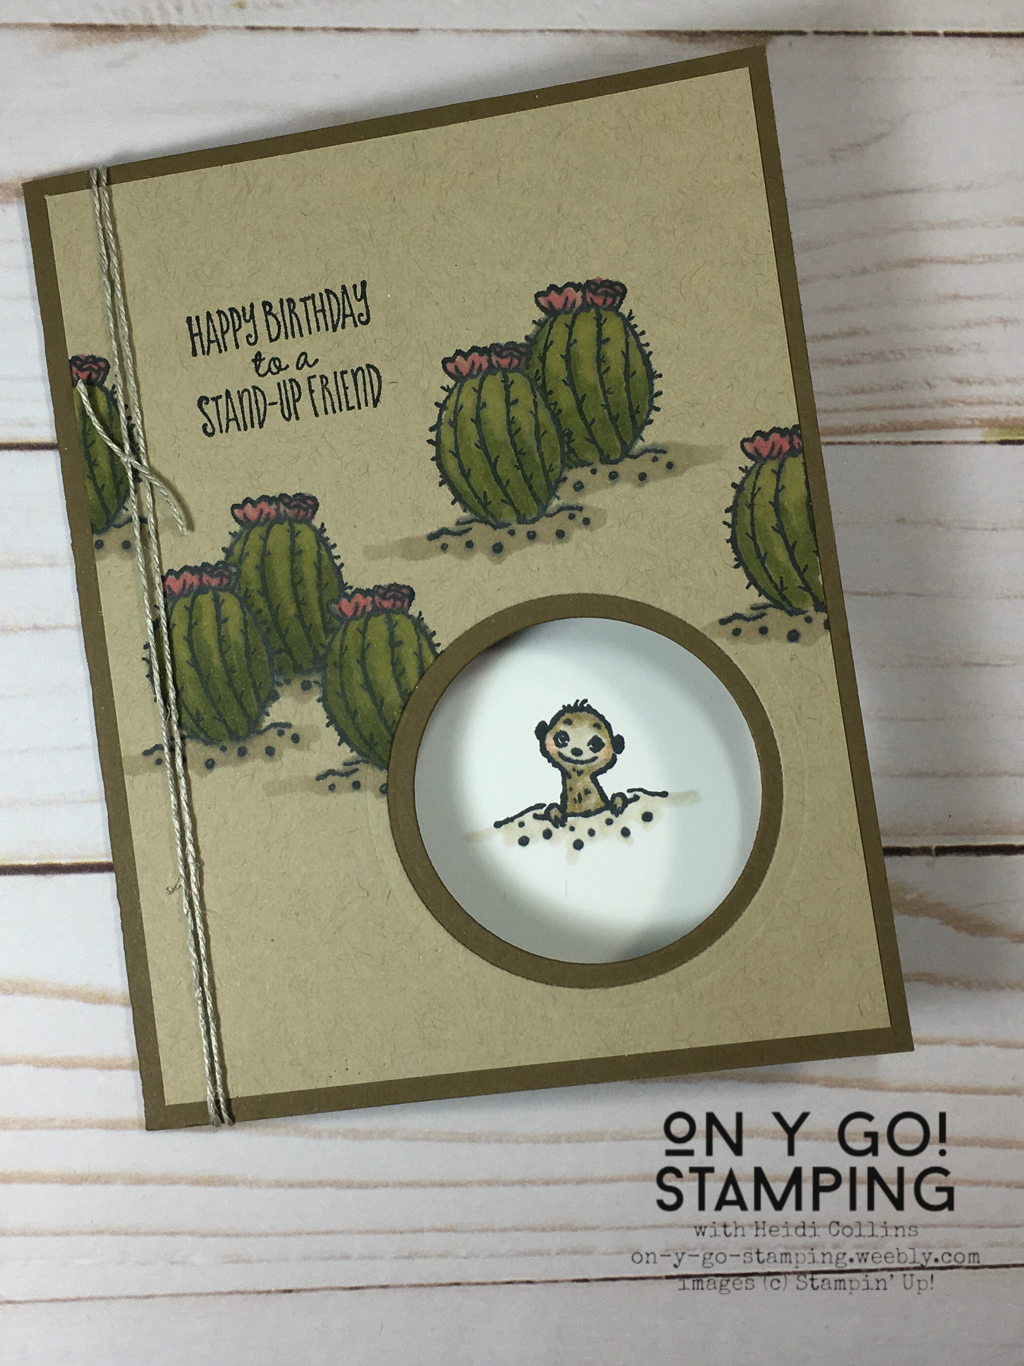
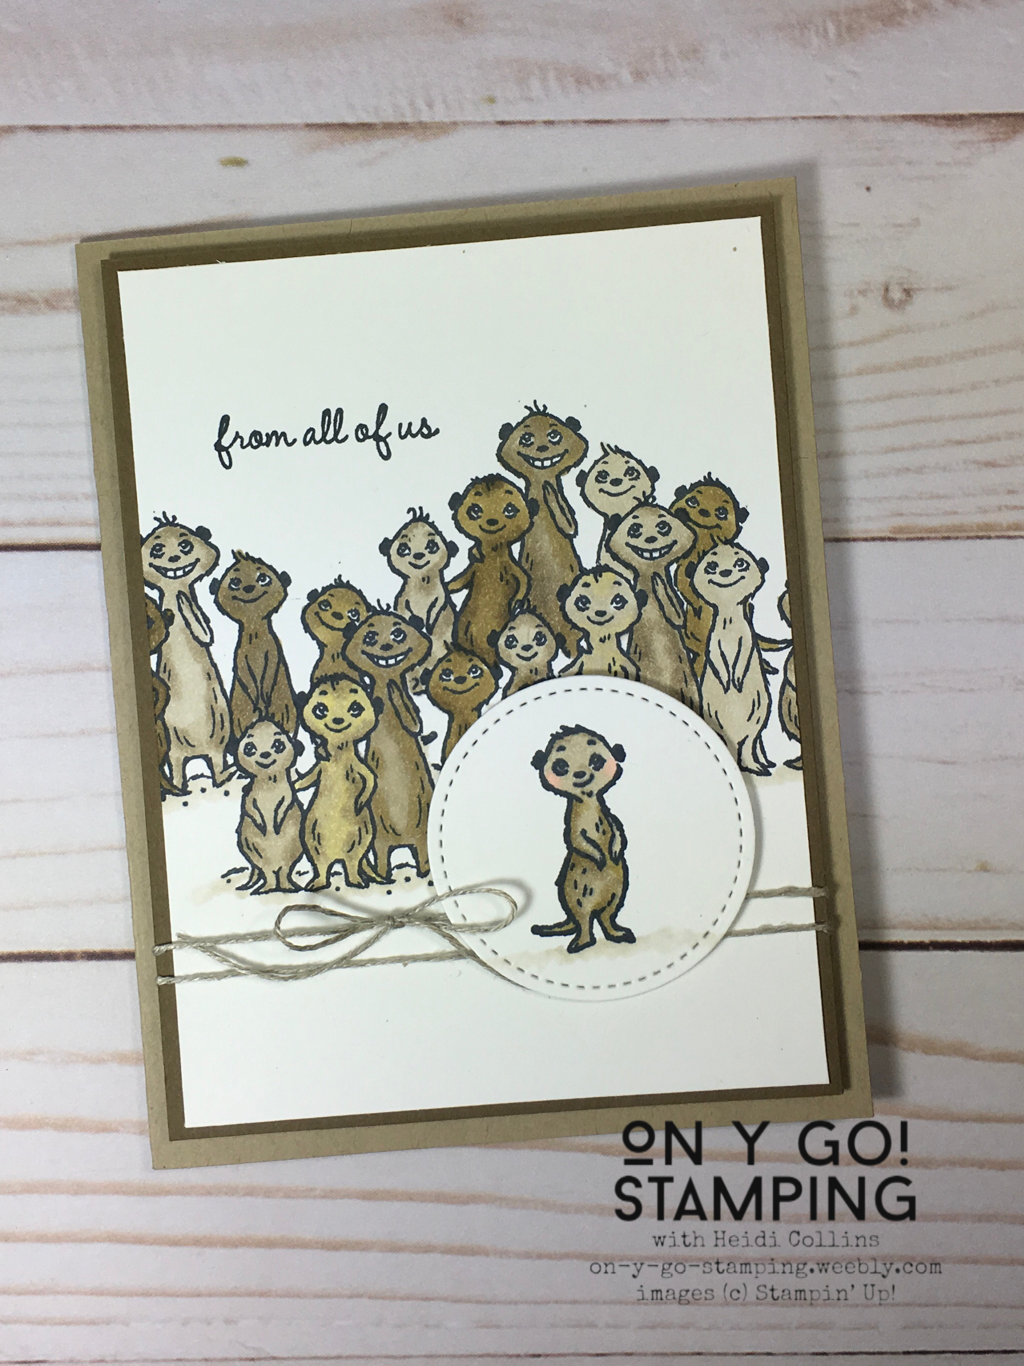
To get the Meerkat stamp set, be sure to check the Sale-A-Bration rewards in the lower left of your screen after you've ordered at least $50 in product. 
Picture
Just Popping In
This card features a window from the card front to the interior of the card where this little meerkat is popping his head out. 

Cardstock:
  • Soft Suede: 8 1/2" x 5 1/2"
  • Crumb Cake: 5 1/4" x 4"
  • Whisper White: 5 1/4" x 4"
 Tips:
Cut the larger circle out of the piece of Crumb Cake cardstock first. Then, adhere the Crumb Cake cardstock to your card front. Next, cut the smaller circle from the Soft Suede card front by positioning a smaller circle die inside the hole already cut from the Crumb Cake cardstock. Adhere the piece of Whisper White on the interior of the card. Finally, close the card and stamp the meerkat in the middle of the circular hole. 

Use the Light Crumb Cake Stampin' Blend to color the sand under the meerkat. Then go over it with the Color Lifter to make it lighter. Add a little Light Flirty Flamingo to the meerkat's cheeks to give him extra personality!

Happy Birthday Lizard

Surrounded by cacti, this little lizard is sticking his tongue out to say happy birthday!

Cardstock: 
  • Old Olive: 8 1/2" x 5 1/2", folded in half
  • Flirty Flamingo: 4 15/16" x 3 11/16"
  • Whisper White: 4 3/4" x 3 1/2", 5 1/4" x 4" (interior), plus scrap
Picture
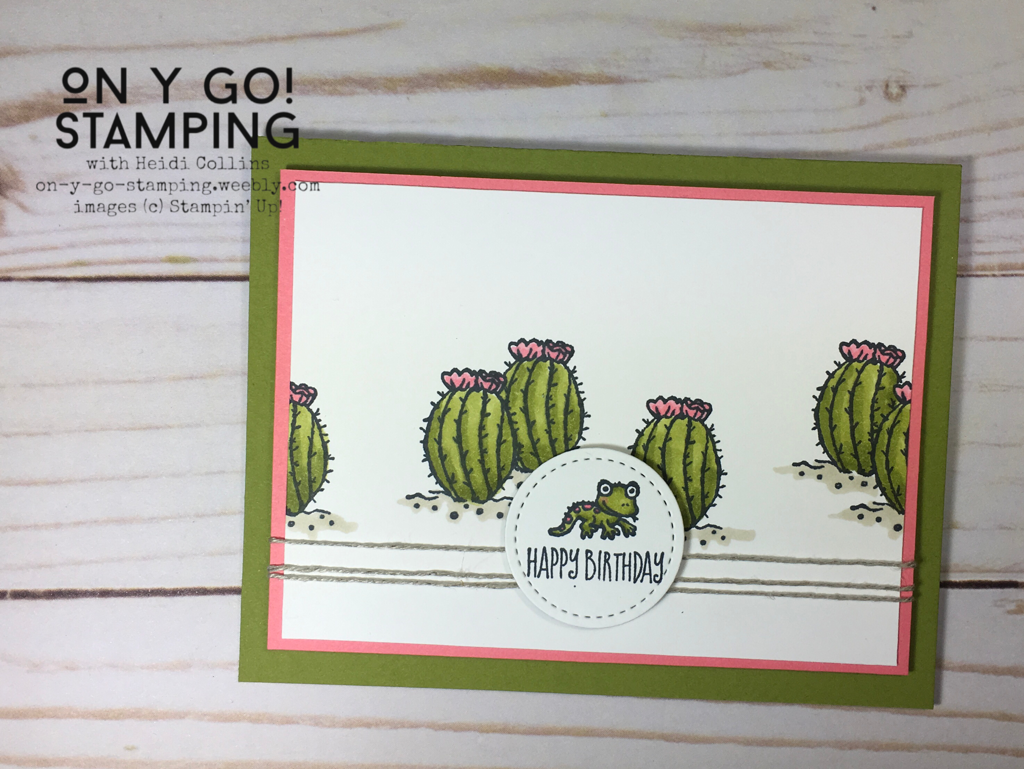
Tips: 
The full sentiment stamp says: Happy Birthday to a Stand Up Guy. Carefully ink only the "Happy Birthday" and stamp it on a scrap of Whisper White cardstock. Then, stamp the greeting above it and cut with the smallest circle from the Stitched Shapes dies.

Adhere the Whisper White card front to the piece of Flirty Flamingo. Wrap a piece of Linen Thread around these 3 times and secure with tape on the back. Adhere this card front using Stampin' Dimensionals to the card front. Also use Stampin' Dimensionals to adhere the greeting. 
Picture
From all of us...

A whole group of meerkats cover this "Thinking of You" card that is perfect to send from a group of friends or co-workers.

Cardstock:
  • Crumb Cake: 8 1/2" x 5 1/2"
  • Soft Suede: 5 3/16" x 3 15/16"
  • Whisper White: 5" x 3 3/4", 5 1/4" x 4" (for interior), scraps
Hints:
Use different combinations of the Crumb Cake, Soft Suede, and Light Daffodil Delight Stampin' Blends to color the meerkats in order to make them different shades of brown.
Color the sand under their feet with the Light Crumb Cake. Then, go over it with the Color Lifter to make it lighter. 
4 Comments

Rooted In Nature: 1 Card, 3 Styles

2/5/2020

2 Comments

 
Picture
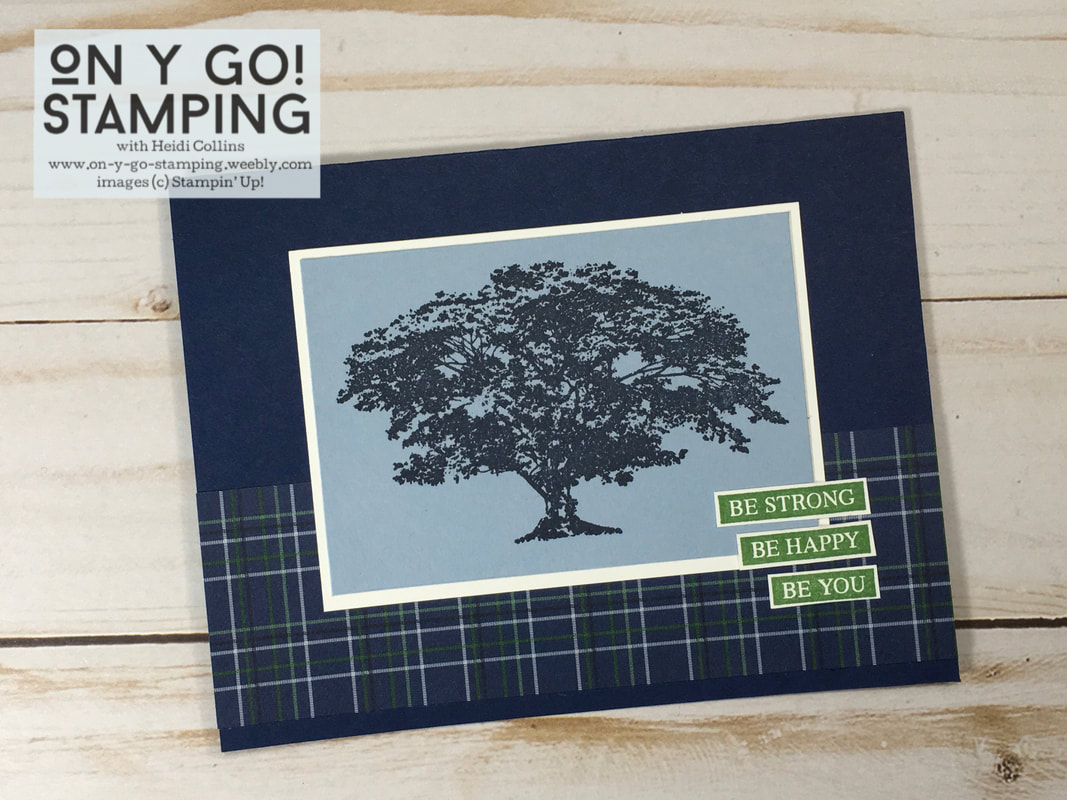
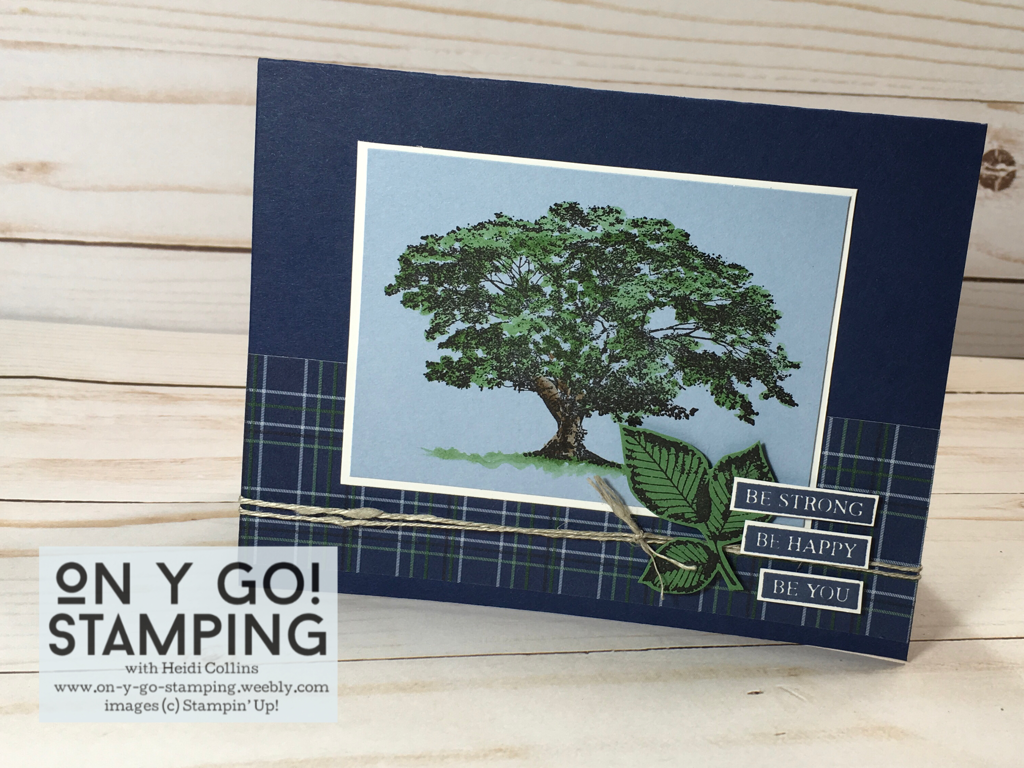
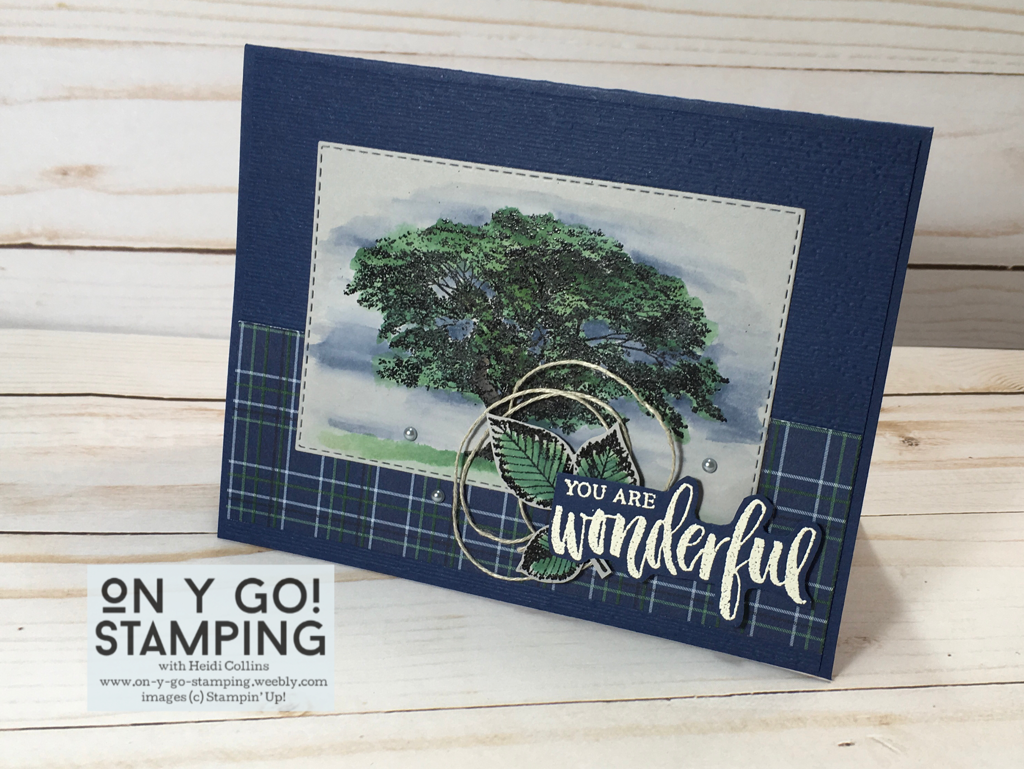
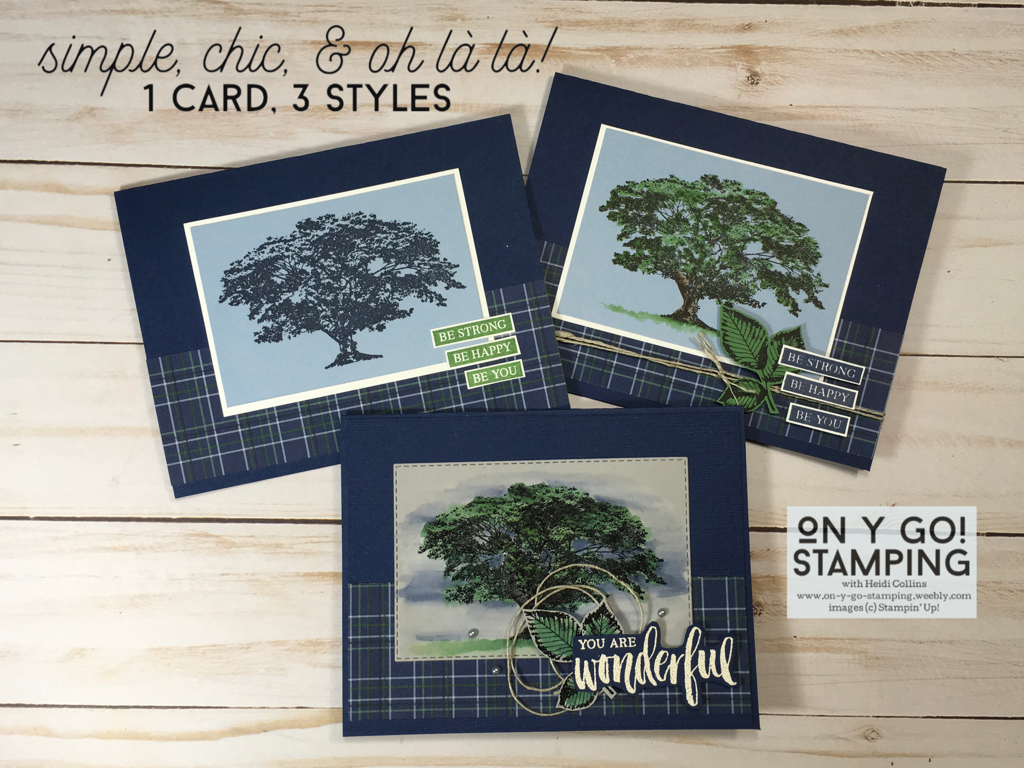
Whether you're new to rubber stamping and card making or you're a seasoned pro, Rooted In Nature is a gorgeous stamp set that is perfect for making elegant cards for all occasions. Because I'm stuck on plaids right now, I used with a blue plaid patterned paper from the Country Club Designer Series Paper pack. I created three cards that use the same basic layout and go from simple to oh là là!
​
Picture
Simple
Ink: Night of Navy, Garden Green
Cardstock: 
  • Night of Navy: 8 1/2" x 5 1/2"
  • Seaside Spray: 3 5/8" x 2 1/2"
  • Whisper White: 3 13/16" x 2 11/16", scraps
Country Club DSP: 5 1/2" x 1 3/4"

Tips: 
  • Stamp the tree with Night of Navy ink.
  • Stamp the sentiment with Garden Green ink on Whisper White cardstock, then trim each phrase leaving a small amount of white showing around the outside.

Chic
Ink: Jet Black StazOn, Night of Navy, Early Espresso, Garden Green
Cardstock: 
  • Night of Navy: 8 1/2" x 5 1/2" folded in half
  • Seaside Spray: 3 5/8" x 2 5/8"
  • Whisper White: 3 13/16" x 2 13/16", scraps
  • Garden Green: Scrap
Country Club DSP​: 5 1/2" x 1 3/4"
Picture
Tips:
  • Stamp the tree with Jet Black Stazon. Color the tree by getting Garden Green and Early Espresso ink on separate clear blocks. Use an Aqua Painter to pick up the ink and watercolor the tree.
  • Wrap the card front twice with Linen thread and tie in a knot. Fray the ends. 
  • Stamp the leaf with Jet Black Stazon on Garden Green cardstock then trim. Adhere with Stampin' Dimensionals.
  • Stamp the greeting with Night of Navy ink on Whisper White cardstock. Then trim each phrase leaving a small edge of white. Adhere with Stampin' Dimensionals except where the words overlap the leaf. 

Picture
Oh là là
Ink: Versamark, Garden Green, Early Espresso, Night of Navy, Whisper White
Cardstock:
  • Night of Navy: 8 1/2" x 5 1/2" folded in half, 5 1/4" x 4", scraps
  • Smoky Slate: cut with Stitched Rectangle Dies 4" x 2 5/8" , scrap
Country Club DSP: 5 1/4" x 1 3/4"
Tips:
  • Emboss the piece of 5 1/4" x 4" Night of Navy cardstock with the Subtle 3D embossing folder.
  • Stamp the tree and leaf with versamark ink. Then heat emboss (directions here) with black embossing powder. Put white ink on a clear block, then use an Aqua Painter to paint the tree and leaf. Color over it by watercoloring with Garden Green, Early Espresso, and Night of Navy. Cut out the leaf.
  • Heat emboss the greeting with white embossing powder. 
  • Wrap linen thread around two fingers three times. Trim and lay on the card front. Attach the leaf and the greeting over top using Stampin' Dimensionals. These will hold the linen thread in place. 
  • Add silver pearls around the greeting.
2 Comments
<<Previous
Forward>>
    Heidi Collins, Independent Stampin' Up! Demonstrator with On Y Go! Stamping
    Get updates and ideas on my Facebook group
    Heidi Collins, Independent Stampin' Up! Demonstrator and Owner of On Y Go! Stamping
    Picture
    Picture
    On Y Go! Stamping YouTube channel with Card Making Videos on how to do rubber stamping, card making, scrapbooking, and paper crafting

    Archives

    May 2025
    April 2025
    March 2025
    February 2025
    January 2025
    December 2024
    November 2024
    October 2024
    September 2024
    August 2024
    July 2024
    June 2024
    May 2024
    April 2024
    March 2024
    February 2024
    January 2024
    December 2023
    November 2023
    October 2023
    September 2023
    August 2023
    July 2023
    June 2023
    May 2023
    April 2023
    March 2023
    February 2023
    January 2023
    December 2022
    November 2022
    October 2022
    September 2022
    August 2022
    July 2022
    June 2022
    May 2022
    April 2022
    March 2022
    February 2022
    January 2022
    December 2021
    November 2021
    October 2021
    September 2021
    August 2021
    July 2021
    June 2021
    May 2021
    April 2021
    March 2021
    February 2021
    January 2021
    December 2020
    November 2020
    October 2020
    September 2020
    August 2020
    July 2020
    June 2020
    May 2020
    April 2020
    March 2020
    February 2020
    January 2020
    December 2019
    November 2019
    October 2019
    September 2019
    August 2019
    July 2019
    June 2019

Proudly powered by Weebly
  • About
  • Online Card Classes
  • Card Making Ideas
  • Stampin' Up! Catalogs
  • Card Tutorials
  • Contact
  • Shopping Rewards
  • Shop
  • Join Stampin' Up!