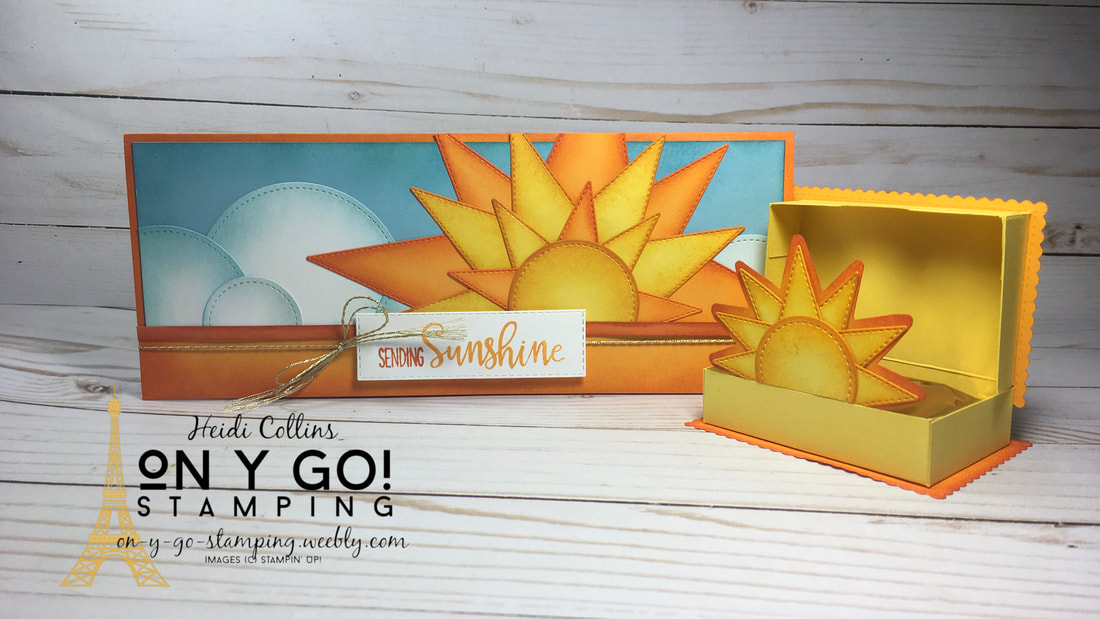
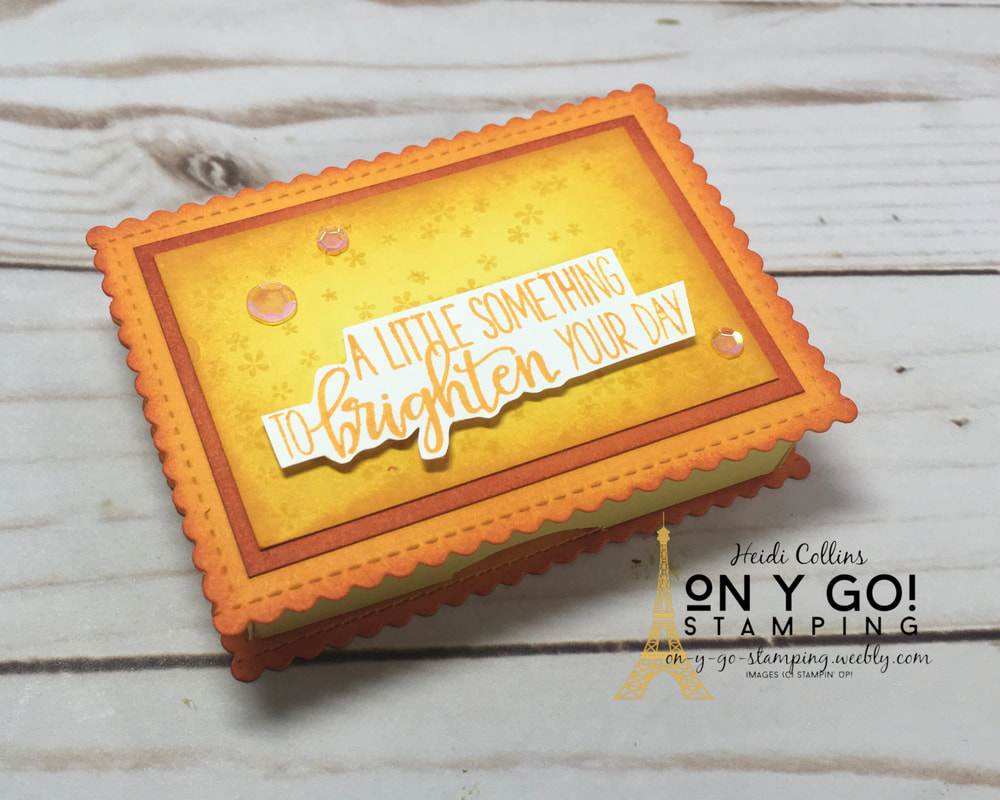
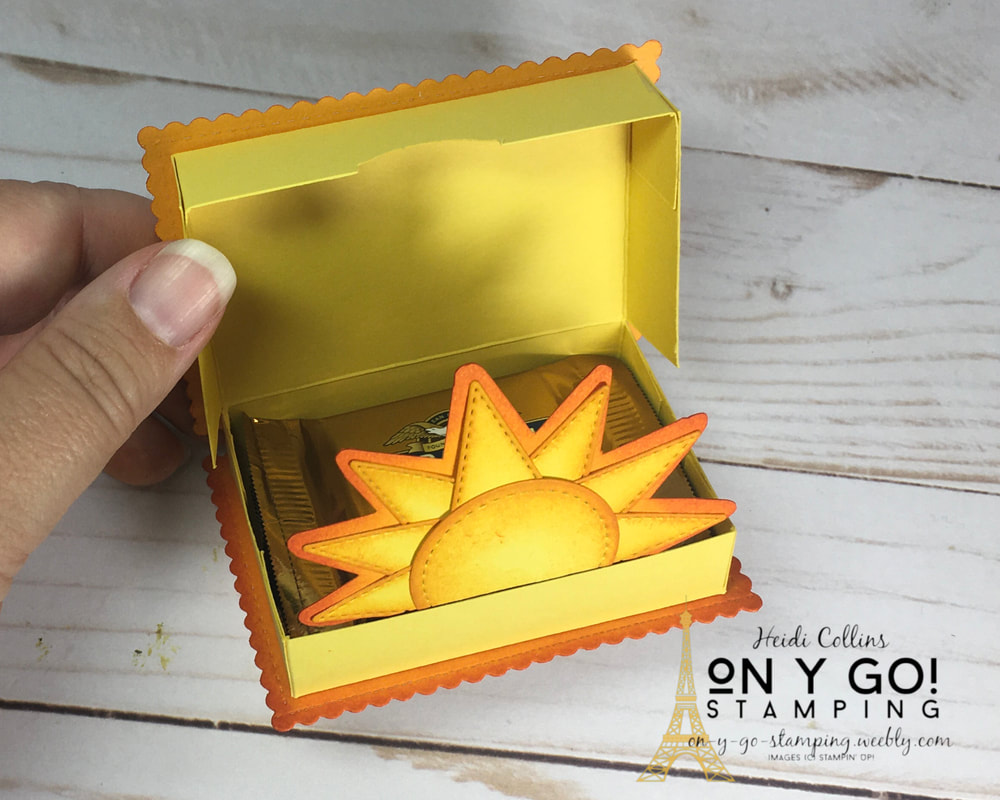
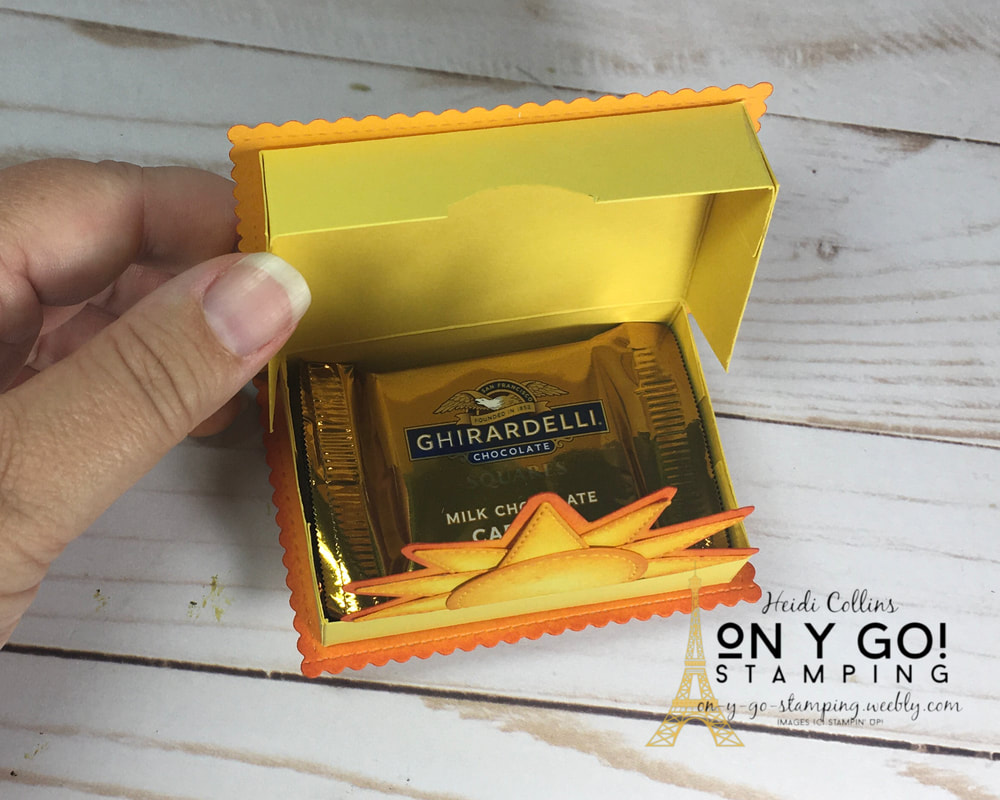
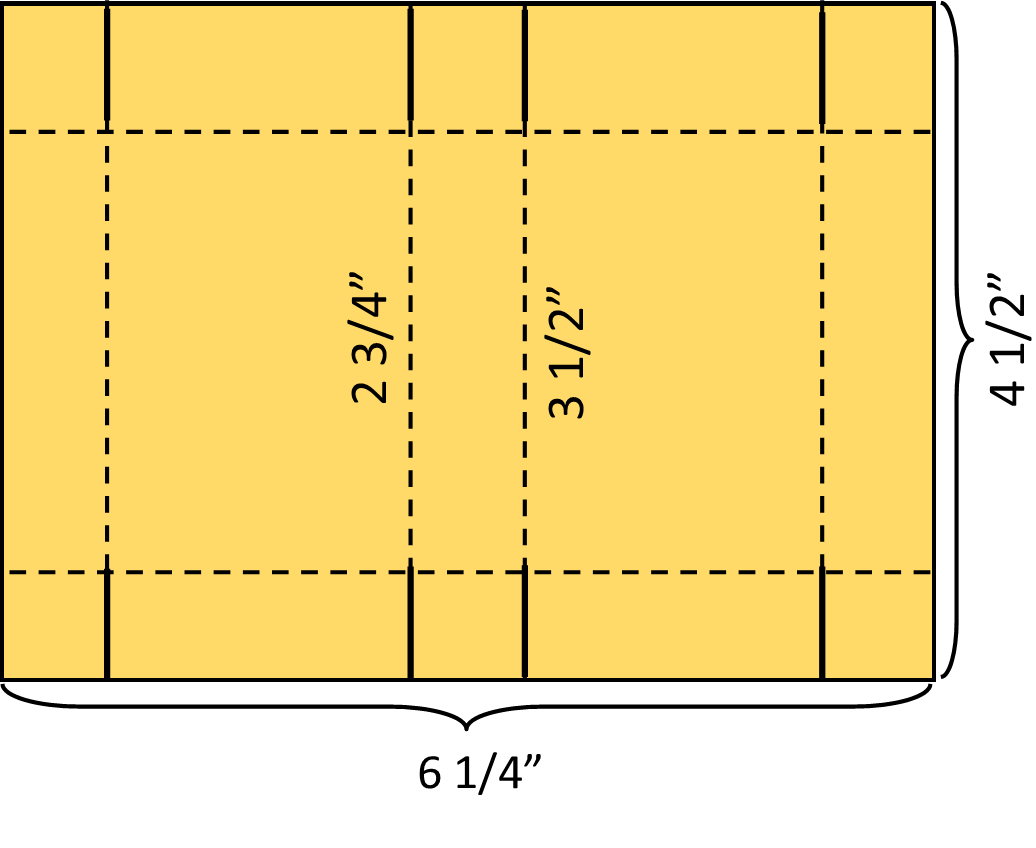
For my projects, I created a card and a mini candy box featuring sun images made by piecing together basic die-cut shapes: triangles and circles. For both of these, I used the Stitched Shapes, Stitched Triangles, and Stitched Rectangle dies. I love the stitching on the edge of these dies as it helps give it a finished edge. To make the die-cut shapes pop even more, I sponged the edges. So, on y go! Let's get stamping. 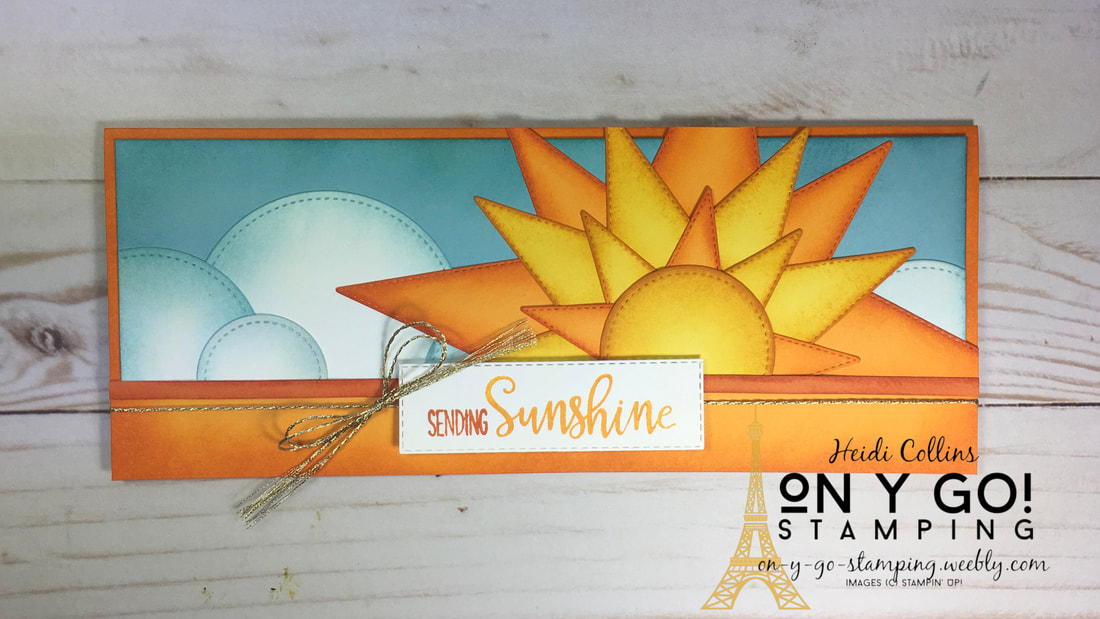
A couple of Ghiradelli chocolates in a sunny box is sure to brighten anyone's day. This box was inspired by one made by Connie Stewart. When you open the box, a sun pops up to reveal two Ghiradelli squares. What a fun and sunny surprise!
Thank you for stopping by today to check out my fun sunshiny projects. I hope they have added a little joy to your life and inspired you to create projects to bring joy to others. Please take a moment to check out all of the other awesome designers on the Stampin' Friends blog hop. Below the list of designers, you will find a link to my online store and the supplies needed for these projects. If you are interested in purchasing Stampin' Up! product and are in the US, I hope you'll come back here after you've clicked through the hop.  Stampin' Friends Blog Hop Links: Project SuppliesWhen you click below, you will see the list of supplies needed to create these sunny projects. If you need everything, simply click "add to cart." If you need only a few things, uncheck the boxes for anything you don't need, then click "add to cart." Leave a comment or email me with questions. I am happy to help! 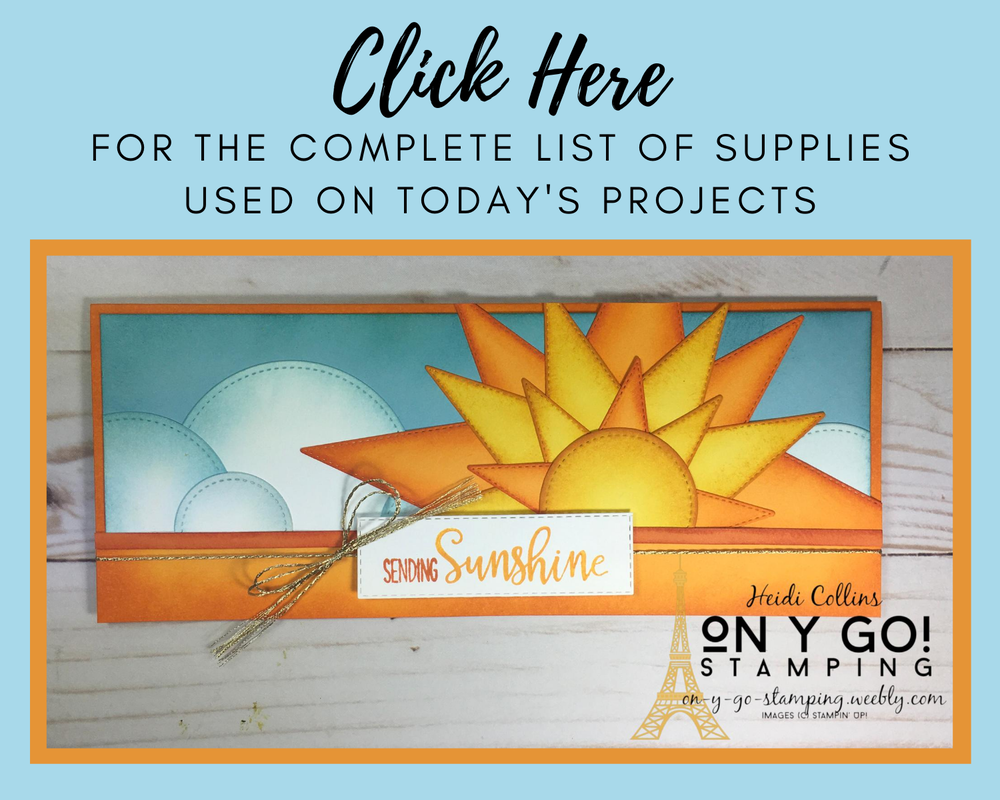
18 Comments
I love blog hop week! Today, I am excited to be hopping with the talented designers of the Stampin' Friends Blog Hop. If you're already going through the hop, you've joined me from Kim Lamos's awesome site. The theme this month is "Anything Goes," so there is a variety of awesome projects on everyone's site. At the bottom of my post is the complete list of designers and links to all of their blogs. Next in line is designer Maureen Rauchfuss. I hope when you're done here, you'll check out all of the projects for the hop. Ok, on y go! Let's get stamping.
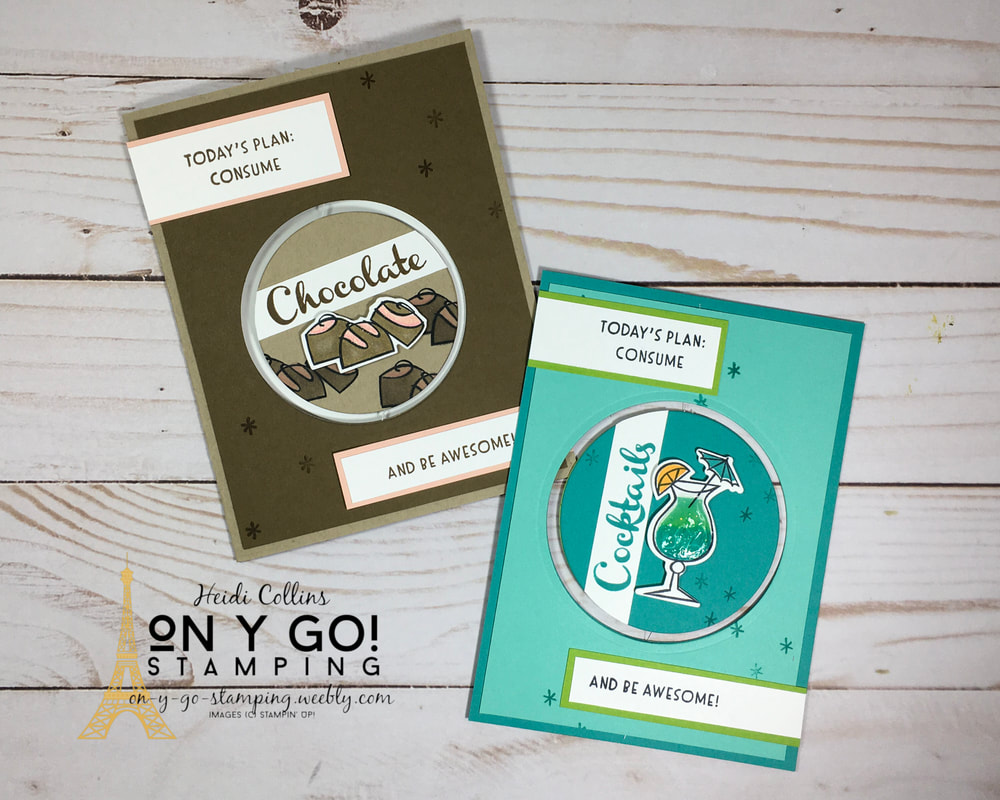
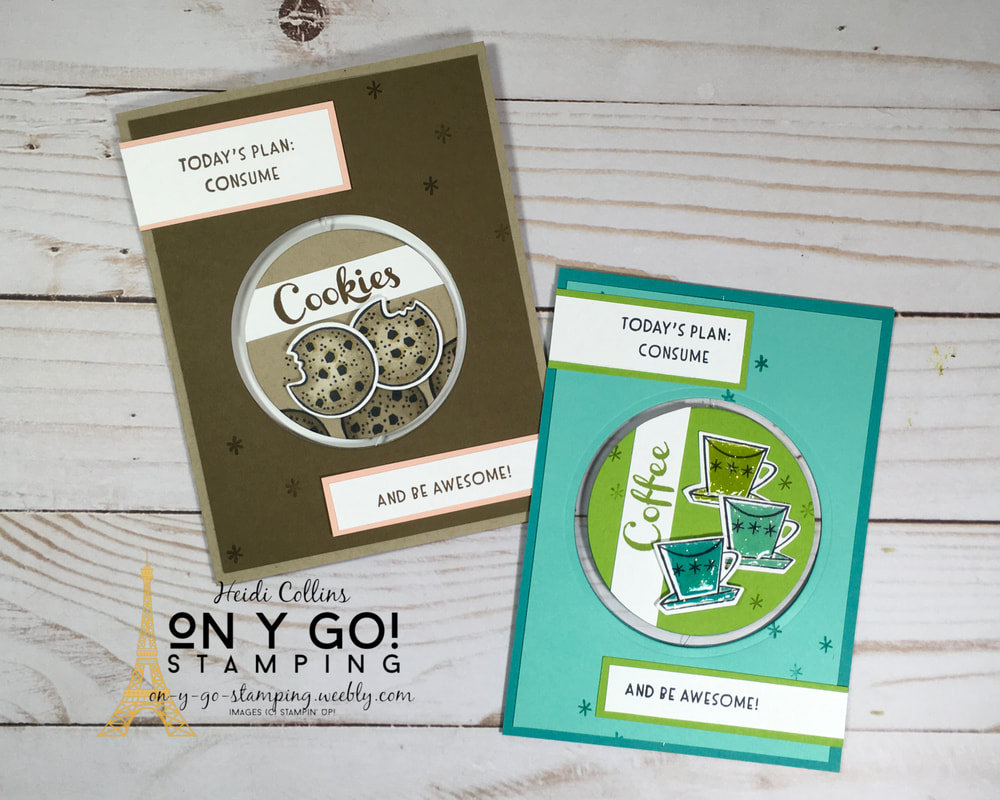
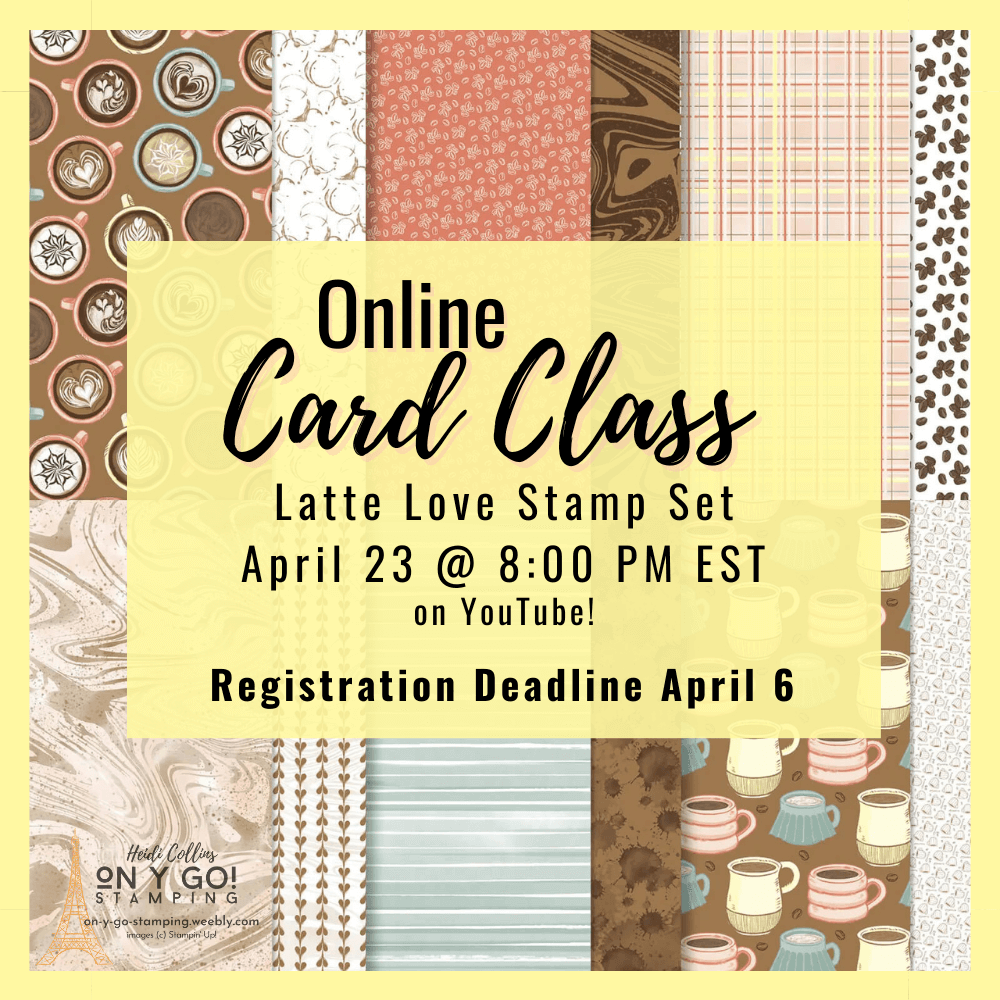
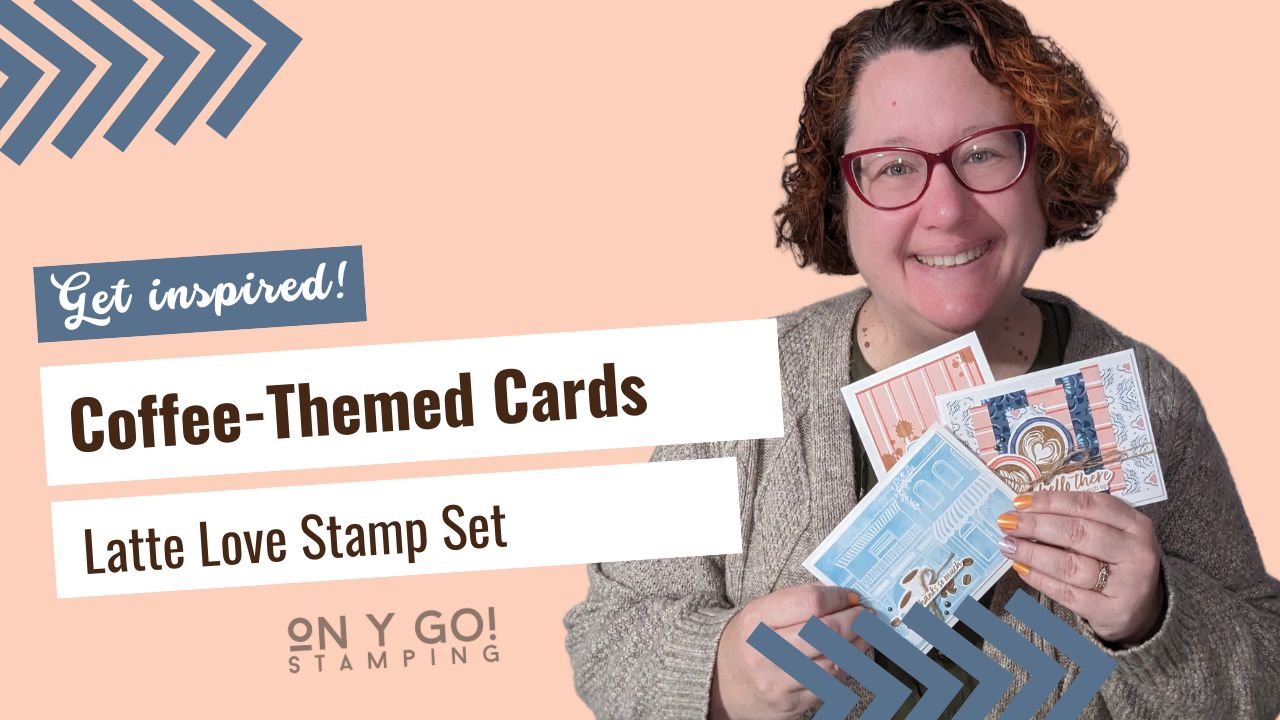
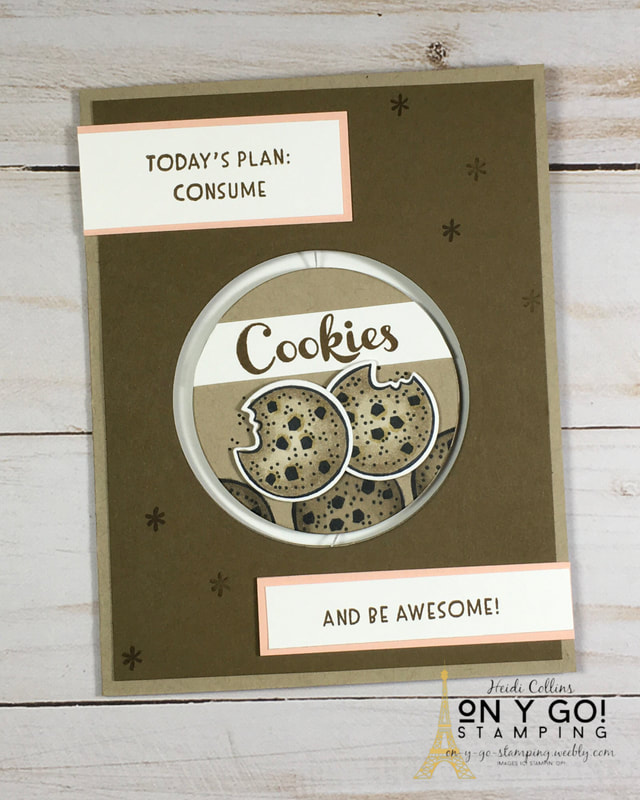
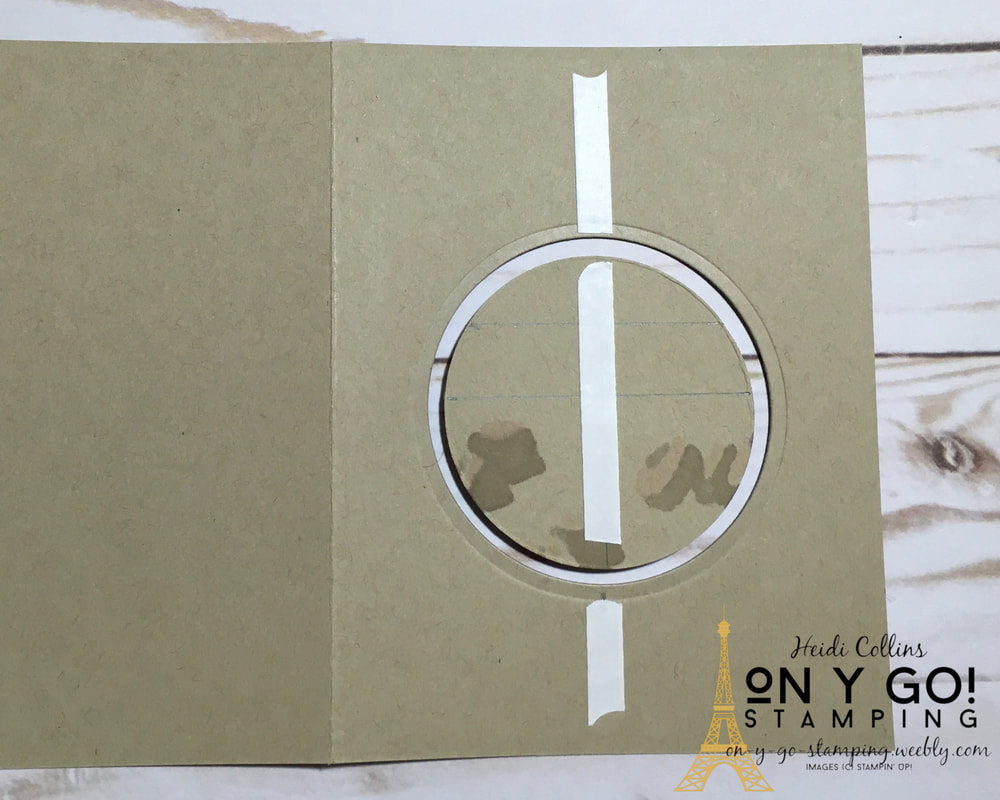
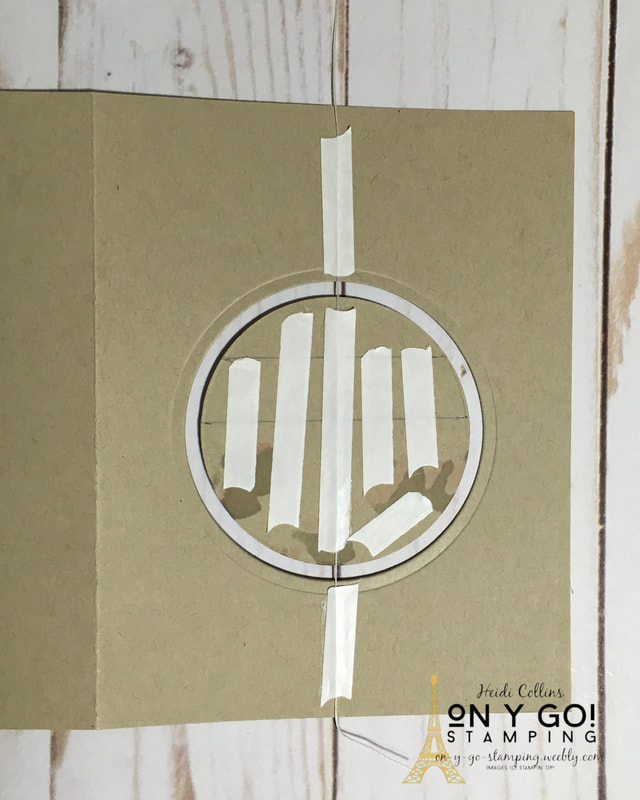
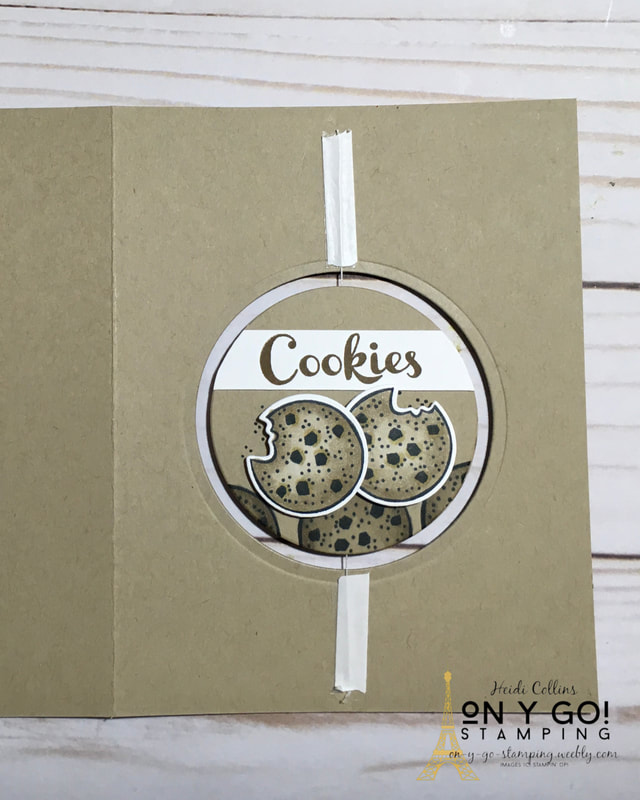
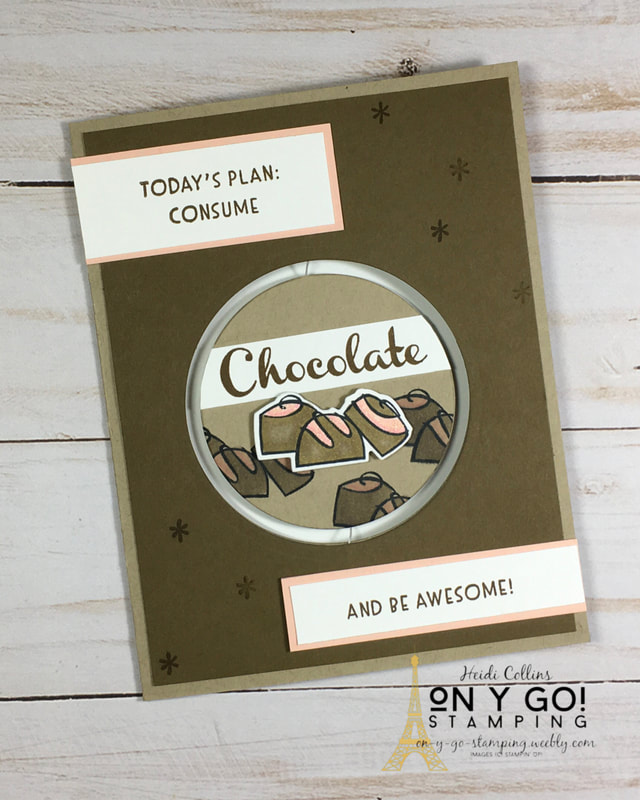
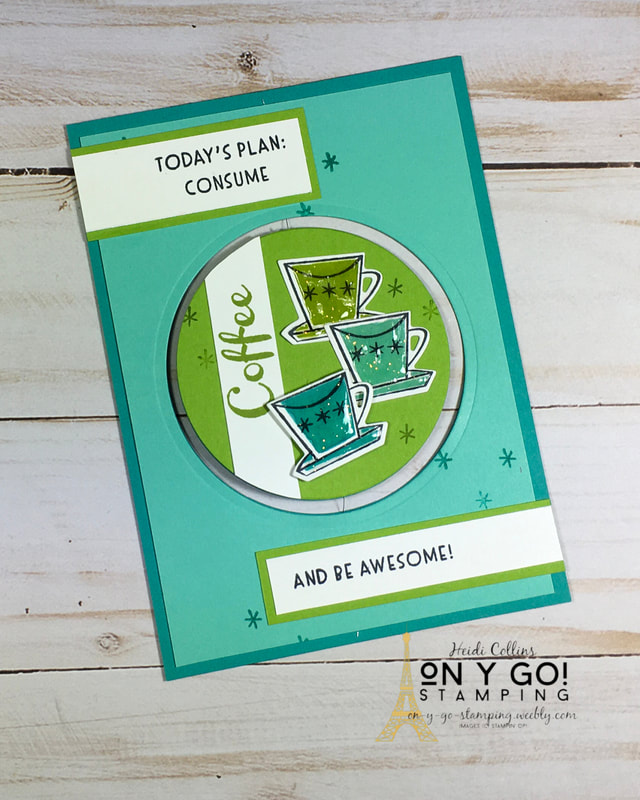
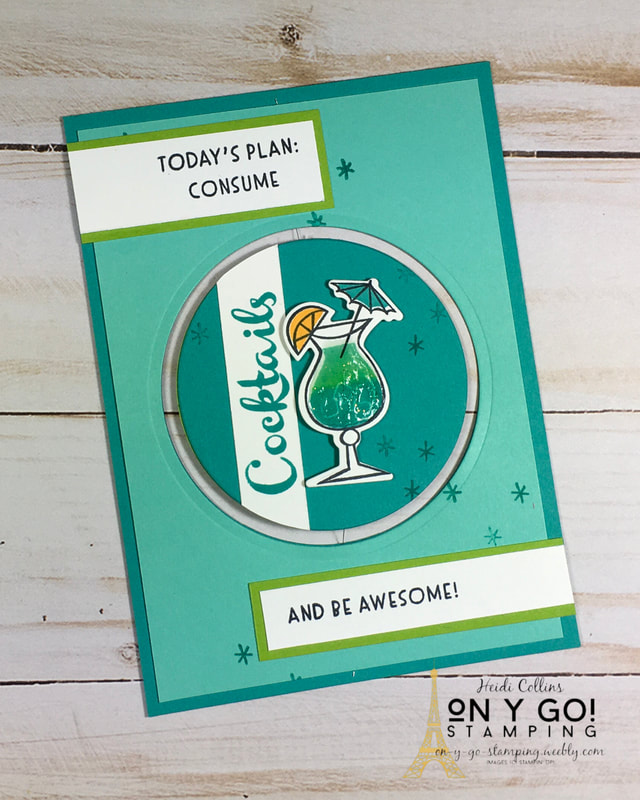
I love the new Nothing's Better Than stamp set, but it's so hard to choose whether to use coffee, chocolate, cocktails, or cookies for my cards. So, I made a spinner card so I could use both chocolate and cookies on one card. Then, I decided to make an awesome fridge magnet using the same design. This way, you can choose whether it's time for coffee or time for cocktails!
Add more tape to the back of the circle and add the other circle on top of it. Then add additional tape to the front of the card base. Be sure to keep the tape away from the edges where the Crumb Cake will show. Then, adhere the Soft Suede card front.
Stampin' Friends Designers:
Do you need a Stampin' Up! Demonstrator? I would love to help you out. Click any of the products below to link to my online shop. Be sure to grab the host code and start earning free stamps (see the more info under the Shopping Rewards tab). And of course, if you need any help, feel free to send me an email (stampin_heidi@yahoo.com) or leave your questions in the comments.
Product List


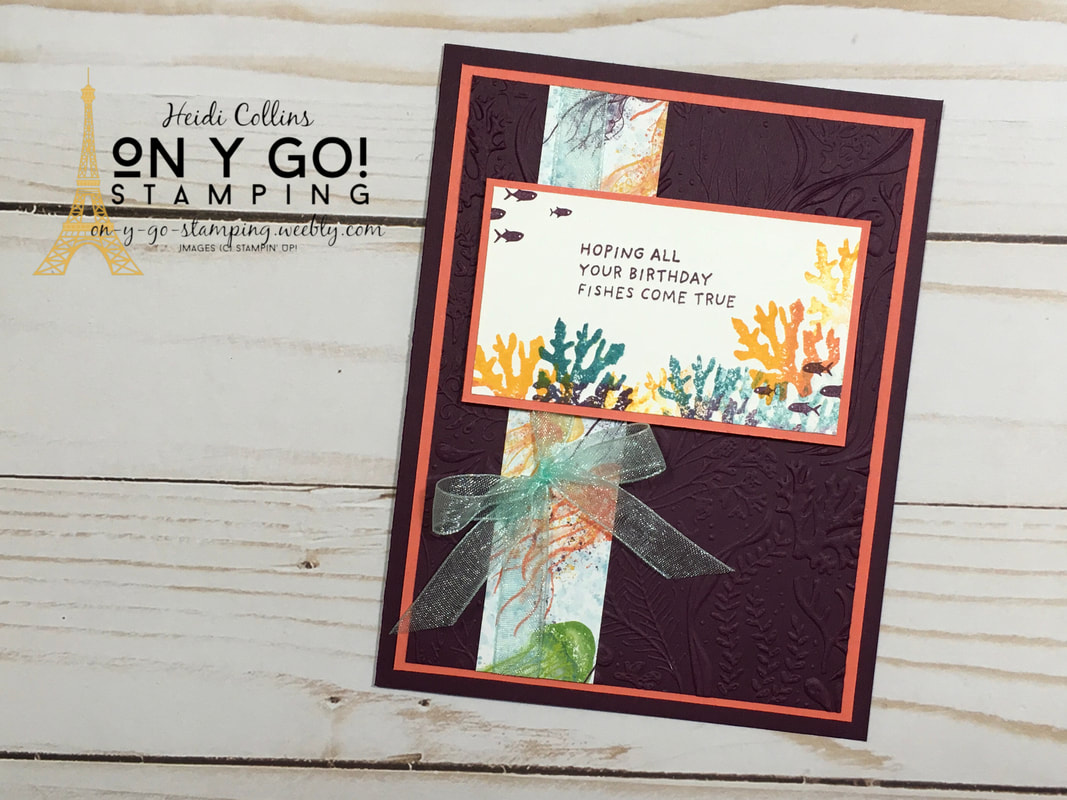
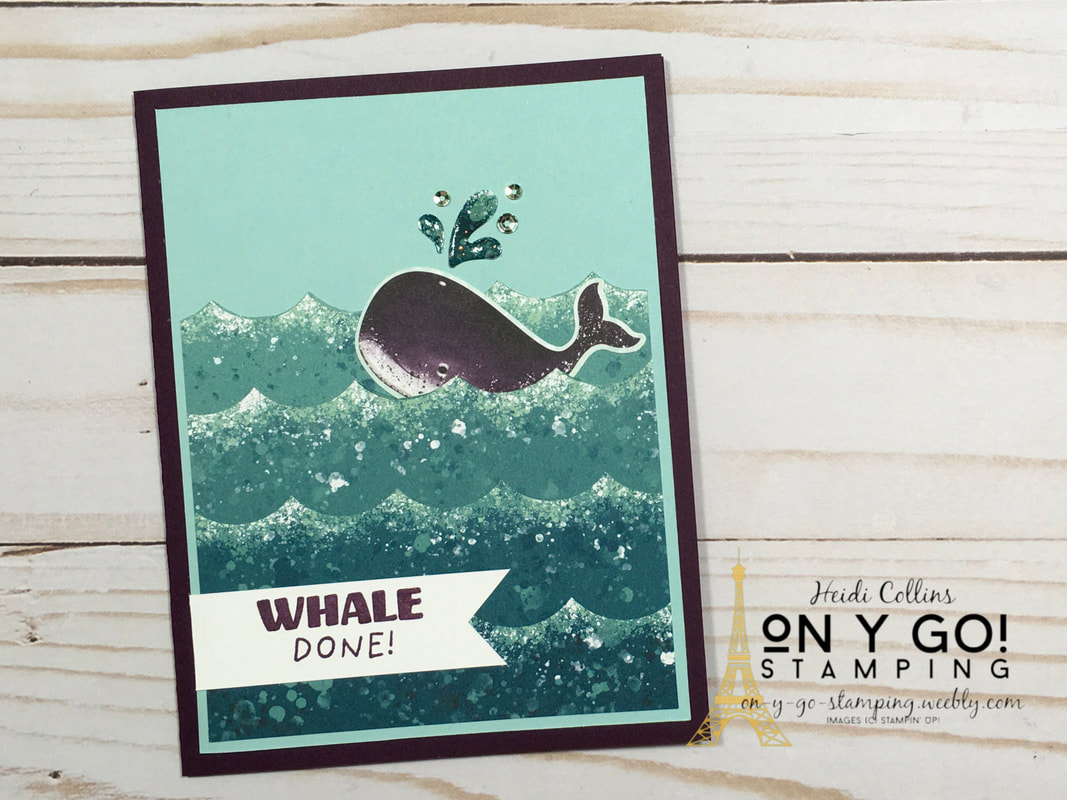
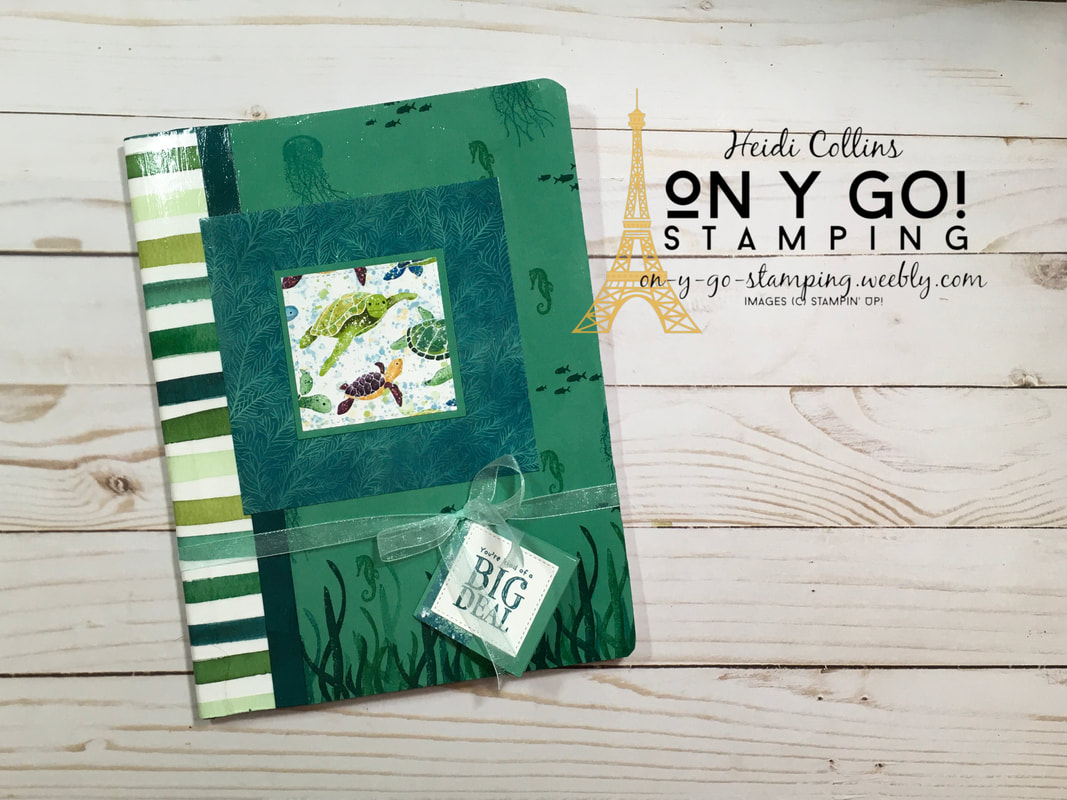
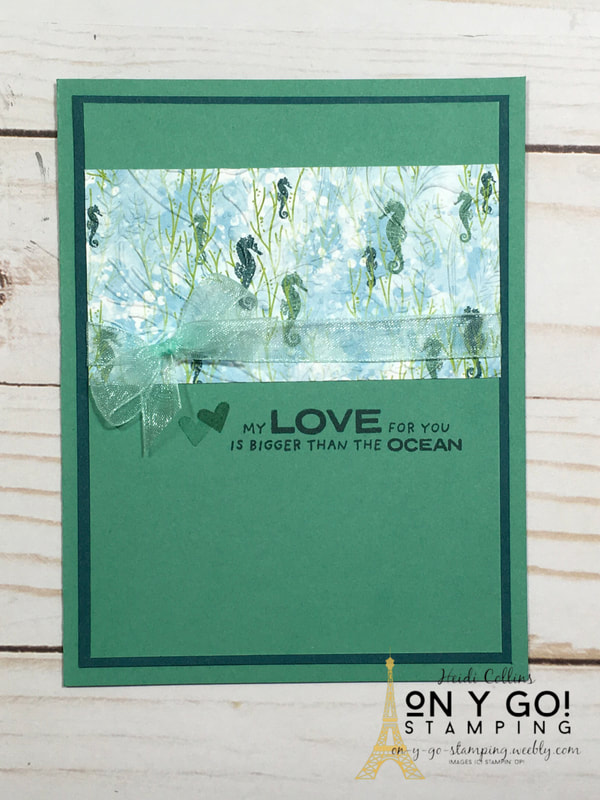
I'm excited to be hopping with the Stampin' Friends again! The theme this month is: What's Going On. Here in the US, that means Summer! So, I have a group of cards and a covered notebook featuring the Whale of a Time Suite. I love all of the images of the ocean and the colors. To me, the suite screams summer. I hope after you have looked at all of my projects, you'll continue to on to Kim Quade's blog and then through the rest of the hop. A complete list of artists can be found at the bottom.
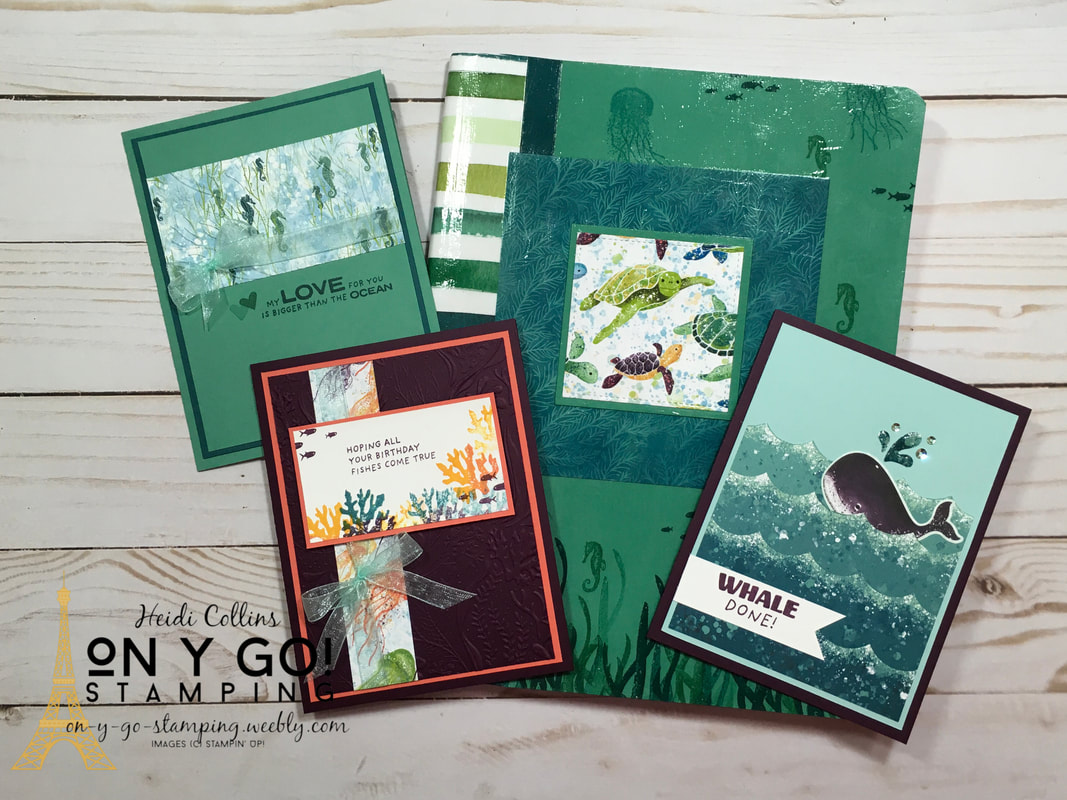
The colors in the Whale of a Time Designer Series Paper are so pretty and bright. This was the first suite in the new catalog that jumped out to me and made my heart sing. I just love it! In addition to the stamp set and paper, the suite includes the Whale Builder punch, the Seabed 3D embossing folder, a roll of Pool Party ribbon, and a package of sparkly sequins.
Notebook Dimensions:
Just Jade cardstock (cover) : (2) pieces 7" x 9 13/16" Forever Greenery Designer Series Paper (spine): 3 1/4" x 9 13/16" Pretty Peacock cardstock (cover strip): 1/2" x 9 13/16" Whale of a Time DSP (layer): 5" x 5" Whale of a Time DSP (Turtle): approximately 2 5/8" x 2 5/8" Just Jade cardstock (layer): 2 7/8" x 2 7/8" 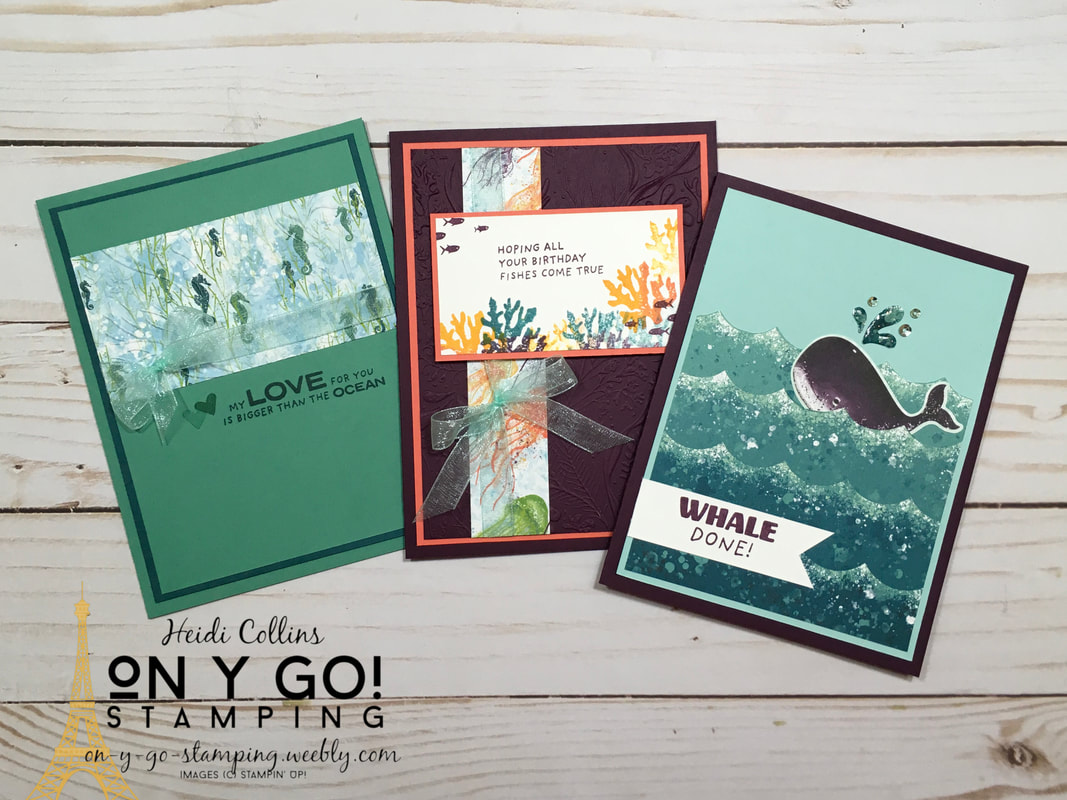
I made three cards for today's post, but I feel like I could make dozens more! I'm sure you'll see many more cards with the Whale of a Time Suite this year.
Thanks for joining me today for some summer fun under the sea! I hope you'll hop along with the Stampin' Friends through the rest of the blog hop. Below is a list of bloggers followed by the products used for today's projects.
Stampin' Friends June Blog Hop:
Stephanie Jandrow Teri Pocock Katja Ettig Heidi Collins <-- YOU ARE HERE Kim Quade Maureen Rauchfuss Jean Beaulieu Tiziana Milano Lisa Ann Bernard Anne Marie Hile Jo Blackman Barbara Welch
Product List
")


If you're following the Stampin' Friends Blog Hop, you've reached me from Anne Marie Hile's wonderful blog. I hope after looking at my projects, you'll continue on to Melissa Thomas's and all the way through the rest of the hop.
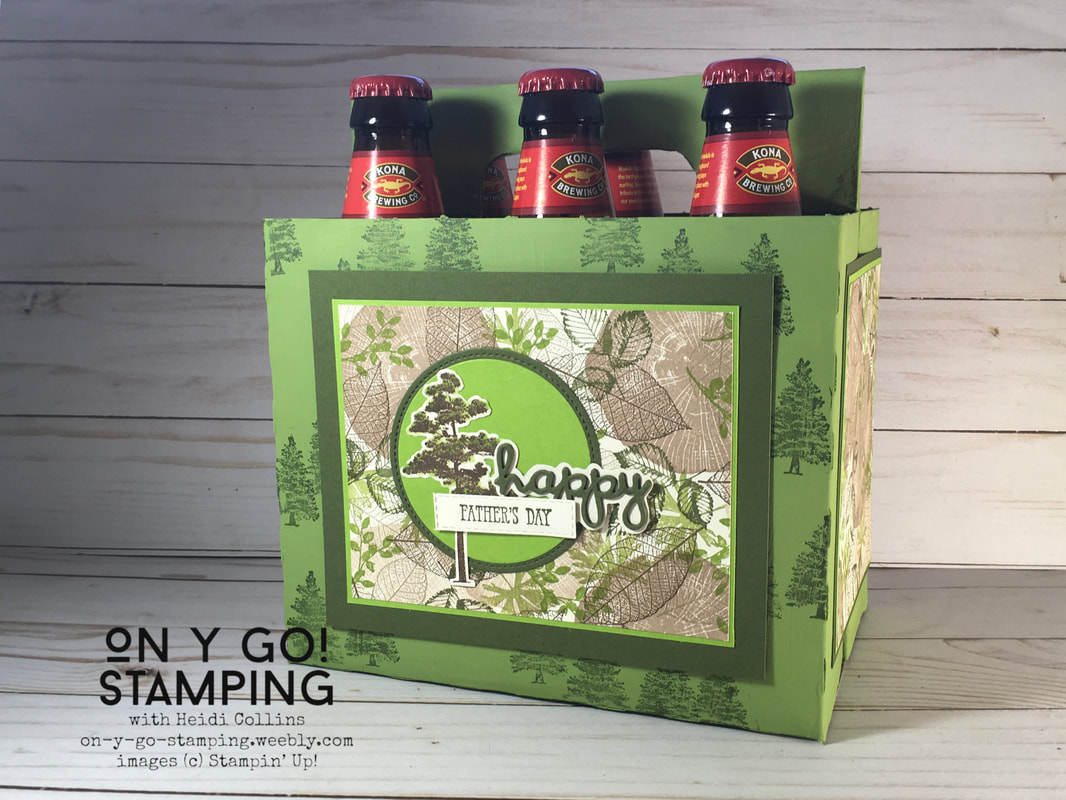
This month's theme for the Stampin' Friends Blog Hop is Masculine or My Guy. The Rooted in Nature stamp set from Stampin' Up! has the perfect stamps for some more masculine looking cards, and with Father's Day coming up in a month, it's the perfect time to get started on some gifts for Dad. So, on y go! Let's get stamping. 
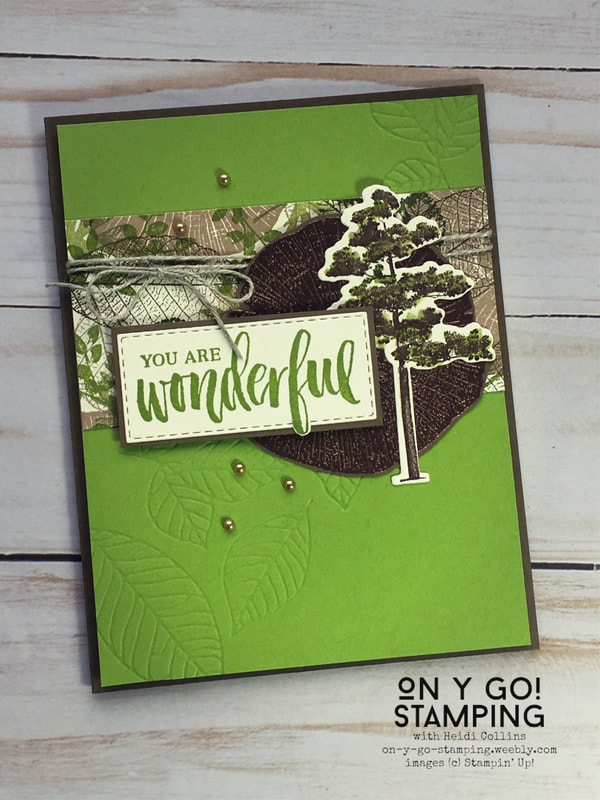
Finding gifts for guys always seems to be a challenge, but I know for my guy, I can't go wrong with some beer. (He's pretty easy to please!) So, to make this six-pack extra special, I added some personalized decoration. To go with the six-pack, I created a card to tell him just how wonderful he is to me and the kids.
For both of these projects, I created my own patterned paper with the different leaf images from the Rooted in Nature stamp set. I started by stamping the tree rings with Crumb Cake ink. I stamped it off first on a piece of scratch paper to make it a little lighter, and then, I stamped it twice on my paper. I stamped these fairly close together all over a piece of 8 1/2" x 11" Very Vanilla cardstock. After my page was filled with tree rings, I stamped the various leaves in Granny Apple Green, Mellow Moss, Soft Suede, and Crumb Cake inks. I overlapped images and stamped multiple times before re-inking. When creating your own background paper, it is very important to get the images to really cover the page. Since you will be cutting the paper apart into smaller sections, you often need to place the images closer together than you normally would. Once you trim the pieces of cardstock into the sizes you want, you may need to go back and stamp a few more partial images around the edge.
I layered a piece of my handmade patterned paper on Granny Apple Green and Mossy Meadow cardstock. I added layered circles of each of these colors as well. On top of that, I added a tree image from the stamp set that I had stamped in Soft Suede ink. I colored over the needles of the tree with a Granny Apple Green Stampin' Blend. Then I fussy cut the tree and adhered it on top of the circles.
The words were cut with the Well Written dies and stamped with the Well Said stamp set. To create the outline for happy, I traced around the outside of the die on a piece of Very Vanilla cardstock and very carefully cut just within my pencil mark. Then, I layered the cut "happy" pieces on top of the vanilla piece I had cut.
I stamped the greeting with Granny Apple Green ink on Very Vanilla cardstock and cut it out with a Stitched Rectangle die. To let the "f" flow out of the rectangle, I trimmed out just the very bottom of the "f" before die-cutting the sentiment. When I placed my rectangle die, I lifted the tail of the edge so that it rested on top of the die instead of underneath it. This way, the bottom of the "f" was not cut with the rest of the rectangle.
To finish the card, I added some linen thread and a few Gold Metallic Pearls. The greeting is mounted on Soft Suede cardstock and adhered with Stampin' Dimensionals. Likewise, the entire card front is attached to a Soft Suede card base with Stampin' Dimensionals. This special card is filled with texture and dimension. The perfect gift for a wonderful guy! Thanks again for visiting the On Y Go! Stamping blog. I hope you will continue on to Melissa Thomas's amazing blog and then on through the rest of the blog. Here's a complete list of bloggers: 1. Jean Bolen Beaulieu 2. Teri Pocock 3. Katja Ettig 4. Steph Jandrow 5. Tiziana Milano 6. Kim Quade - US 7. Kim Lamos 8. Maureen Rauchfuss - US 9. Anne Marie Hile - US 10. Heidi Collins <--- YOU ARE HERE 11. Melissa Thomas 12. Rachael Rife
Product List


")


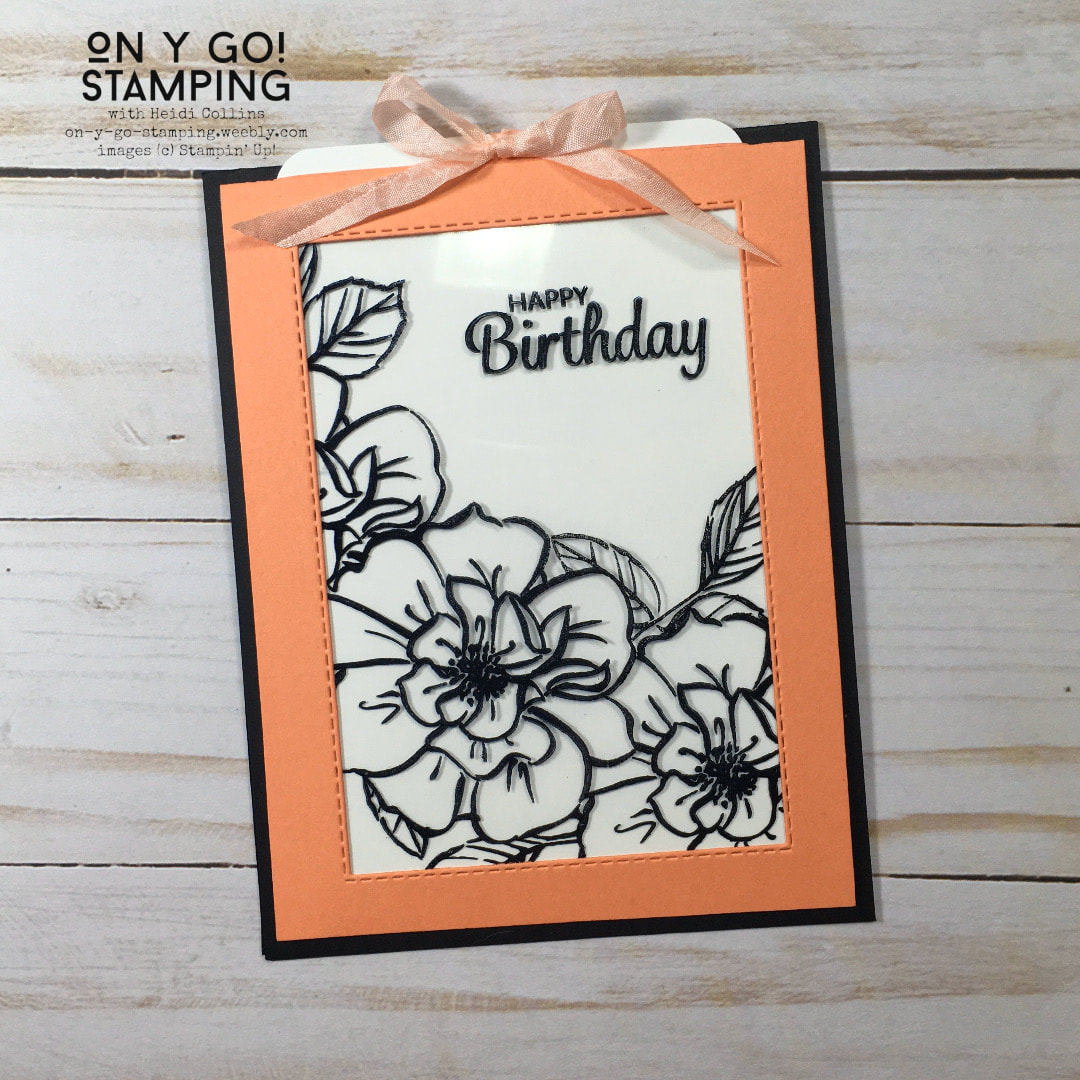
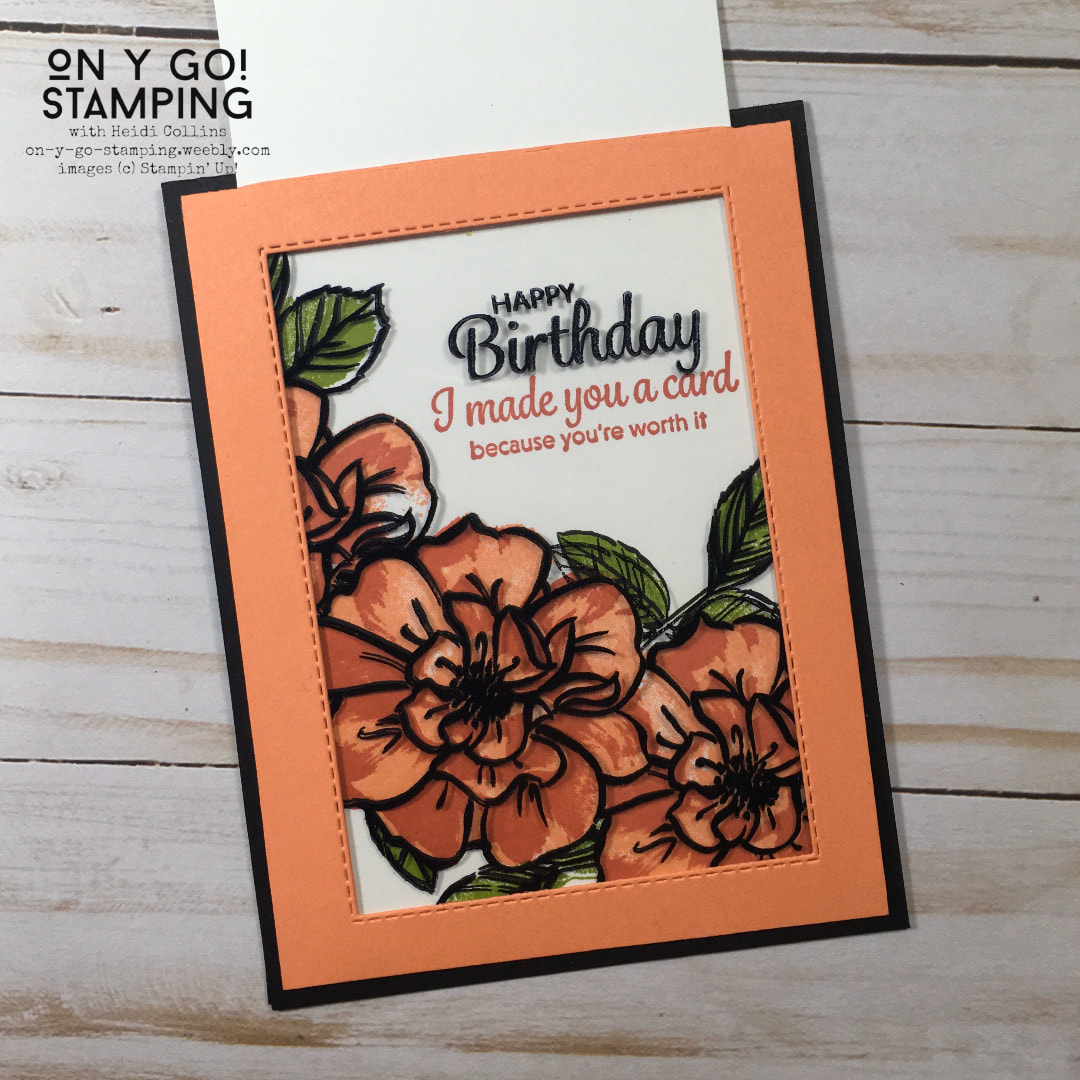
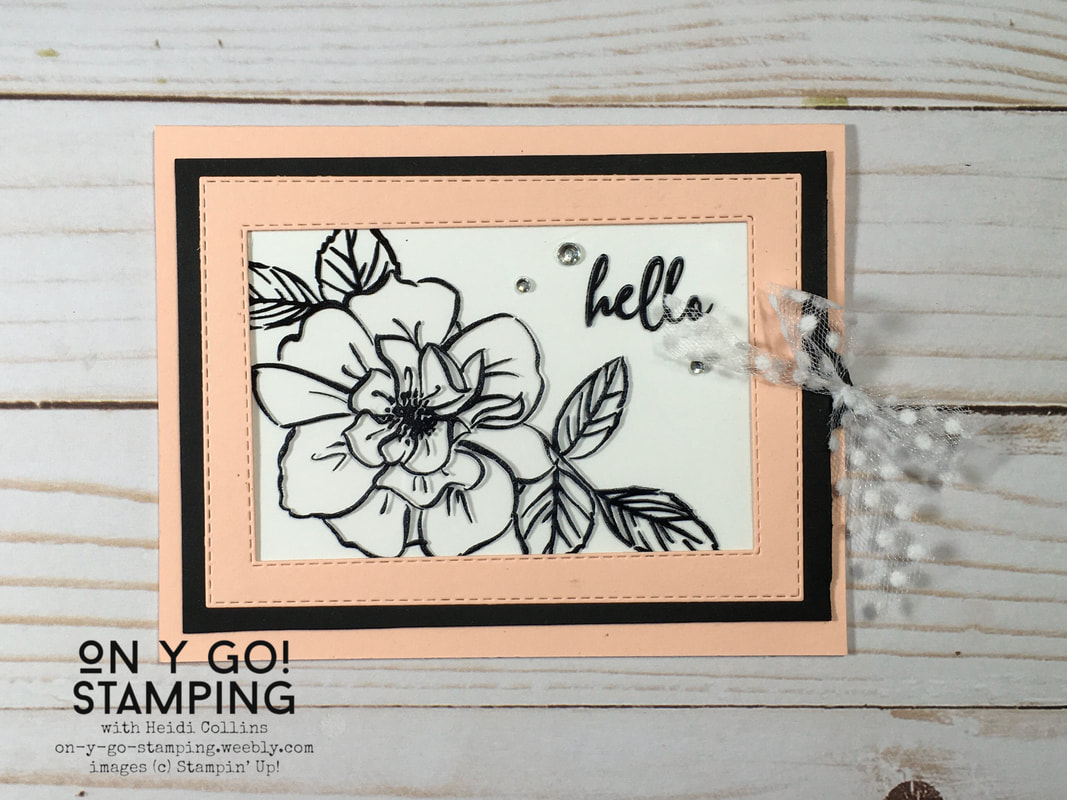
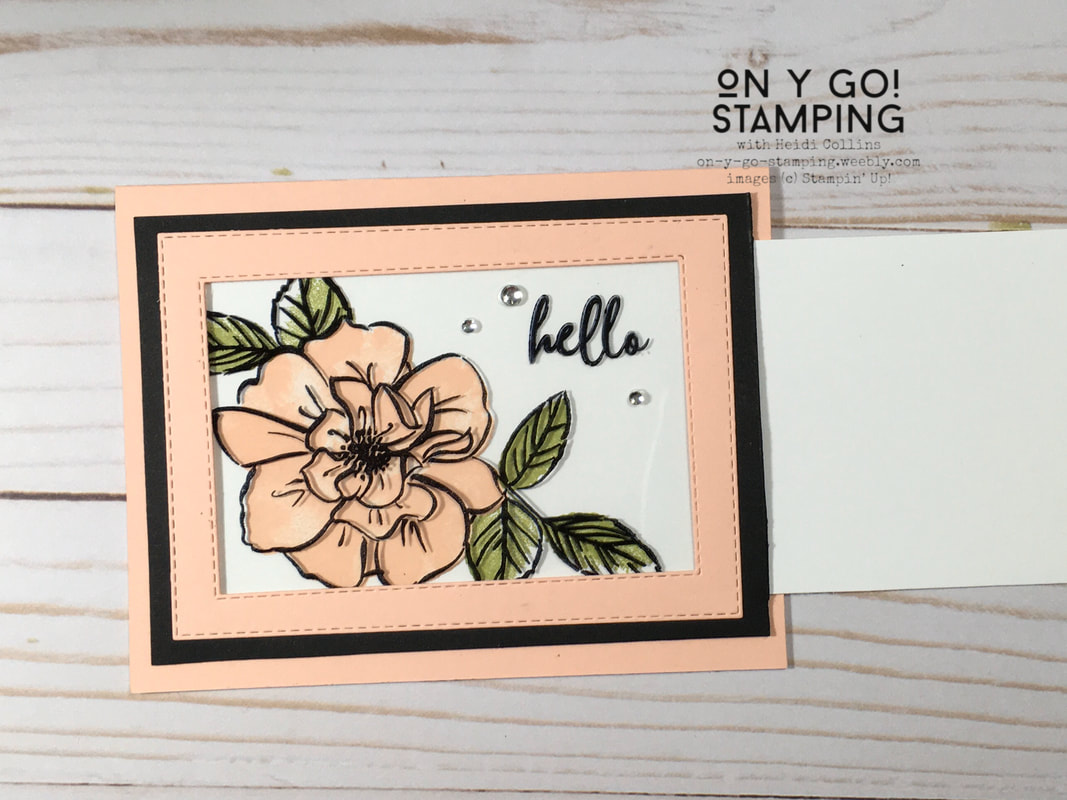
I am excited to be hoppin' with the Stampin' Friends again this month! The theme for April is All About Flowers and Moms which is perfect for today because it's my Mom's birthday! (Happy Birthday Mom!) If you've been following the hop, you've joined me from Kim Quade's blog. I hope when you've read about my projects, you will continue on to Katja Ettig's blog and then through all the other blogs as well. There are lots of amazing cards and projects this month! To celebrate my Mom's birthday, I sent her this magic slider card. While it starts as a simple black and white image, by tugging where the ribbon is, you slide out an interior card to reveal a fully colored image below.
This was the first slider card that I had ever made, and it was a little more challenging than expected. Mostly because I had to have a really clear idea of what I wanted the final project to look like when I started. This card for my Mom is one of a kind, just like her! However, I wanted to make a Magic Slider card for a swap, and so I made 10 more, very similar cards. In doing so, I perfected my technique. If you would like a a card kit to make this card or a complete, step-by-step tutorial for this card including both written instructions and a link to a video, look for ordering information all the way at the bottom of this blog post.
Besides today being my Mom's birthday, Mother's Day is quickly approaching! Who knows if we'll be able to see our mother's this Mother's Day or partake in the normal rituals of Mother/Daughter banquets and Mother's Day Brunch. But, these cute little purses would make excellent name cards or favors. Or perhaps a little porch gift for your favorite mother!
Thank you for stopping by and celebrating my Mom's birthday with me. Below is a complete list of Stampin' Friends bloggers. I hope you'll take the time to click through to each one's post! Ordering information for the Magic Slider tutorial is below the list of bloggers. Stampin' Friends Blog Hop1. Stephanie Jandrow 2. Jo Blackman 3. Jean Bolen Beaulieu 4. Teri Pocock 5. Tiziana Milano 6. Kim Quade 7. Heidi Collins <-- YOU ARE HERE 8. Katja Ettig 9. Rachael Rife USA 10. Maureen Rauchfuss USA 11. Kim Lamos 12. Barbara Welch 13. Anne Marie Hile 14. Melissa Thomas Magic Slider Tutorial or Card Kit
If you place a qualifying order, the Tutorial or Card Kit + Tutorial will be sent to you automatically. If you would like to purchase them separately, please click the button below.
|


Archives
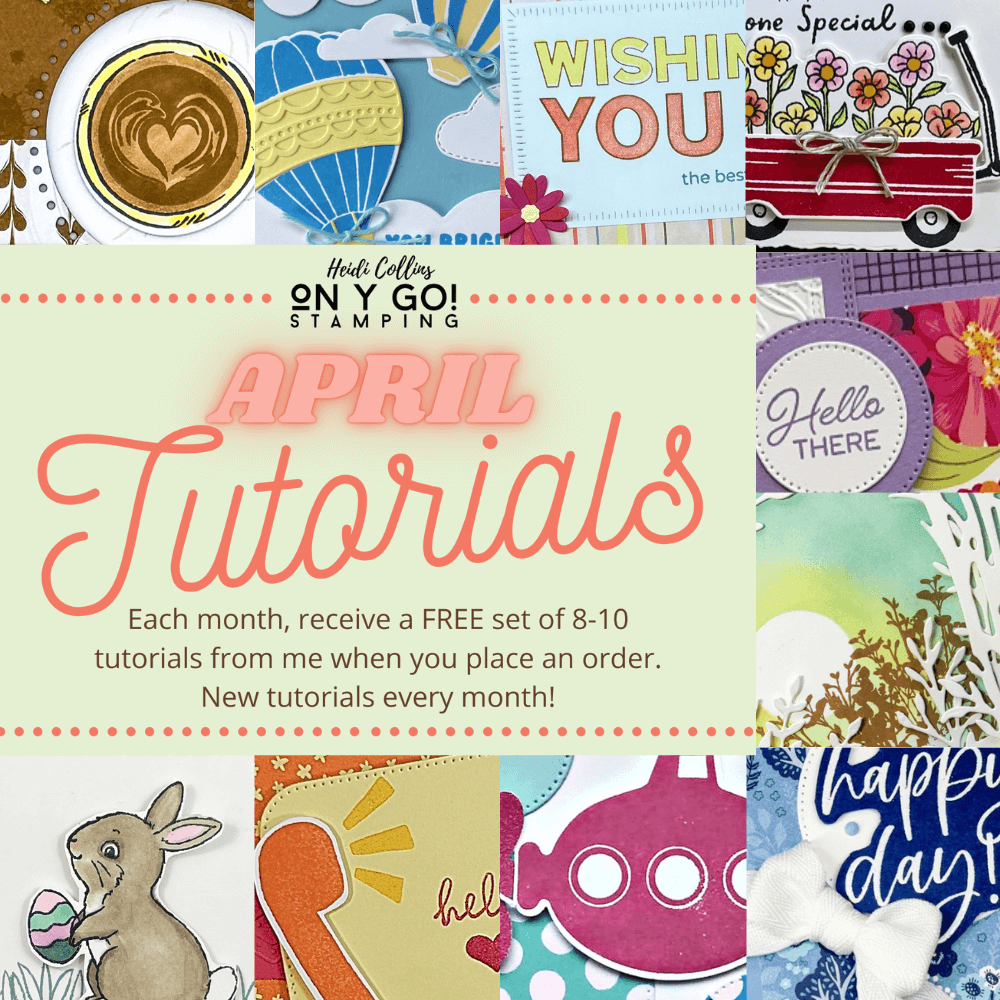
April 2024
|
")


")
")
 Designer Series Paper")
 Sheer Ribbon")