• Home
  • About
  • Contact
  • Shopping Rewards
  • Shop
  • Join Stampin' Up!
  • Stampin' Up! Catalogs
  • Online Card Classes
  • Ideas & Inspiration
  • Tutorial Store
On y go! Stamping
  • Home
  • About
  • Contact
  • Shopping Rewards
  • Shop
  • Join Stampin' Up!
  • Stampin' Up! Catalogs
  • Online Card Classes
  • Ideas & Inspiration
  • Tutorial Store

Fun Folds for Christmas and Beyond

12/21/2019

7 Comments

 
Picture
I am so excited to be participating in the very first Magnolia Blog Hop today! These designers from around the globe have prepared some beautiful Christmas projects for you, so be sure to check out Ginny Harrell's Celebrate the Journey blog next. You can find the complete Blog Hop itinerary and links at the bottom of this post. 

You've probably already stamped, signed, and mailed your Christmas cards this year, but I wanted to share some of the cards I made using three different fun folds. These folds are great for Christmas or any occasion.


Picture
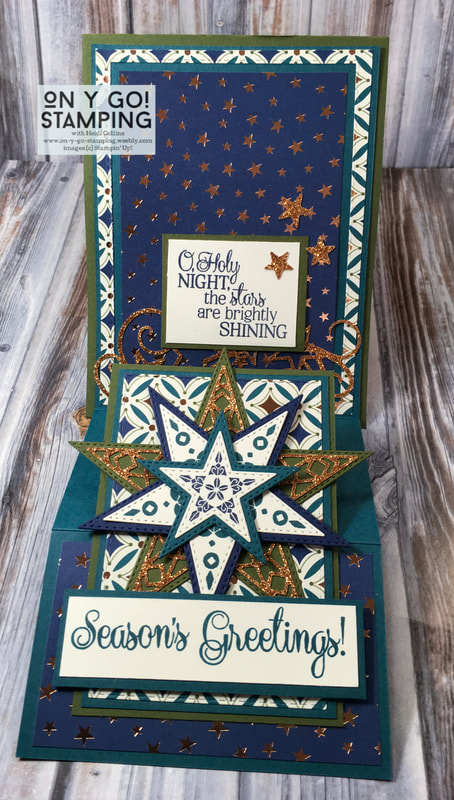
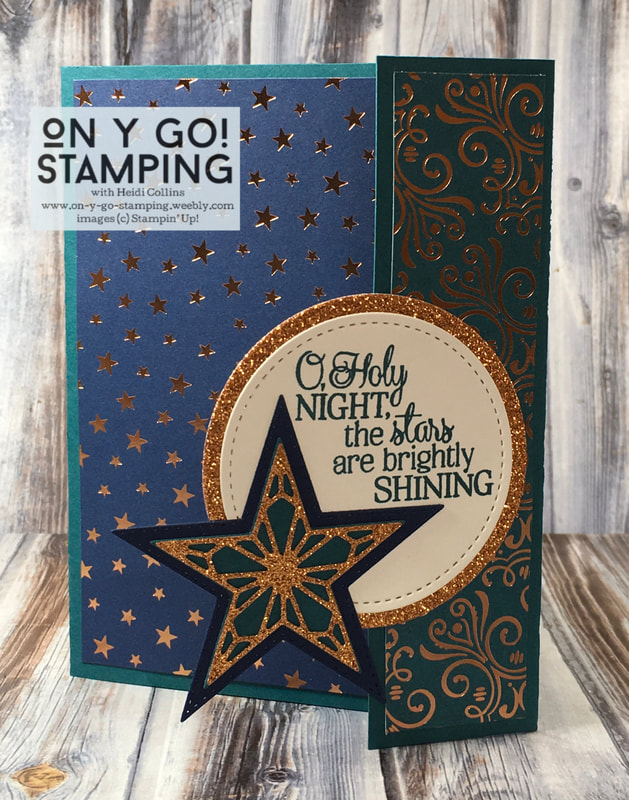
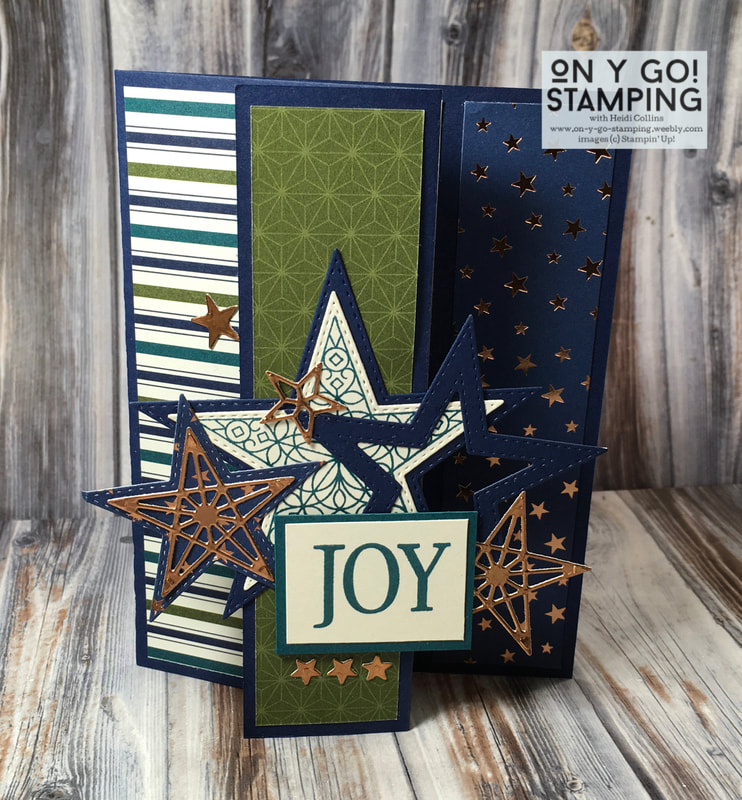
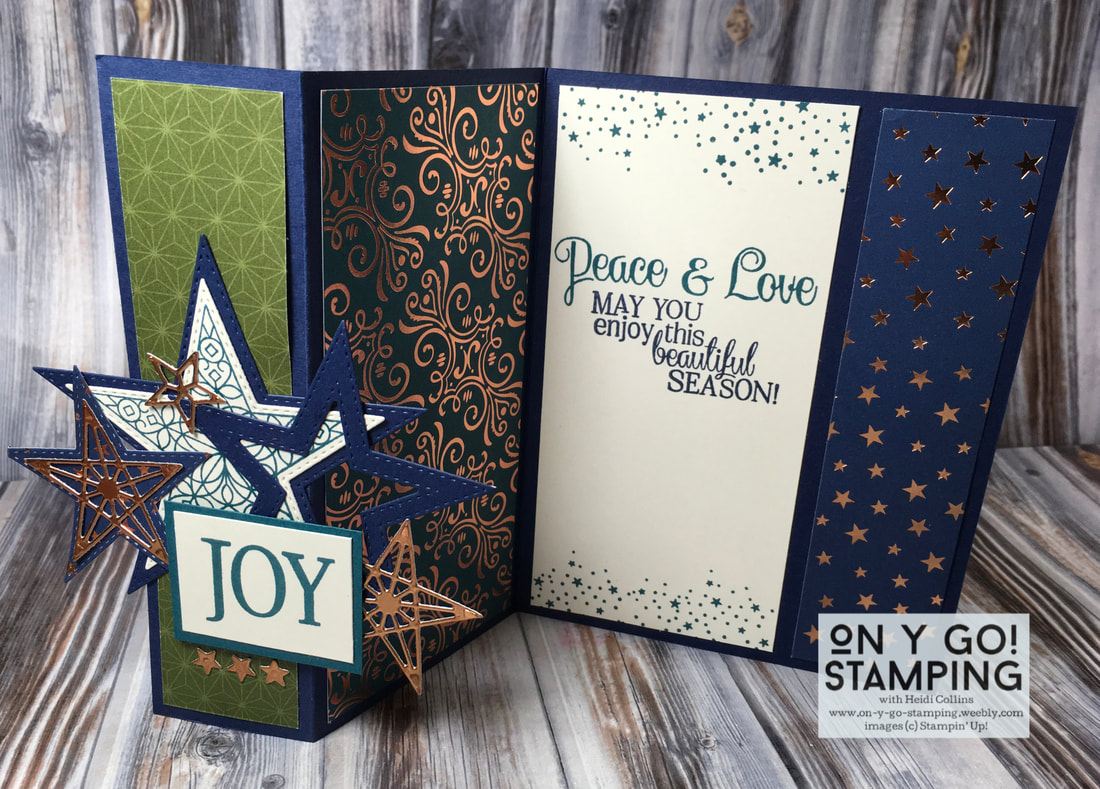
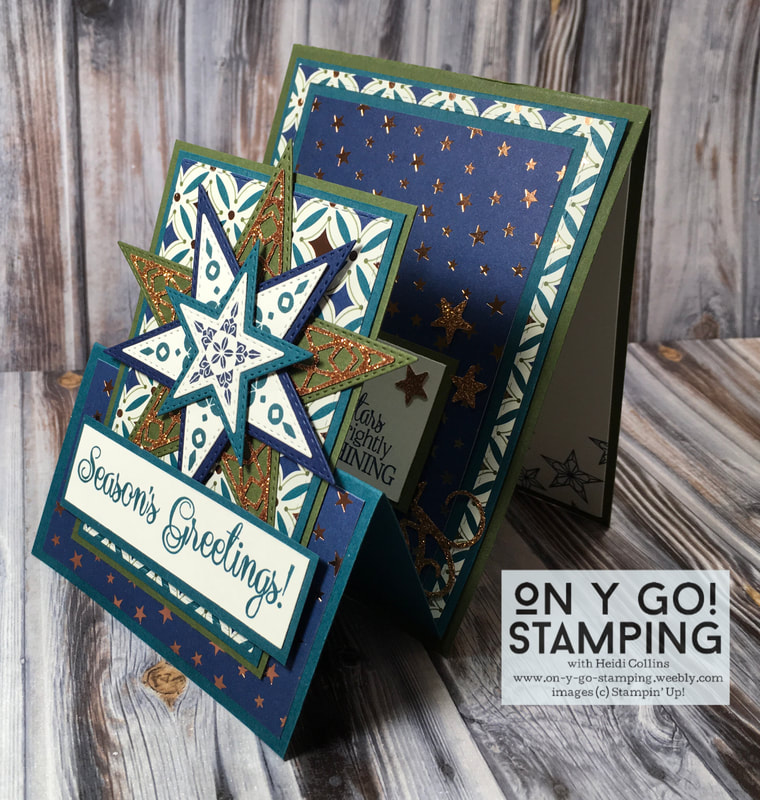
For the Christmas cards, I used the So Many Stars stamp set and dies with the Beautifully Gleaming Designer Series paper. Unfortunately, this gorgeous paper is sold out for this year, but Stampin' Up! has promised to bring it back next September! The stamps and dies will be retiring at the end of December, so if they're on your wish list, be sure to order them before they are gone. ​
Picture
This first card is a tri-fold card. This is created using two pieces of cardstock. The back is a piece of Mossy Meadow Cardstock that is 11" x 4 1/4" and is scored at 5 1/2". This piece is then simply folded in half. The front piece is Pretty Peacock cardstock and is 10 1/4" x 4". This piece is scored at 2 1/2" and 5". The folds are folded in different directions to create an accordion type fold as you can see in this photo. 

​I decorated it using paper from the Brightly Gleaming Designer Series Paper and Mossy Meadow, Night of Navy, and Pretty Peacock ink and cardstock. The star decorage on the front fold hides additional decoration on the layer behind. The card also lifts up to reveal an "inside" with an additional sentiment.
Picture
Picture
This second card features a flap on the right hand side. The central images on the card is attached to this flap. In addition to the beautiful patterned paper, this card has lots of sparkle because it uses gold glimmer paper. While the foil in the designer series paper is copper, next to the gold glimmer paper, it appears golden. 
Picture
Picture
Picture
Picture
The last card has a fold-back flap. It is basically a regular card where the right side has been folded back to reveal the inside. Three strips of the Brightly Gleaming Designer Series Paper are used to emphasize the three areas. I decorated this card with a group of stars. The stars are glued to each other where they overlap so that they are only attached to the center, folded-back flap. 
Picture
Picture
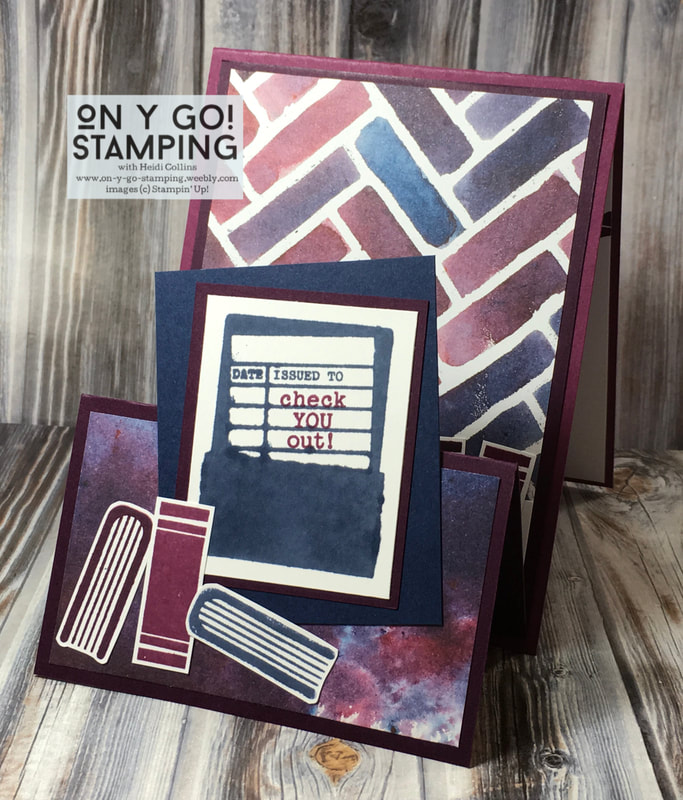
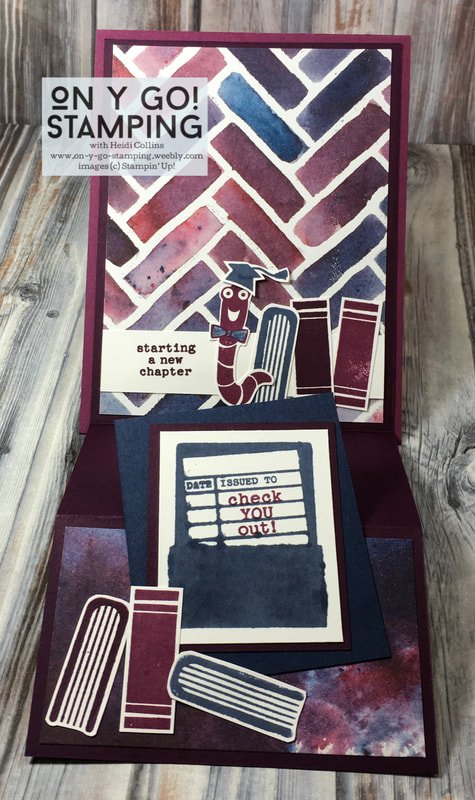
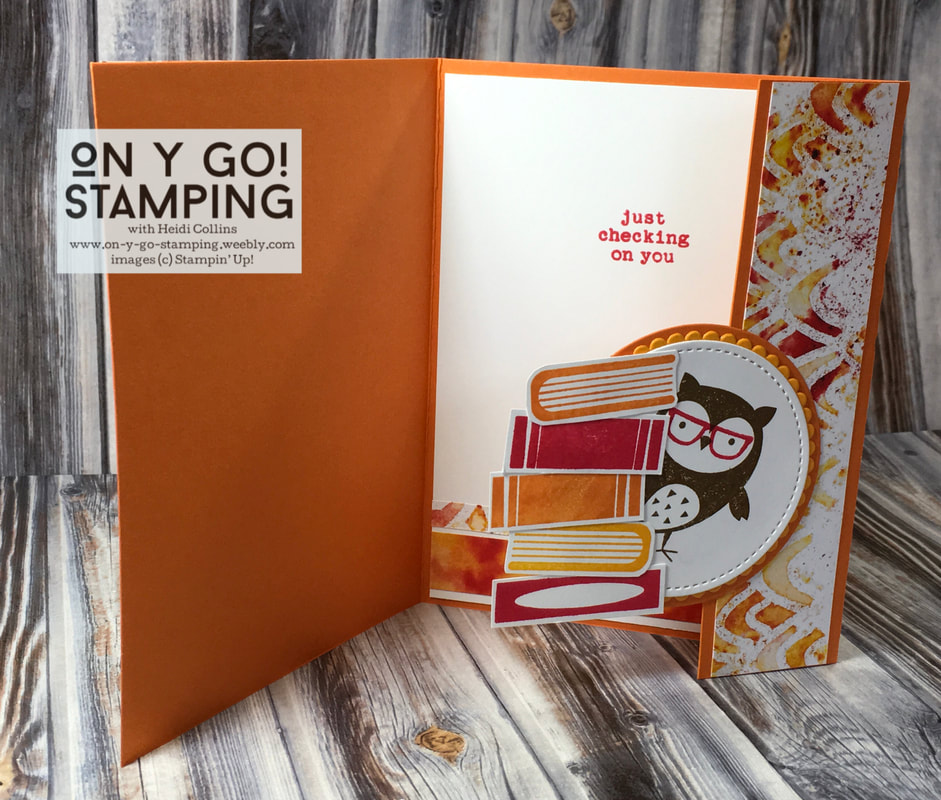
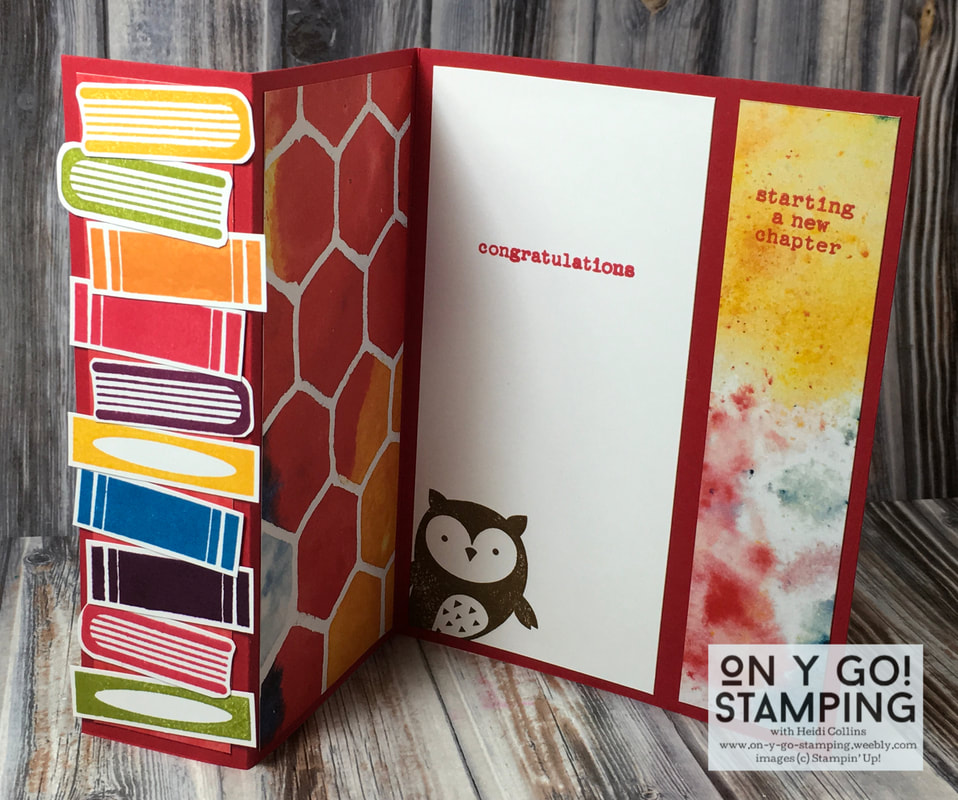
While all of these fun folds make great Christmas cards, they can be used for any occasion. I paired the Check You Out stamp set with the See a Silhouette Designer Series Paper to create another set of cards using these same three folds. 
Picture
Picture
Picture
Picture
Picture
Picture
I hope you've enjoyed these Christmas cards and are able to use the fun folds in your own creations. Please take a moment to check out the rest of the designers participating in the Magnolia Blog Hop!

Judith Weiß
​
Silke Trapani
Samira Merzouk​
Heidi Collins (You are here!)
Ginny Harrell
Ramona Shneider
Margreit Siekman
Sandra Herzog
7 Comments

A Quartet of Playful Penguins

12/20/2019

0 Comments

 
Picture
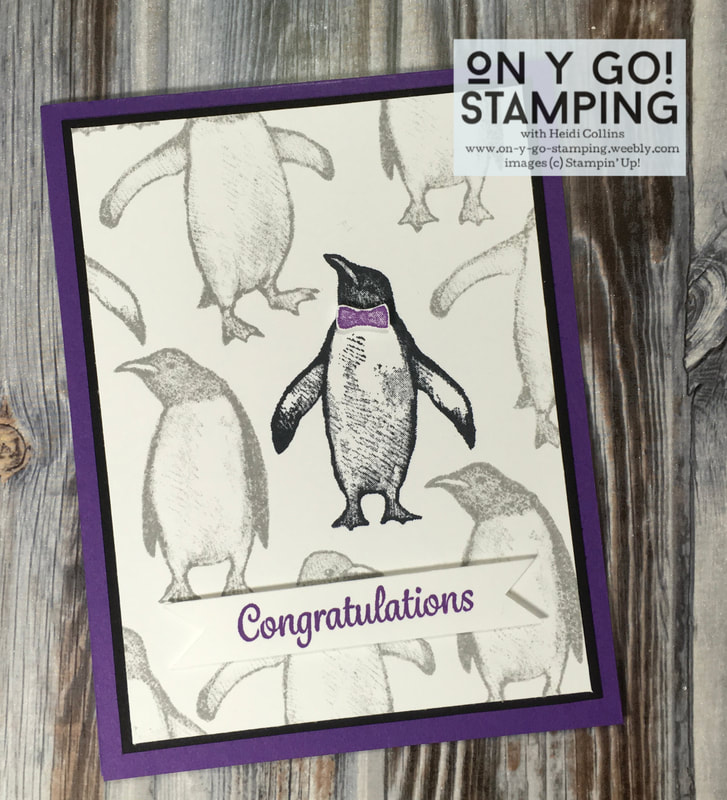
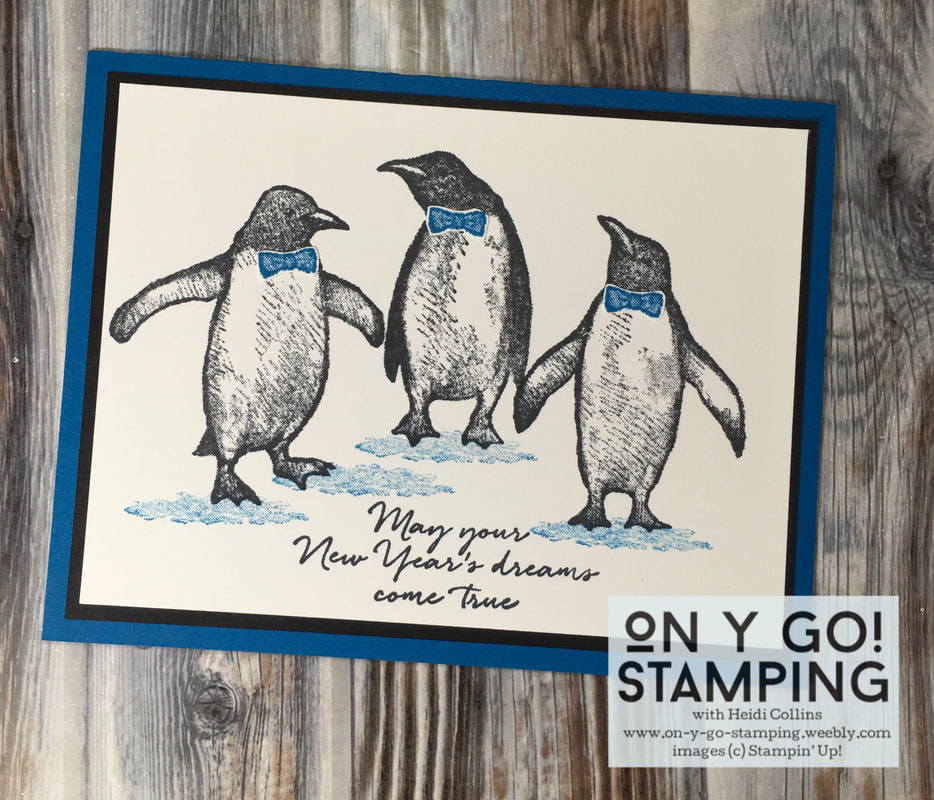
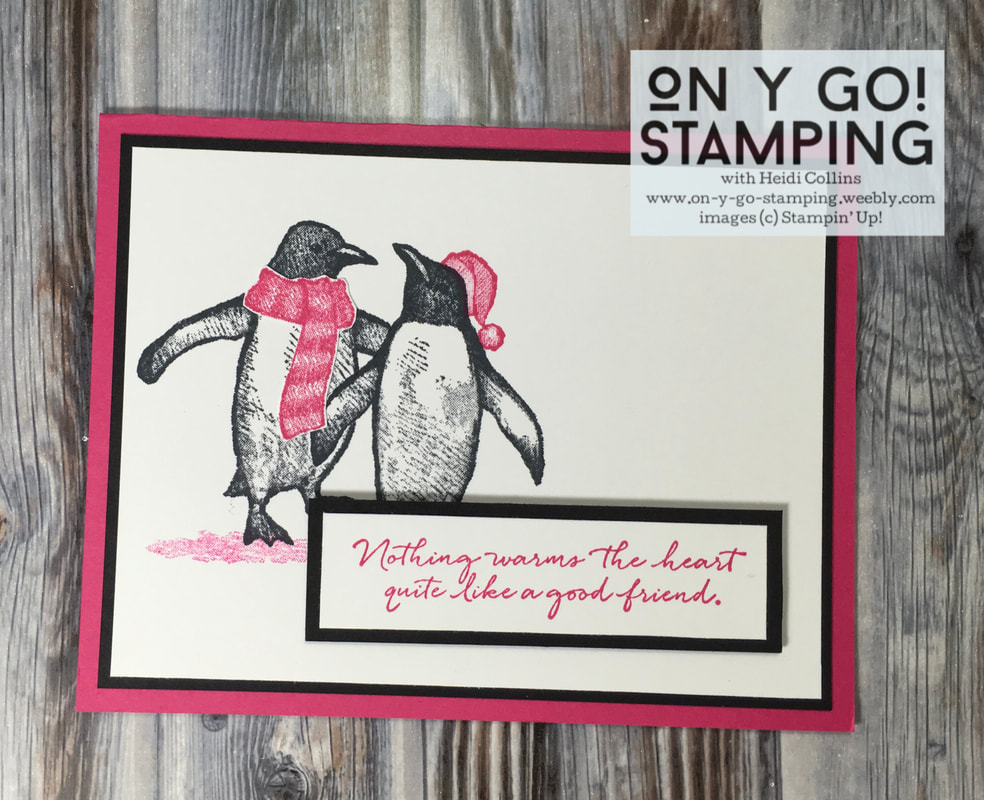
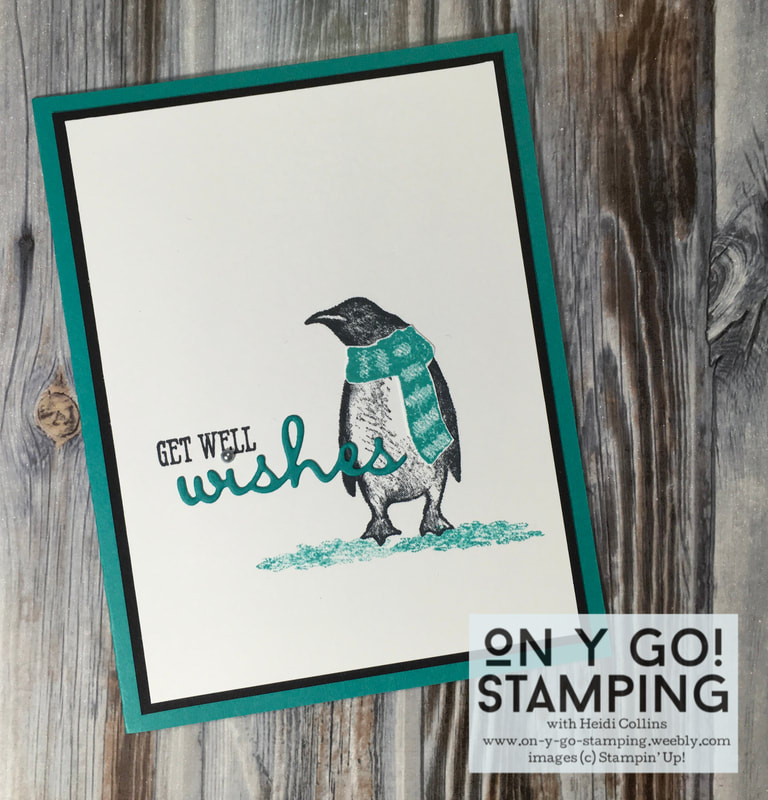
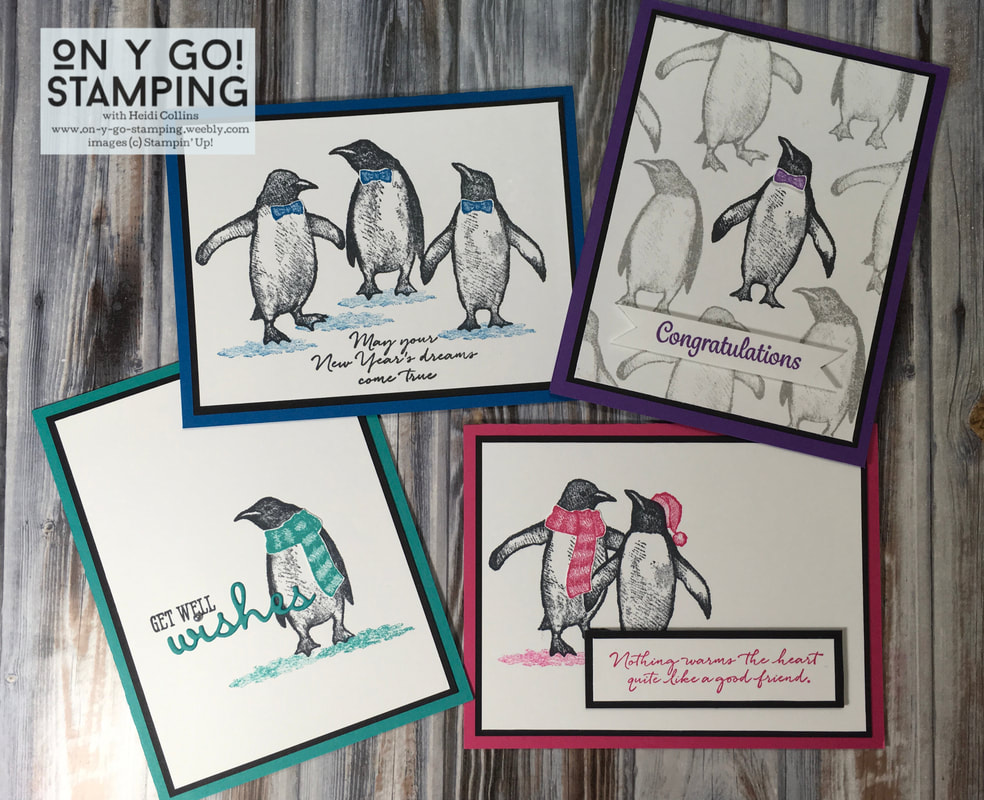
Before the 2019 Holiday Catalog by Stampin' Up is over, I wanted to share a few more cards featuring stamp sets from it, like these Playful Penguins. This set is so cute and easy to overlook in the catalog. It is a great set for creating a variety of cards. While the stamp set includes some great sentiments, I also paired the penguins with greetings from other stamp sets to show its versatility. 

All of these cards follow the same basic pattern. A piece of 5" x 3 3/4" Whisper White cardstock, a piece of 5 3/16" x 3 15/16" Basic Black cardstock, and a card base in one of the brights colors cut to 5 1/2" x 8 1/2" and scored at 4 1/4". 
Complete Supply List
Picture
For this first card, I stamped the focal penguin in Jet Black Stazon ink. Then I stamped the other penguins around him using Smoky Slate ink. I stamped the penguin's bow tie in Gorgeous Grape, cut it out, and attached it to the penguin using a mini Stampin' Dimensional. 

The "Congratulations" stamp is from the "Here's a Card" stamp set, found in the 2019-20 Annual Catalog. I stamped it on a strip of Whisper White cardstock using Gorgeous Grape ink. I cut the ends as flags and adhered it to the card front using Stampin' Dimensionals to give it depth. 
The second card has a trio of penguins all stamped in Jet Black Stazon ink. I stamped the bow ties with Pacific Point ink, cut them out, and glued them to the penguins using liquid adhesive. I stamped some snow for the penguins to stand on using Pacific Point as well. However, I wanted it to be a little lighter, so I stamped off on a piece of scrap paper before stamping on my card front. 

The New Year's sentiment for this card comes from the Playful Penguins stamp set. I simply stamped it directly on the card front using Jet Black Stazon ink.
Picture
Picture
These cute little penguin friends seem to be cheering each other up, and the fun pop of Melon Mambo helps brighten the card. To allow one penguin to stand in front of the other penguin, I used masking. I stamped the front penguin (the one with her wings down) on a sticky note. Then, I cut out the left side of the penguin. I stamped this same penguin in Jet Black Stazon ink on my card front. Next, I put the sticky note penguin directly on top of the penguin stamped on my card front. Then, I stamped the penguin in the background (the one with his wings up) on my card front overlapping the sticky note penguin. Finally, I peeled the sticky note off to reveal the image. 
​
I stamped the scarf with Melon Mambo ink on a scrap piece of Whisper White cardstock and cut it out before adhering it to my penguin with liquid adhesive. I tried stamping the scarf directly on the penguin, but was unhappy with the muddled results. The scarf is much brighter when it isn't stamped onto a black penguin. And fussy cutting the scarf was easy! However, the hat is stamped directly on the card front. 

Once again, the sentiment is from the Playful Penguins stamp set. I stamped it in Melon Mambo on a strip of Whisper White cardstock and mounted it on another piece of Basic Black cardstock. Then I mounted it to my card front using Stampin' Dimensionals.
​
The last card may be my favorite of the quartet. This little penguin in his scarf definitely looks like he needs some get well wishes!

Like the others, he's stamped with Jet Black Stazon ink. His scarf is stamped in Bermuda Bay ink on a scrap piece of Whisper White and cut out and attached. The sentiment comes from the Well Said Stamp Set and "wishes" is cut from Bermuda Bay cardstock using the Well Written dies. To dot the "i," I used a silver metallic pearl. Like the other cards, I stamped off the snow before stamping it on the card front in Bermuda Bay ink. 
Picture

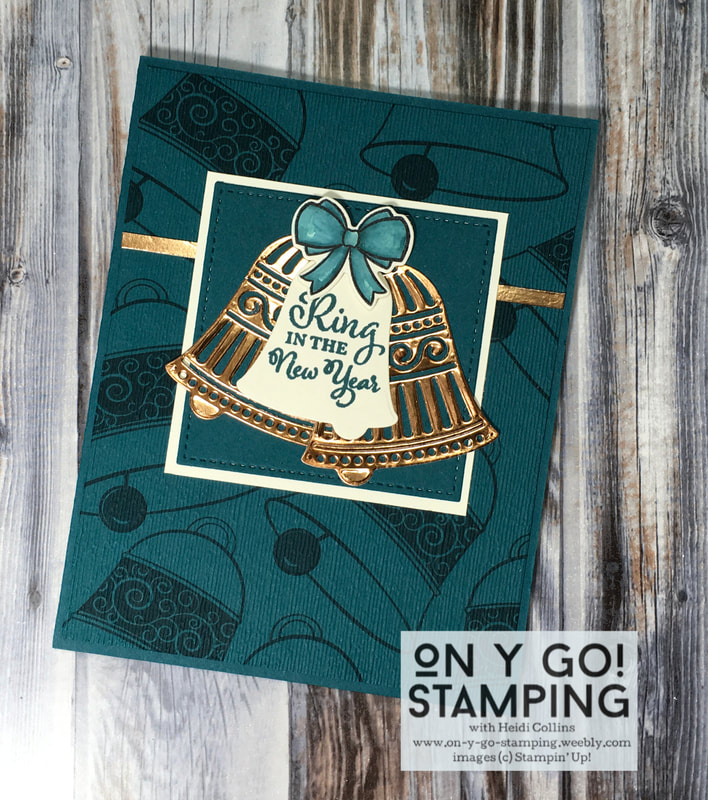
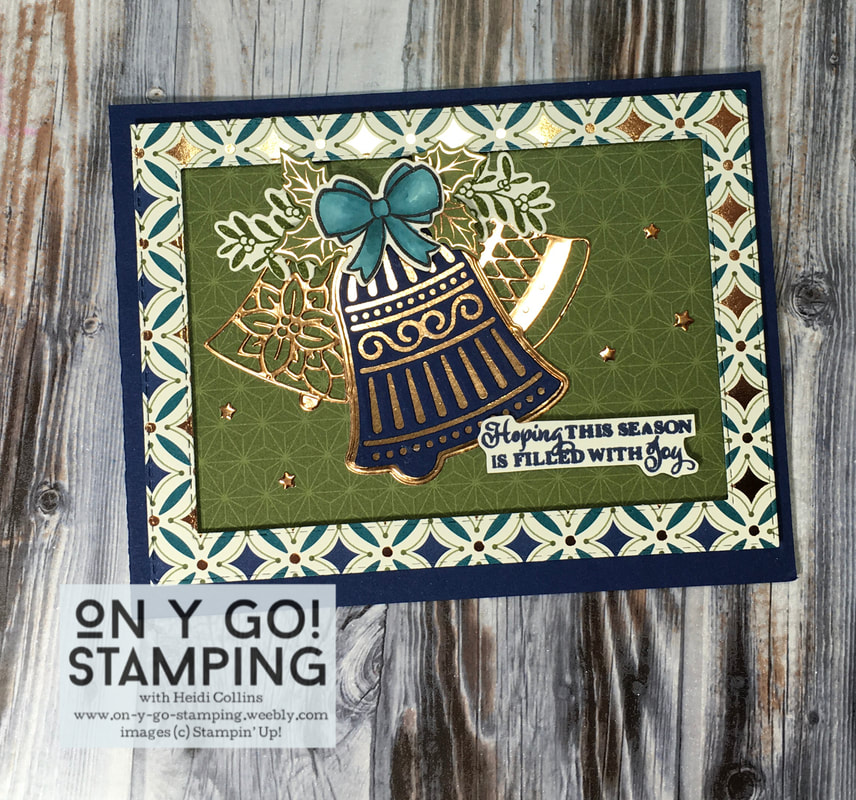
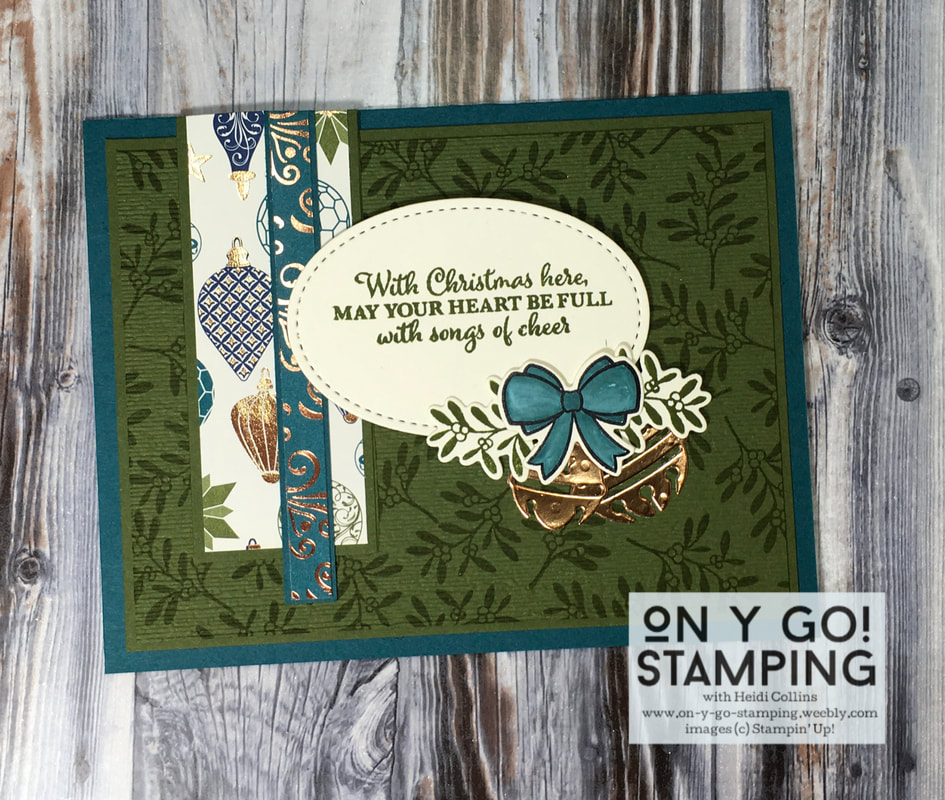
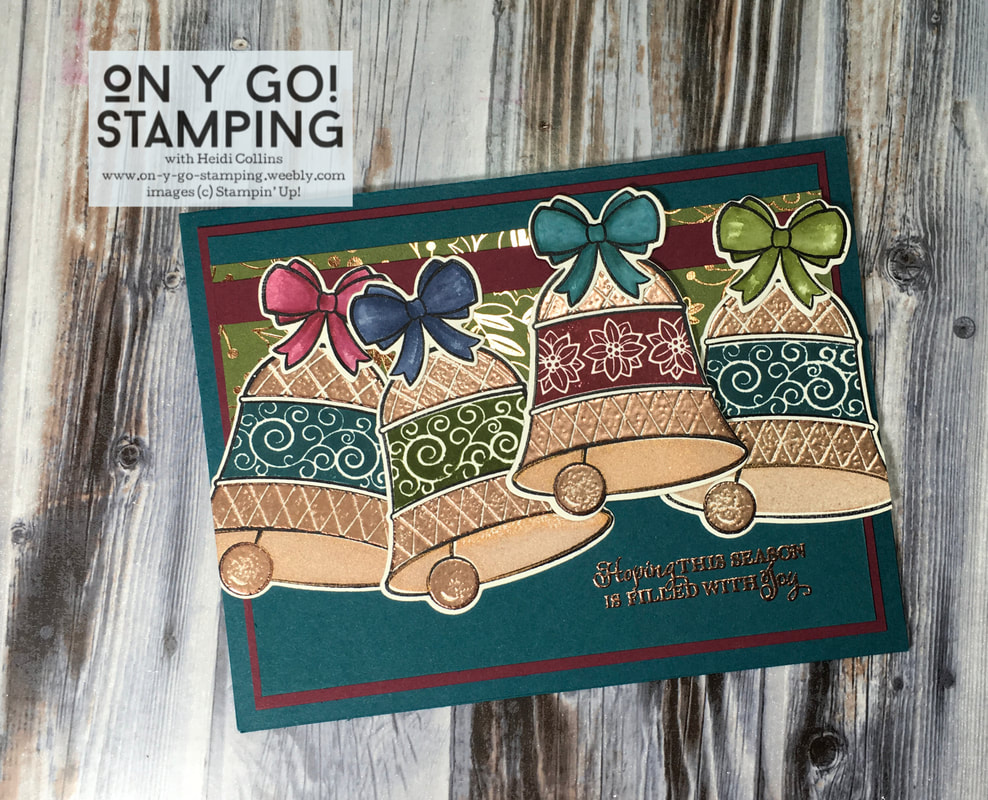
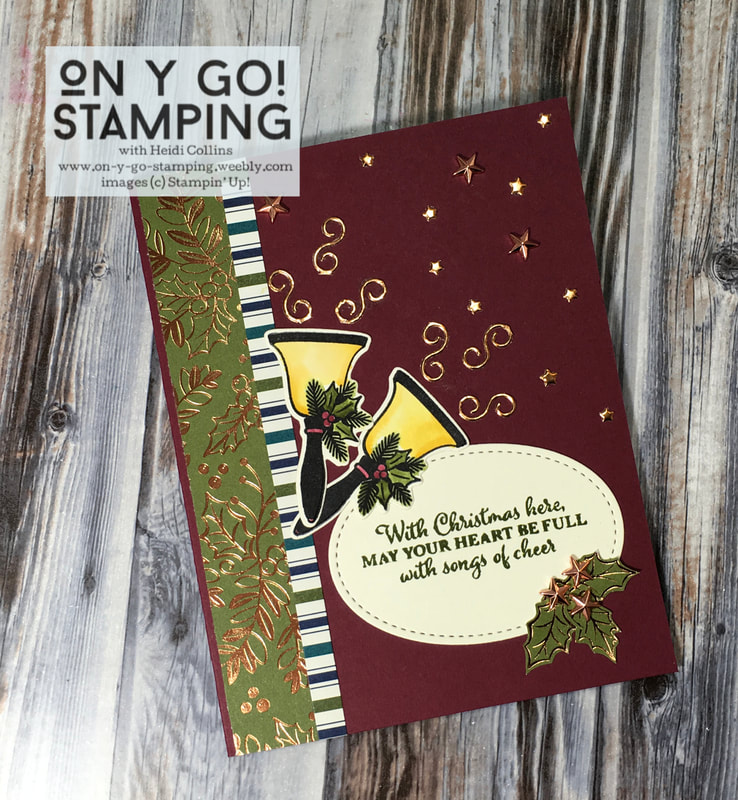
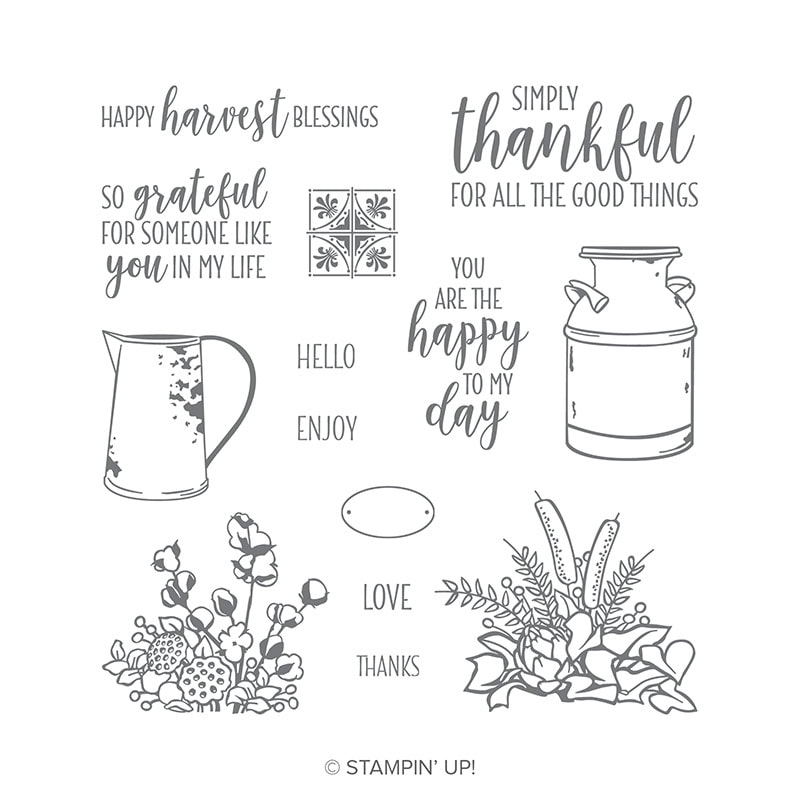
I hope you've enjoyed this quartet of penguins! Tomorrow, I have one last post of gorgeous Christmas cards coming your way as I participate in the first ever Magnolia Bloghop Project.
0 Comments

Bells are Ringing

12/15/2019

0 Comments

 
Picture
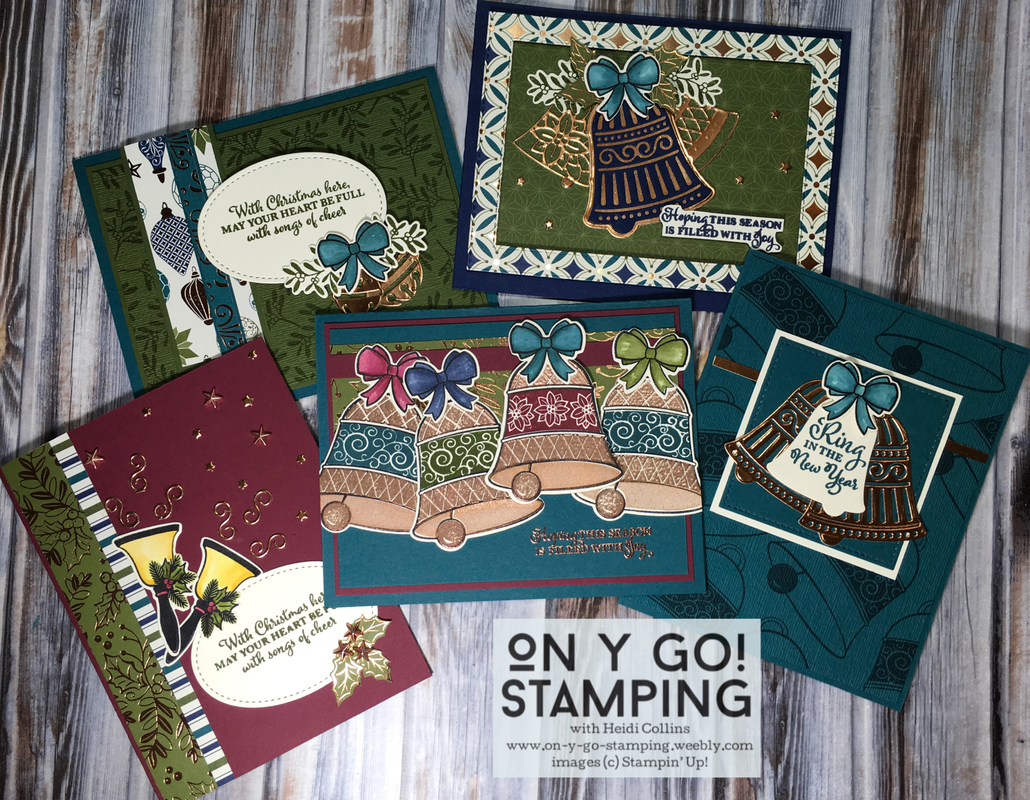
The Bells are Ringing stamp set and the Detailed Bells Dies from the 2019 Holiday catalog feature a variety of bells from handbells to jingle bells that are perfect for Christmas, the New Year, weddings, and more. I paired this bundle with the Brightly Gleaming Designer Series Paper. While the paper is sold out for this year, it will be back for the Holiday 2020 catalog. However, this wonderful bundle of bells will retire at the end of December!

To coordinate with the Brightly Gleaming DSP, all of these cards use Pretty Peacock, Mossy Meadow, Night of Navy, and Merry Merlot cardstock and ink as well as Very Vanilla Copper Foil cardstock. All of the coloring on these cards has been done using an aqua-painter with ink from the ink pad. 
Complete Supply List
Picture

This card uses only Pretty Peacock, Copper Foil, and Very Vanilla cardstock. I stamped the bells with Pretty Peacock ink on Pretty Peacock cardstock (5 5/16" x 4 1/16") for the background. To give this background layer some texture, I embossed it with the Subtle 3D embossing folder. 

I cut another piece of Pretty Peacock cardstock with the Stitched Shape dies and mounted it on a piece of Very Vanilla cardstock. To pull your eye up, I added a thin strip of Copper Foil cardstock about one third of the way down the front of the card.

I stamped the bow with Stazon ink. To color it, I tapped my Pretty Peacock ink pad on an acrylic block to transfer a little ink. Then, I used my aqua-painter to pick up the ink from the acrylic block and color the ribbon. 

I cut the bells using the Detailed Bells dies and stamped the sentiment with Pretty Peacock ink. ​

For this second card, I used the Stitched Rectangles dies to cut a frame from the Brightly Gleaming Designer Series Paper. When I assembled the card, I used Stampin' Dimensionals to attach this frame so that it is higher than the background. 

The bells, bow, and sprigs were cut using the Detailed Bells dies. The small stars are punched out from one of the other bells in the die set. The sentiment is stamped in Night of Navy ink on Very Vanilla cardstock. Then I cut it out free hand, trimming closely to the words to get the straight edges in the center and the curliness of "Hoping" and "Joy" on the ends. 
Picture
Picture
The third card uses the same technique as the first card of stamping a background and then embossing it with the Subtle 3D embossing folder. I love the look this gives the background; it almost looks like fabric. I mounted this piece of Mossy Meadow (5" x 3 3/4") on another piece of Mossy Meadow (5 3/16" x 3 15/16") that hadn't been stamped or embossed. This provides a subtle border between the embossed background and the Pretty Peacock card base.

The sentiment is stamped on Very Vanilla and cut with the Stitched Shapes dies. The other images are cut using the Detailed Bells dies.
My fourth card features the largest bell in the Bells are Ringing stamp set. For this bell, the outside of the bell, the inside of the bell, the clapper, and the decorative band in the center are all separate stamps. To create two different coppers for the outside and the inside of the bell, I embossed the outside of the bell and the clapper using copper embossing powder. Then, I stamped the inside of the bell using Copper Delicata ink. I added the decorative centers in Pretty Peacock, Mossy Meadow, Night of Navy, and Merry Merlot ink and added coordinating bows colored with the same inks. 

Picture
I cut the bells using the Detailed Bells dies and attached them to the front of the card overlapping the bells and varying the heights to give interest and a feeling of movement. 
Picture
For the final card, I used the handbell stamp. I stamped it using Stazon ink and then colored with an aqua-painter and inkpads as I did in the other cards using Crushed Curry for the bells. 

The holly leaves in the lower right are cut from the Brightly Gleaming DSP and instead of berries, I used the Copper Star Designer Elements.  A couple of these are used on the top of the card as well. The other swirls and stars are pieces that are "punched out" when cutting the other bells in the Detailed Bells dies. 
0 Comments

Cup of Christmas Take 2

11/27/2019

0 Comments

 
Picture
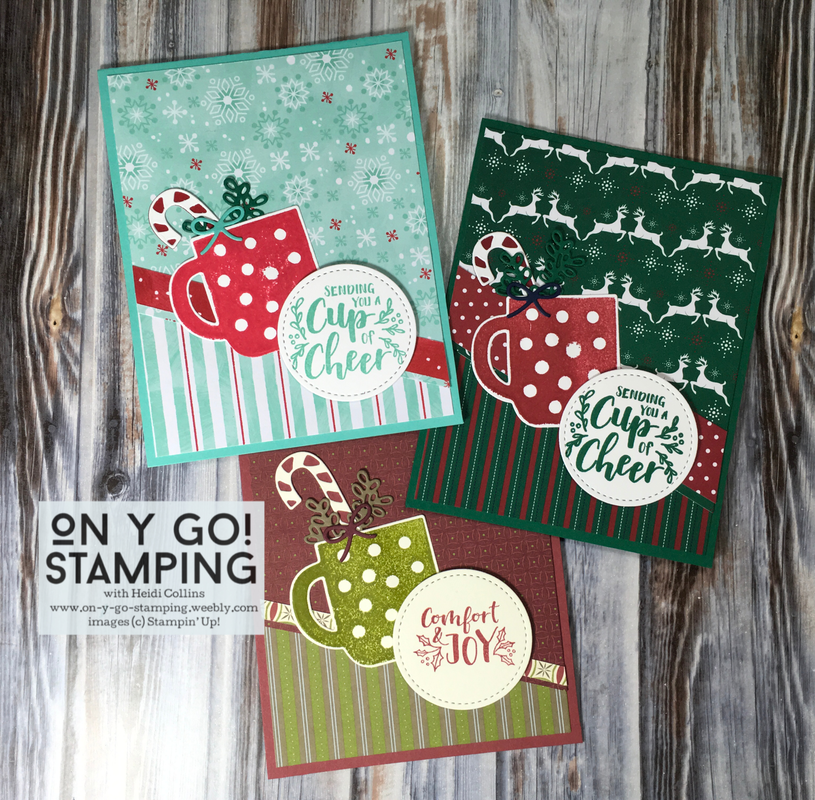
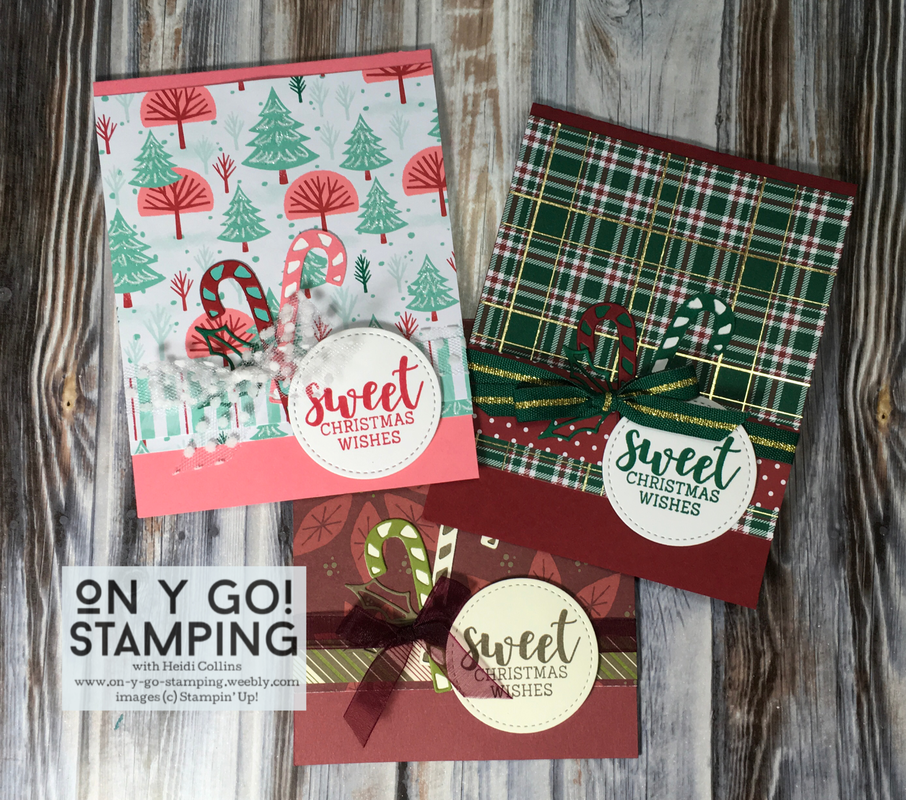
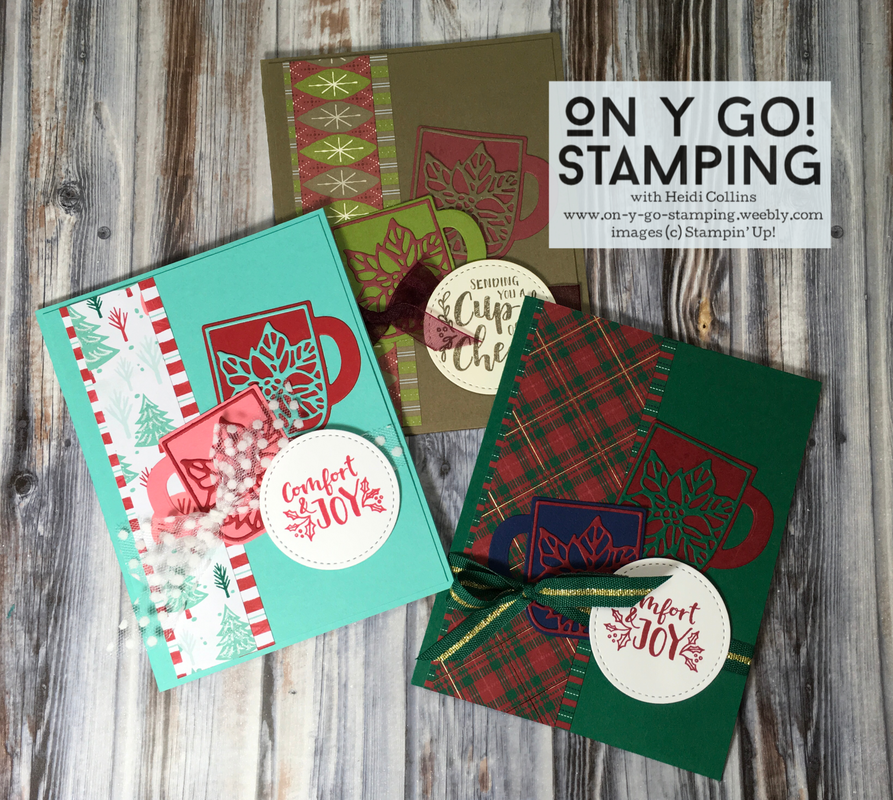
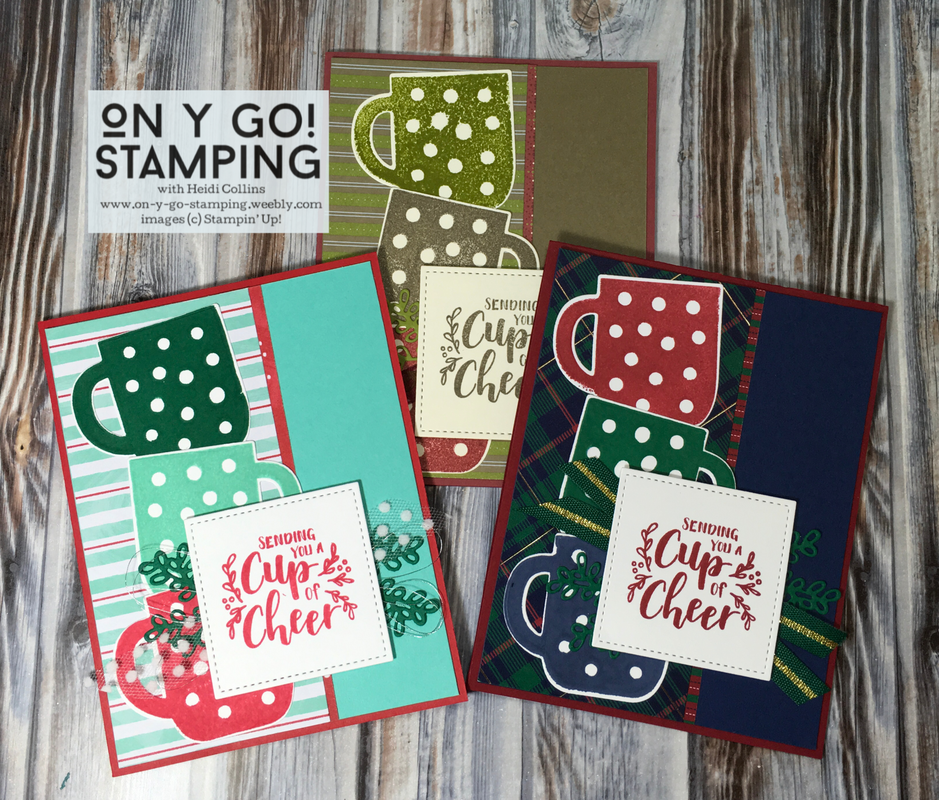
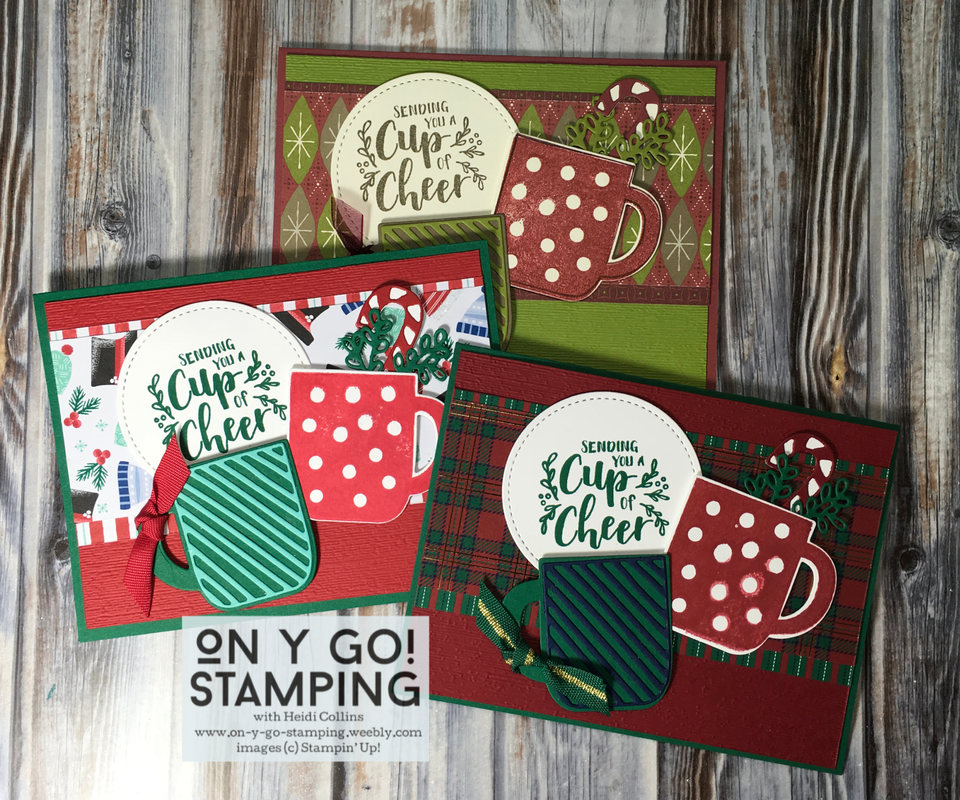
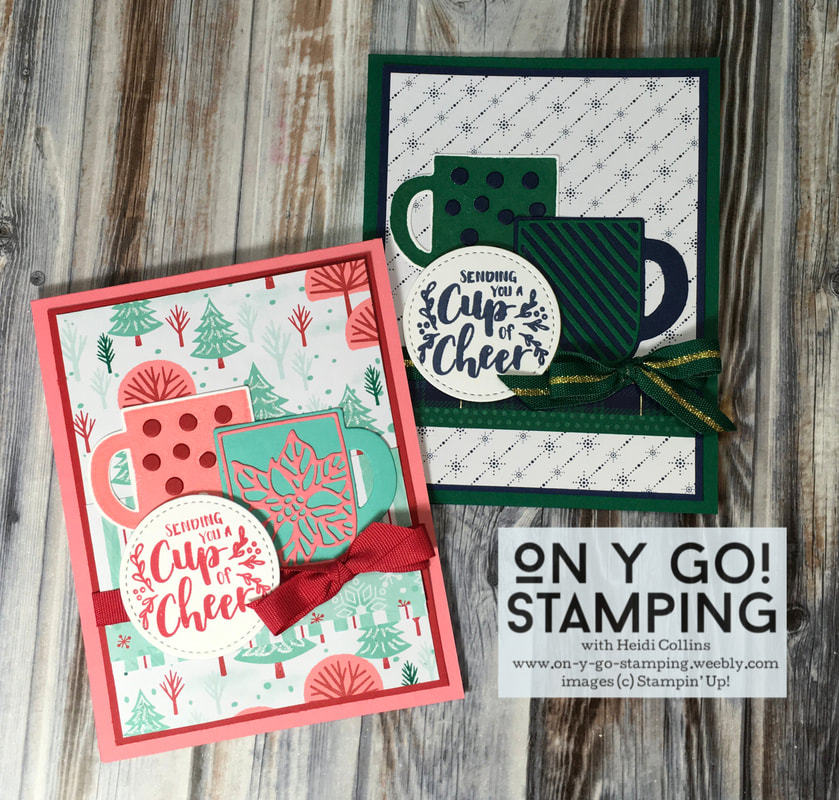
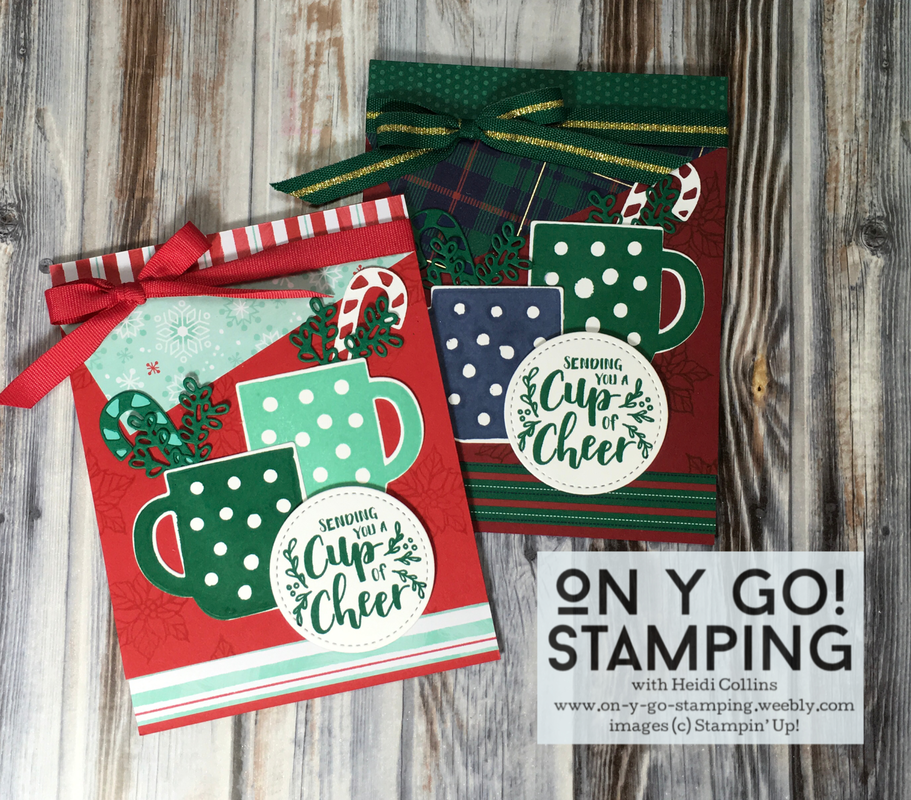
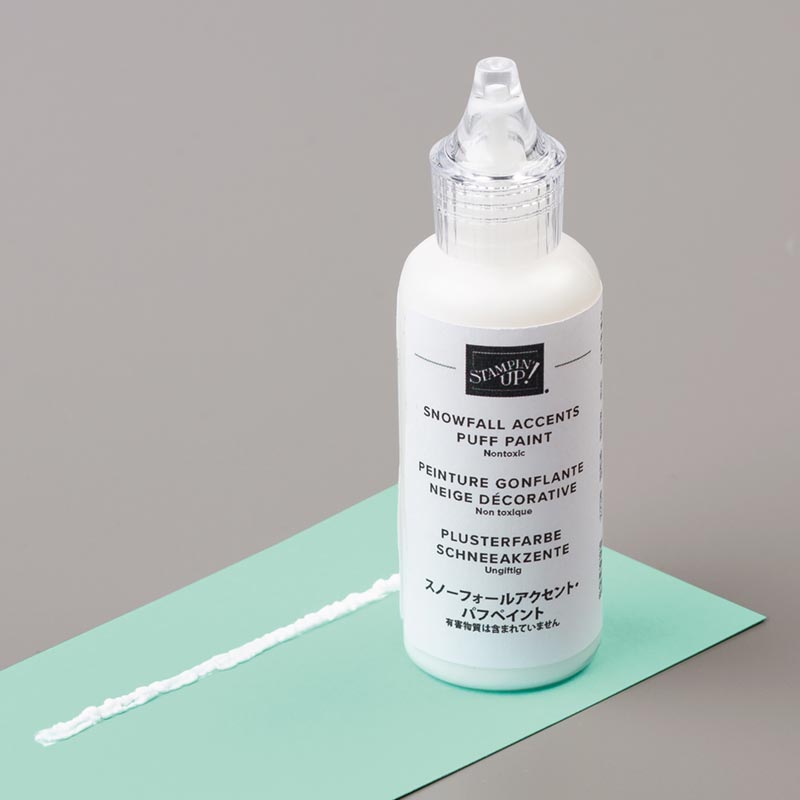
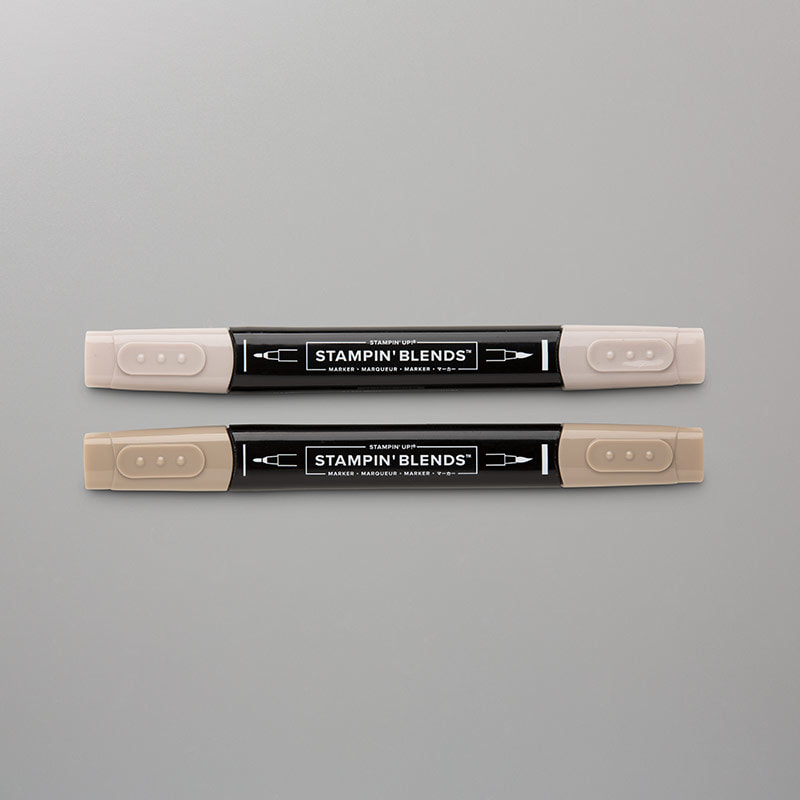
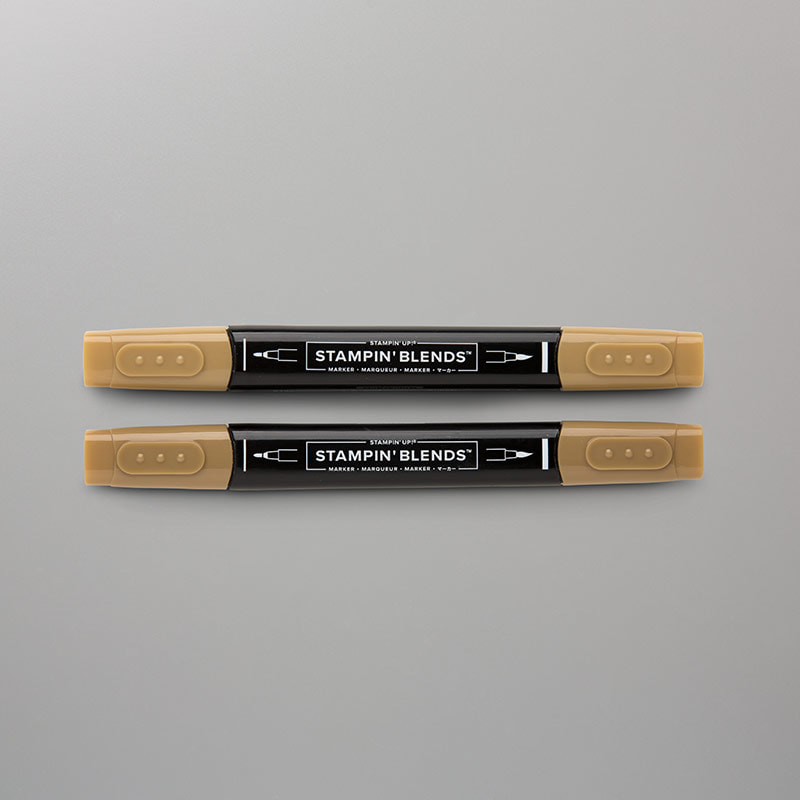
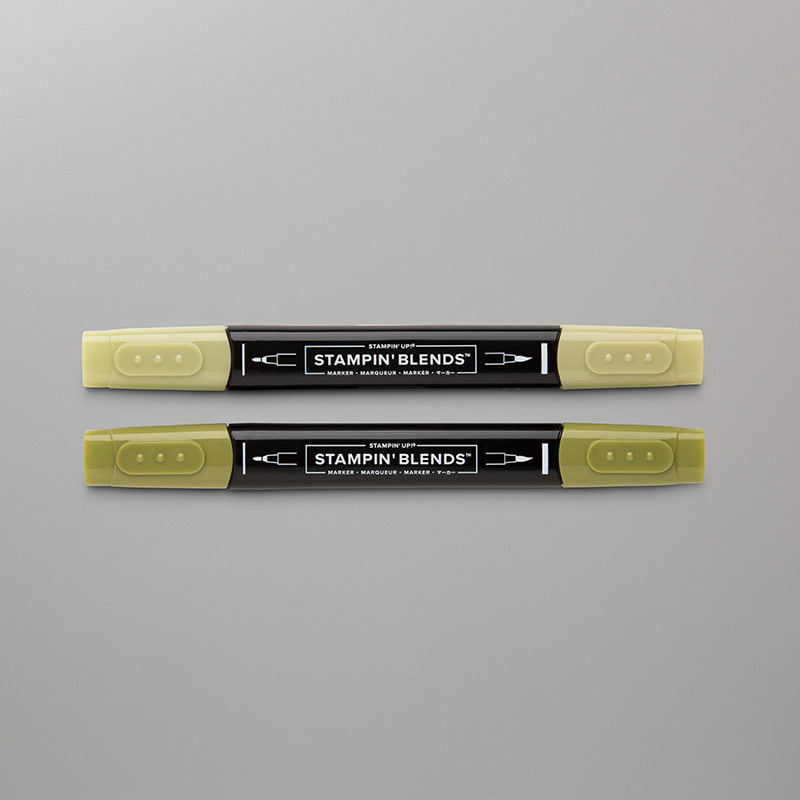
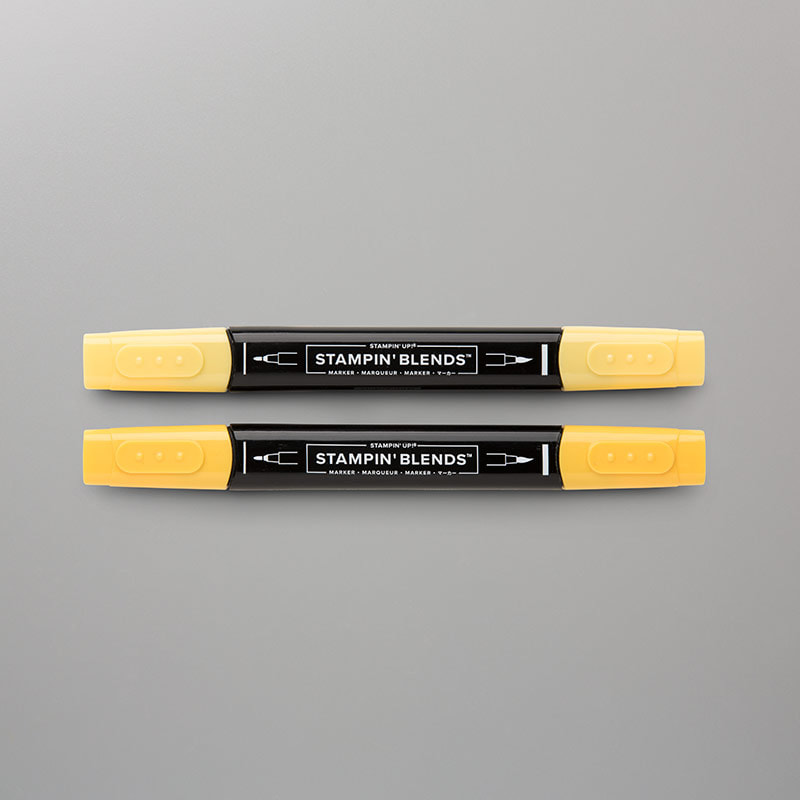
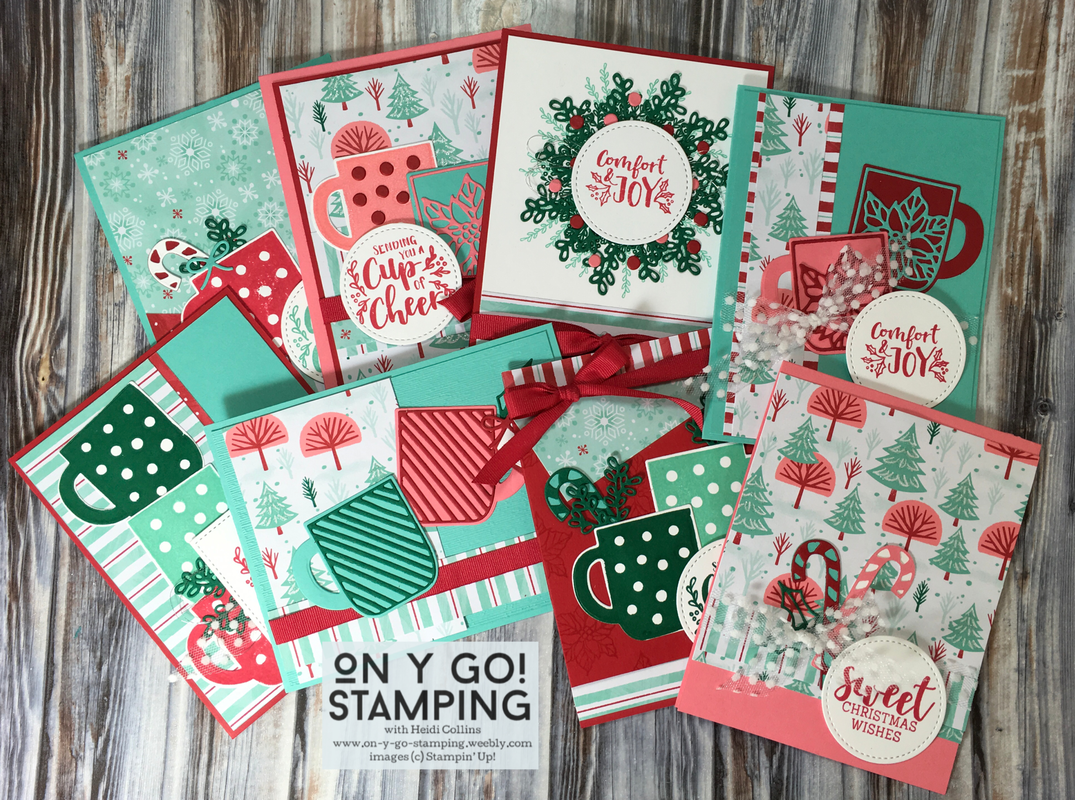
A while back, when the Holiday catalog was still brand new and exciting, I shared with you a bunch of cards using the Cup of Christmas stamp set and retired Christmas paper. This week, I thought I'd make some of the same cards, but this time, I'd use the Let it Snow and Wrapped in Plaid Designer Series Paper from the 2019 Holiday Catalog. So, here are the same cards, but with a completely different look. It's amazing what a change in color and background paper can do!
And a few more with just the Let It Snow and Wrapped in Plaid papers...
0 Comments

My First YouTube Video

11/11/2019

0 Comments

 
Picture
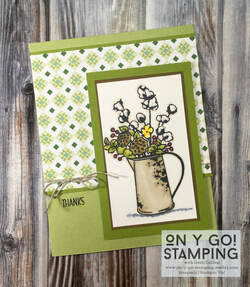
I would like to announce my first ever YouTube video featuring the Country Home stamp set and the Snowfall Accents Puff Paint. I am excited to have another way to share projects and techniques with you in a way where you can actually see what I am doing!


Country Home with Fluffy Cotton YouTube Video

​In this first video, I show you how to apply the Snowfall Accents Puff Paint using a paintbrush for a more even effect. Basically, you pour out a little puddle of paint onto a clear block and then use a paintbrush to scoop some up and dab it onto your project. In order for the puff effect to work, you need to create little puddles of puff paint, so I show you how to apply it with a tapping method to leave a puddle of paint instead of brushing it into the cardstock. Then, heat it with a heat gun and watch it puff up! You can also go back and add a little more paint with your paintbrush if you don't get quite the puff you were hoping for the first time.

I also demonstrate how to create beautiful shading with the Stampin' Blends markers. These markers are so easy to use. Begin by coloring the image with the lighter marker. Then, color the shaded areas with the darker marker. Finally, go back over the whole image with the lighter marker to blend the colors together. You can keep going over the image until you have the desired darkness and effect. 

You'll want to check out the video to see the puff paint and blends in action! I'd love to hear what you think about my first foray into the world of instructional videos; please leave a comment or suggestion below. As always, On Y Go! Let's get stamping!
​

Cardstock Dimensions

Pear Pizzaz Cardstock: 4 1/4" x 11", scored at 5 1/2"
Whisper White Cardstock: 2 1/2" x 3 3/4"
Soft Suede Cardstock: 2 5/8" x 3 7/8"
Old Olive Cardstock: 3" x 4 1/4"
Old Olive Cardstock: 4 1/4" x 3 3/16"
Garden Lane DSP: 4 1/4" x 3"
​

Supplies

Purchase the Supplies
Country Home 147678
Snowfall Accents Puff Paint 150691
Pear Pizzaz Cardstock 131201
Old Olive CS 100702
Soft Suede Cardstock 115318
Whisper White Cardstock 100730
Garden Lane Designer Series Paper 149488
Tuxedo Black Memento Ink 132708
Crumb Cake Blends 144601
Soft Suede Blends 147273
Old Olive Blends 144597
Daffodil Delight Blends 144603
Cherry Cobbler Light Blend 144576
Blends Color Lifter 144608
Linen Thread 104199
0 Comments
<<Previous
    Heidi Collins, Independent Stampin' Up! Demonstrator with On Y Go! Stamping
    Get updates and ideas on my Facebook group
    Heidi Collins, Independent Stampin' Up! Demonstrator and Owner of On Y Go! Stamping
    Online card class featuring the Let's Set Sail stamp set and punch from Stampin' Up!
    Get a 6 x 6 sample of all of the new patterned papers from the 2022-2023 Annual Catalog. Plus, a free invitation to a Sneak Peek Virtual Pajama Party to see card making demonstrations using all new products.
    Shop for Stampin' Up! stamps, inks, paper, tools, and embellishments with Heidi Collins and earn points towards FREE stamps!
    On Y Go! Stamping YouTube channel with Card Making Videos on how to do rubber stamping, card making, scrapbooking, and paper crafting

    Archives

    May 2022
    April 2022
    March 2022
    February 2022
    January 2022
    December 2021
    November 2021
    October 2021
    September 2021
    August 2021
    July 2021
    June 2021
    May 2021
    April 2021
    March 2021
    February 2021
    January 2021
    December 2020
    November 2020
    October 2020
    September 2020
    August 2020
    July 2020
    June 2020
    May 2020
    April 2020
    March 2020
    February 2020
    January 2020
    December 2019
    November 2019
    October 2019
    September 2019
    August 2019
    July 2019
    June 2019

Powered by Create your own unique website with customizable templates.
  • Home
  • About
  • Contact
  • Shopping Rewards
  • Shop
  • Join Stampin' Up!
  • Stampin' Up! Catalogs
  • Online Card Classes
  • Ideas & Inspiration
  • Tutorial Store