• About
  • Online Card Classes
  • Card Making Ideas
  • Stampin' Up! Catalogs
  • Card Tutorials
  • Contact
  • Shopping Rewards
  • Shop
  • Join Stampin' Up!
ON Y GO! STAMPING
  • About
  • Online Card Classes
  • Card Making Ideas
  • Stampin' Up! Catalogs
  • Card Tutorials
  • Contact
  • Shopping Rewards
  • Shop
  • Join Stampin' Up!

A PeacefUl Silhouette of a Lily Filled Pond

2/28/2020

0 Comments

 
Picture
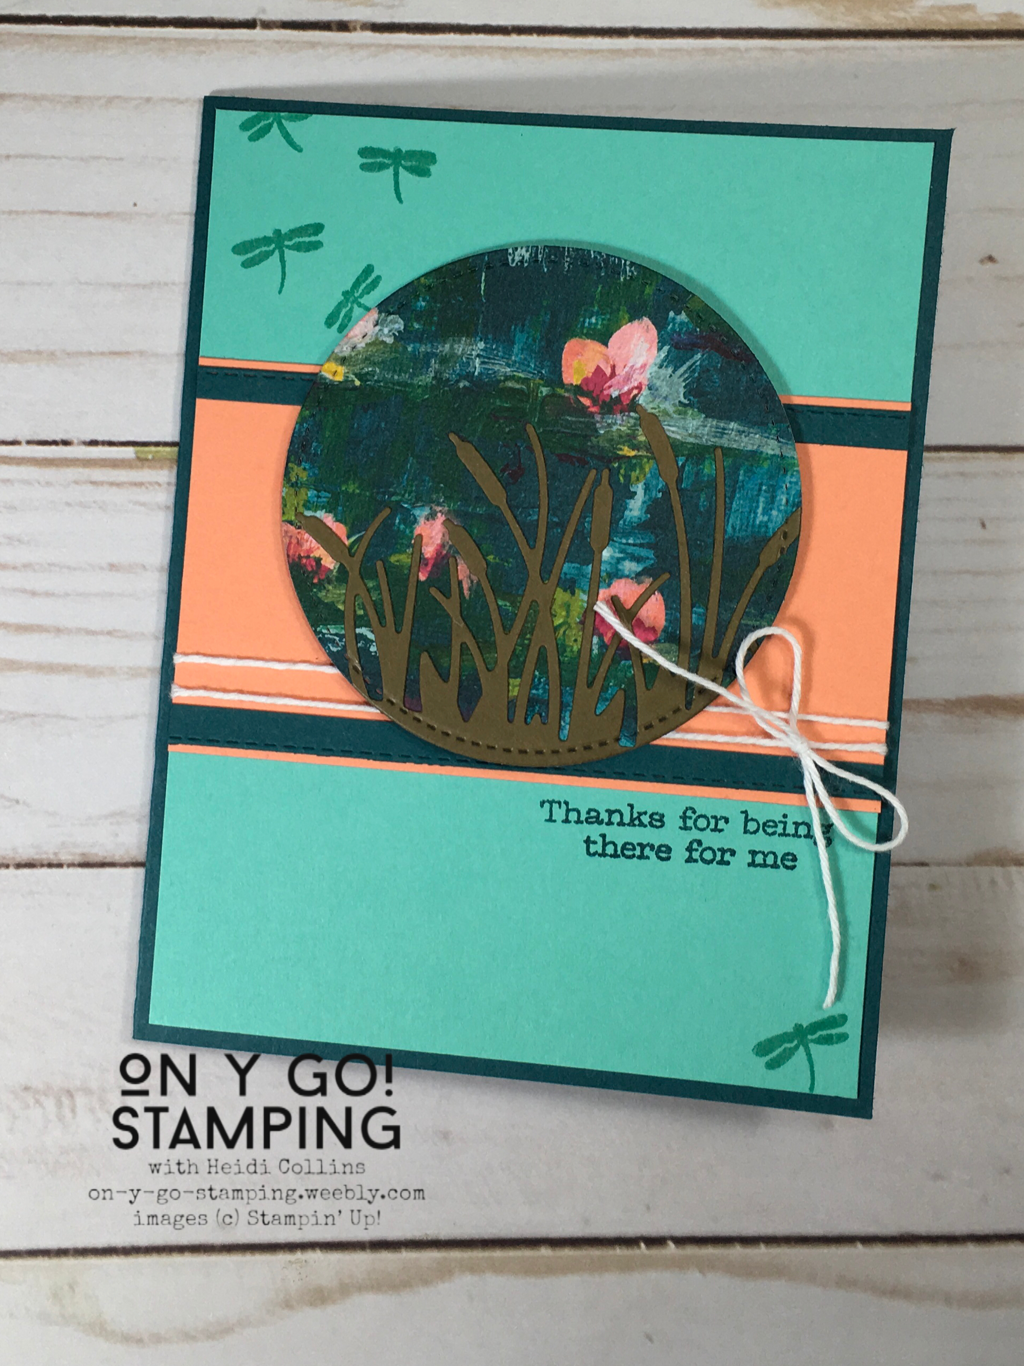
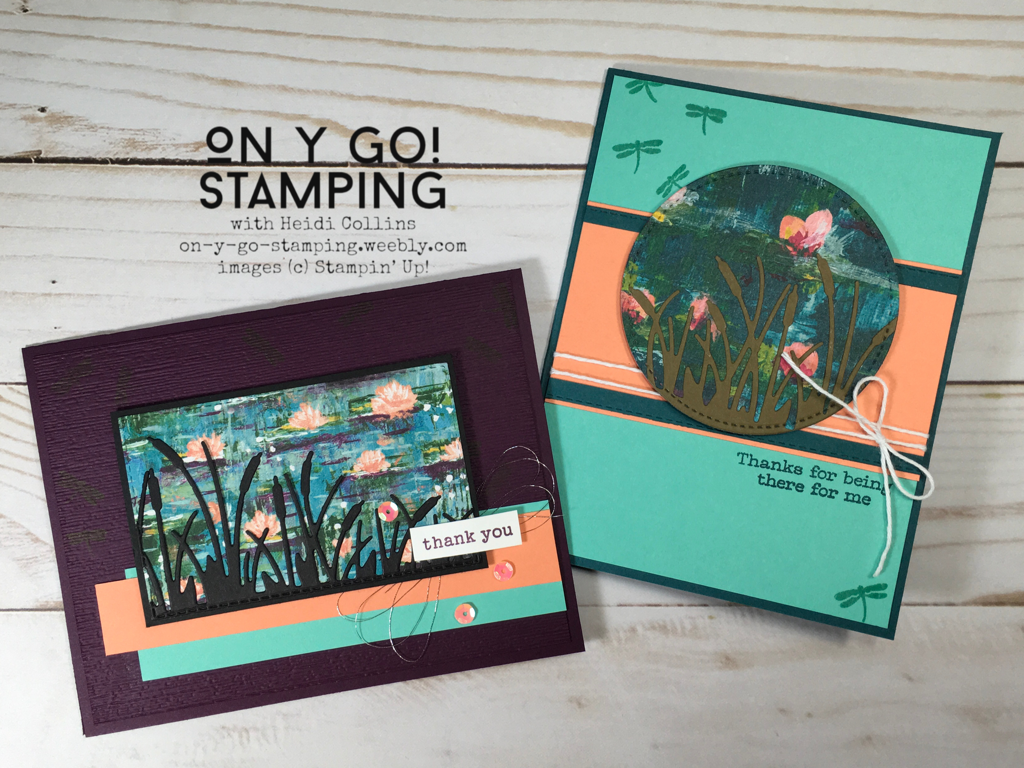
I love Monet's waterlilies and their invocation of a peaceful day quietly sitting by the pond. The Lily Impressions Designer Series Paper, available FREE with a $50 order, mimics these famous paintings and creates a beautiful backdrop for the cattails from the Friendly Silhouettes dies. 
Picture
Thank You with Sparkle:
This first card features the cattails cut from Basic Black cardstock and a few touches of bling with sequins and metallic thread. 

Cardstock:
  • Blackberry Bliss: 8 1/2" x 5 1/2" folded in half, 5 1/4" x 4"
  • Basic Black: 3 3/4" x 2 3/8", scrap
  • Grapefruit Grove: 3/4" x 5"
  • Coastal Cabana: 1 1/4" x 4 5/8"
  • Whisper White: 1 1/4" x 3/8"
  • Lily Impressions DSP: cut with 2 1/4" x 3 1/2" stitched rectangle die
Ink: Blackberry Bliss
Accessories:
  • Friendly Silhouettes dies
  • Stitched Rectangle dies
  • Subtle 3D embossing folder
  • Silver metallic thread
  • Gingham Gala Adhesive-Backed Sequins
  • Stampin' Dimensionals
  • Check You Out stamp set
  • Friend Like You stamp set
Notes:
  • I cut the cattail silhouette from Basic Black cardstock using the Friendly Silhouettes dies first. Then, I adhered it to a piece of Lily Impressions DSP before cutting the rectangle using the Stitched Rectangle dies. I used Stampin' Dimensionals to attach this piece to the card front.
  • I used the Subtle 3D embossing folder on the 5 1/4" x 4" piece of Blackberry Bliss cardstock.
Thanks for Being There:
This card also features the cattails from the Friendly Silhouettes dies, but this time they are cut from Soft Suede cardstock. 
Cardstock:
  • Pretty Peacock: 8 1/2" x 5 1/2" folded in half, 2 pieces 1/4" x 4 1/16"
  • Coastal Cabana: 5 5/16" x 4 1/16"
  • Grapefruit grove: 2 1/4" x 4 1/16"
  • Soft Suede: scraps
  • Lily Impressions DSP, cut with the 3" diameter circle from the Stitched Shapes dies
Inks:
  • Coastal Cabana
  • Pretty Peacock
Picture
Accessories:
  • Friendly Silhouette dies
  • Stitched Shapes dies
  • Stitched Rectangle dies
  • Stampin' Dimensionals
  • Whisper White Baker's Twine
  • Friend Like You stamp set
Notes:
  • Again, I cut the cattails from Soft Suede cardstock first, adhered it to a piece of Lily Impressions DSP, and then cut it with a circle from the Stitched Shapes dies. The circle is attached to the card front with Stampin' Dimensionals.
  • I cut the edges of the skinny strips of Pretty Peacock cardstock with the edge of one of the large rectangles from the Stitched Rectangle dies so that there is "stitching" along one edge.
  • The dragonflies are stamped with Coastal Cabana ink while the greeting is stamped with Pretty Peacock ink.
0 Comments

Witty-Cisms Virtual Stamp Class

2/26/2020

0 Comments

 
Picture
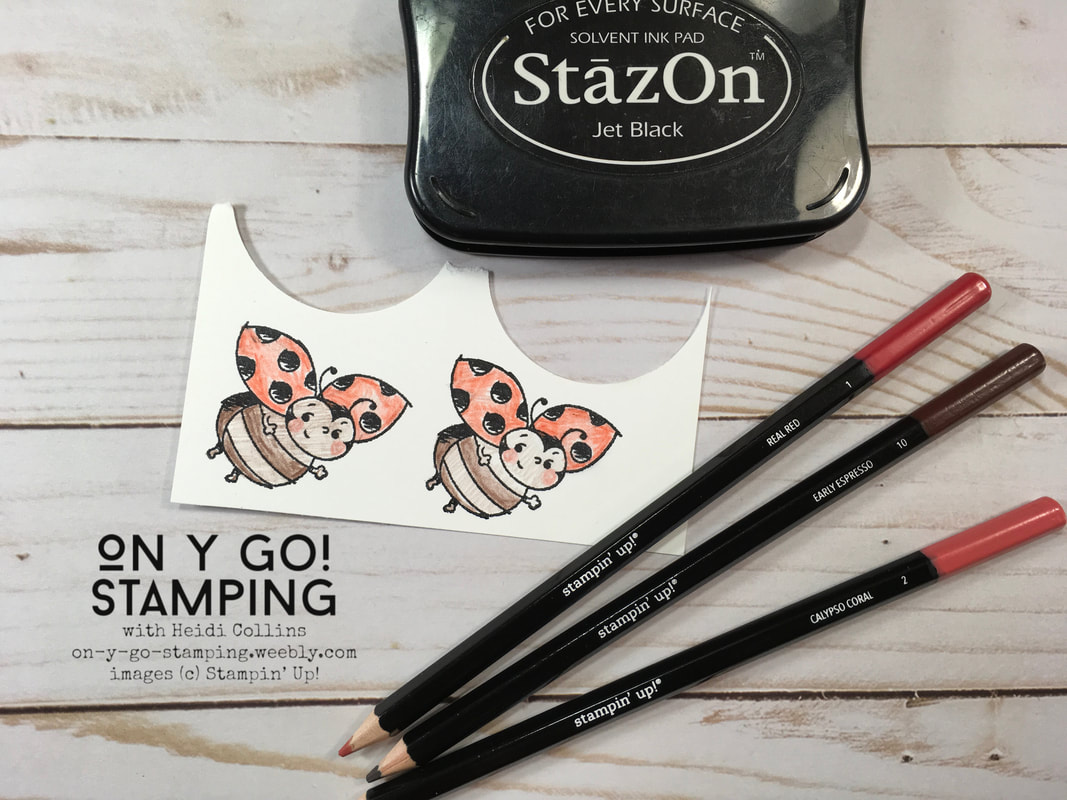
Are you new to stamping? My next virtual class is the perfect opportunity for you to plunge into the world of stamps, ink, and paper! March 11, 2020, I will be demonstrating 3 cards and 1 mystery project featuring the Witty-Cisms stamp set. If you're a seasoned stamper, don't worry - these cards and project are perfect for you too! I'm sharing photos of the cards with you today, but because I'll be demonstrating everything on the 11th, there are no instructions in today's blog post. 

You can stamp along with me on March 11 - all you need to do is place an order of at least $40 (before S&H and tax) that includes the Witty-Cisms stamp set before Saturday, February 29, and I will send you a complete Make-N-Take kit. There are only a couple of other supplies you will need for this class including the watercolor pencils assortment #1, a Jet Black Stazon ink pad, adhesive, and a clear block or two. That's it! I will send you all the cardstock and accessories already pre-cut and ready to go. Click the button below to order all the supplies or just the ones you need. And don't forget, every $50 includes a FREE Sale-A-Bration item of your choice!
Order Witty-Cisms and Supplies
Picture
Picture
Picture
Picture
0 Comments

Coloring Basics with Little Ladybug

2/24/2020

4 Comments

 
Picture
Aren't these little ladybugs adorable? You can get them FREE right now through Sale-A-Bration when you host a workshop - virtual or live - totally at least $300. 

Did you know that in the US, you can get stamp sets in French as well as English? While these are primarily for the Canadian market, they will ship to addresses in the US as well. I have a number of French friends, so I love having a few stamp sets in French.

For these samples, I used three different methods of coloring the ladybugs to show you their differences: Stampin' Blends, watercolor pencils, and Aqua Painters with ink from a stamp pad. Each method gives a little bit different look to the ladybug. 
Order Supplies

Picture
Ladybug Flying:
This first card was inspired by a Fab Friday Challenge. I used the vine cut using the Well Written dies instead of the second strip across the front. 
Picture
Picture
Picture
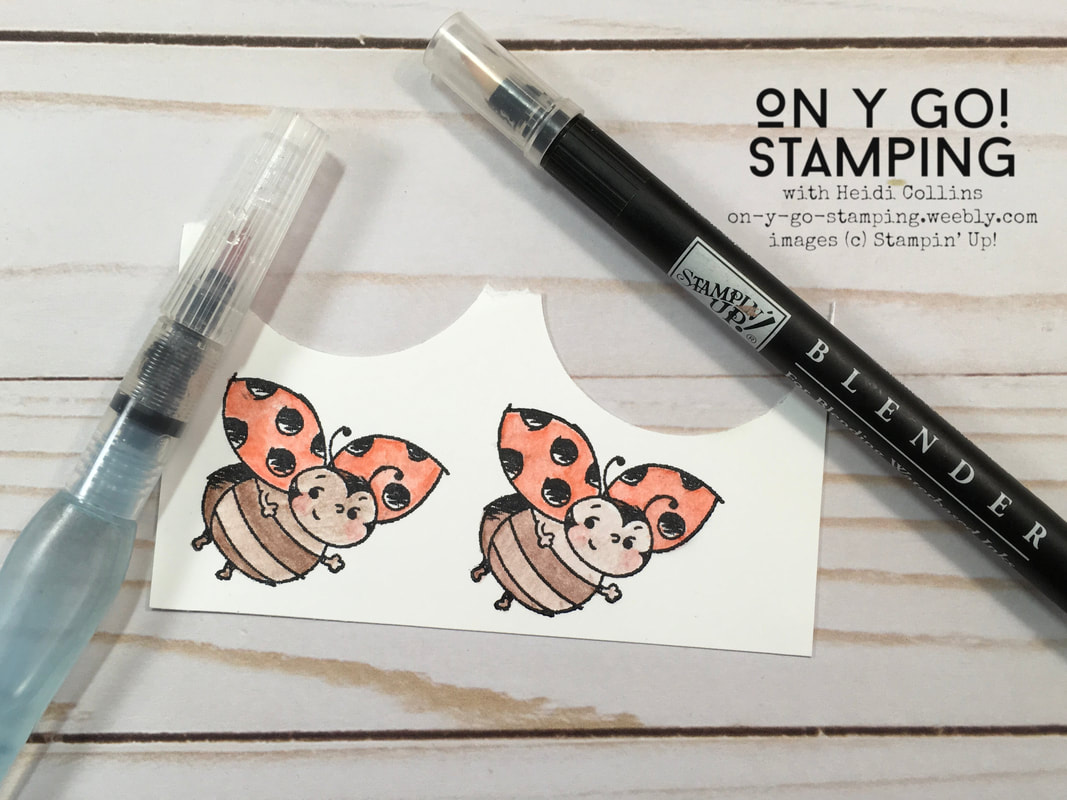
I colored the ladybug with watercolor pencils. These colored pencils are fabulous because when they get wet, the color softens and looks more like watercolor paint than colored pencil. After coloring, you can use either an Aqua Painter or a Blender Pen to turn it into a watercolor. When doing any type of watercolor, it is important to use a permanent ink like the Jet Black Stazon. As you can see, I colored two different ladybugs. Then, I colored over the one on the left with an Aqua Painter and the one on the right with a Blender Pen. As you can see, they give similar results. 

With the Aqua Painter, you want to make sure that the tip isn't too wet. If it is very wet, the color may run too much. The Aqua Painter is also at a higher price point, but will last for a very long time as you can refill it with water.

The Blender Pen cost less and comes in a pack of three. However, they are not refillable and will eventually dry out. When the pen becomes a little too dry, the pencil lines will not fade away as much and the colors won't blend. 
​
Cardstock:
  • Poppy Parade: 8 1/2" x 5 1/2" folded in half, 5 5/16" x 4 1/16"
  • Granny Apple Green: scraps cut with a circle from the Stitched Shapes and Well Written dies
  • Poppy Parade DSP: 3 3/4" x 3/4"
  • Whisper White: scraps
Ink: ​​Jet Black Stazon
Accessories:
  • Well Written dies
  • Stitched Shape dies
  • Basic Rhinestones
  • Retired Polka Dot embossing folder
  • Watercolor pencils assortment 1 & 2
  • Blender Pens or Aqua Painter
  • Stampin' Dimensionals

Picture
Ladybug of Happiness:
I also water-colored the images on this card, but I used an Aqua Painter dipped in ink from an ink pad to do so.

First, I heat embossed the images using black embossing powder. You could also stamped the images using Jet Black Stazon ink. Then, I pressed a clear block against an ink pad so that there would be ink on the clear block. I swirled the tip of an Aqua Painter in the ink and then colored my images. When the color lightens, pick up more ink from the clear block. By coloring around the edges when you first pick up ink and then coloring towards the centers as the ink lessens, you can create highlights on your images.
Cardstock:
  • Poppy Parade: 8 1/2" x 5 1/2" folded in half, 5 3/16" x 3 15/16"
  • Whisper White: 5" x 3 3/4", 1/2" x 3 1/2", scraps
  • Daffodil Delight DSP: two strips 3" x 1/2"
  • Poppy Parade DSP: 3/4" x 1 1/2"
Inks:
  • Versamark
  • Poppy Parade
  • Daffodil Delight
  • Granny Apple Green
  • Balmy Blue
  • Early Espresso
  • Crumb Cake
Accessories:
  • Black embossing powder
  • Whisper White Baker's Twine
  • Stampin' Dimensionals

Ladybug Luck:
Ladybugs are often considered lucky, and this one is even luckier because she's carrying a 4-leaf clover to say "Bonne chance!" or "Good Luck!"

For this ladybug, I used Stampin' Blends to color the image. These are alcohol markers and are fabulous for blending colors. You can get each color in a light or dark version. The two work wonderfully together to create shadows and highlights. Because Stampin' Blends are alcohol markers, you need to stamp the image with a permanent water-based ink like the Tuxedo Black Memento.
​
Picture
Cardstock:
  • Granny Apple Green: 8 1/2" x 5 1/2" folded in half
  • Poppy Parade: 
  • Poppy Parade DSP:
  • Granny Apple Green DSP: 
  • Whisper White:
​Ink: Tuxedo Black Memento
Stampin' Blends:
  • Poppy Parade light and dark
  • Crumb Cake light and dark
  • Soft Suede light and dark
  • Daffodil Delight light and dark
  • Granny Apple Green light and dark
  • Petal Pink dark
  • Color lifter
Accessories:
  • Red cotton ribbon
  • White Polka Dot Tulle ribbon
  • 2" Circle Punch
4 Comments

So Very Vellum

2/21/2020

0 Comments

 
Picture
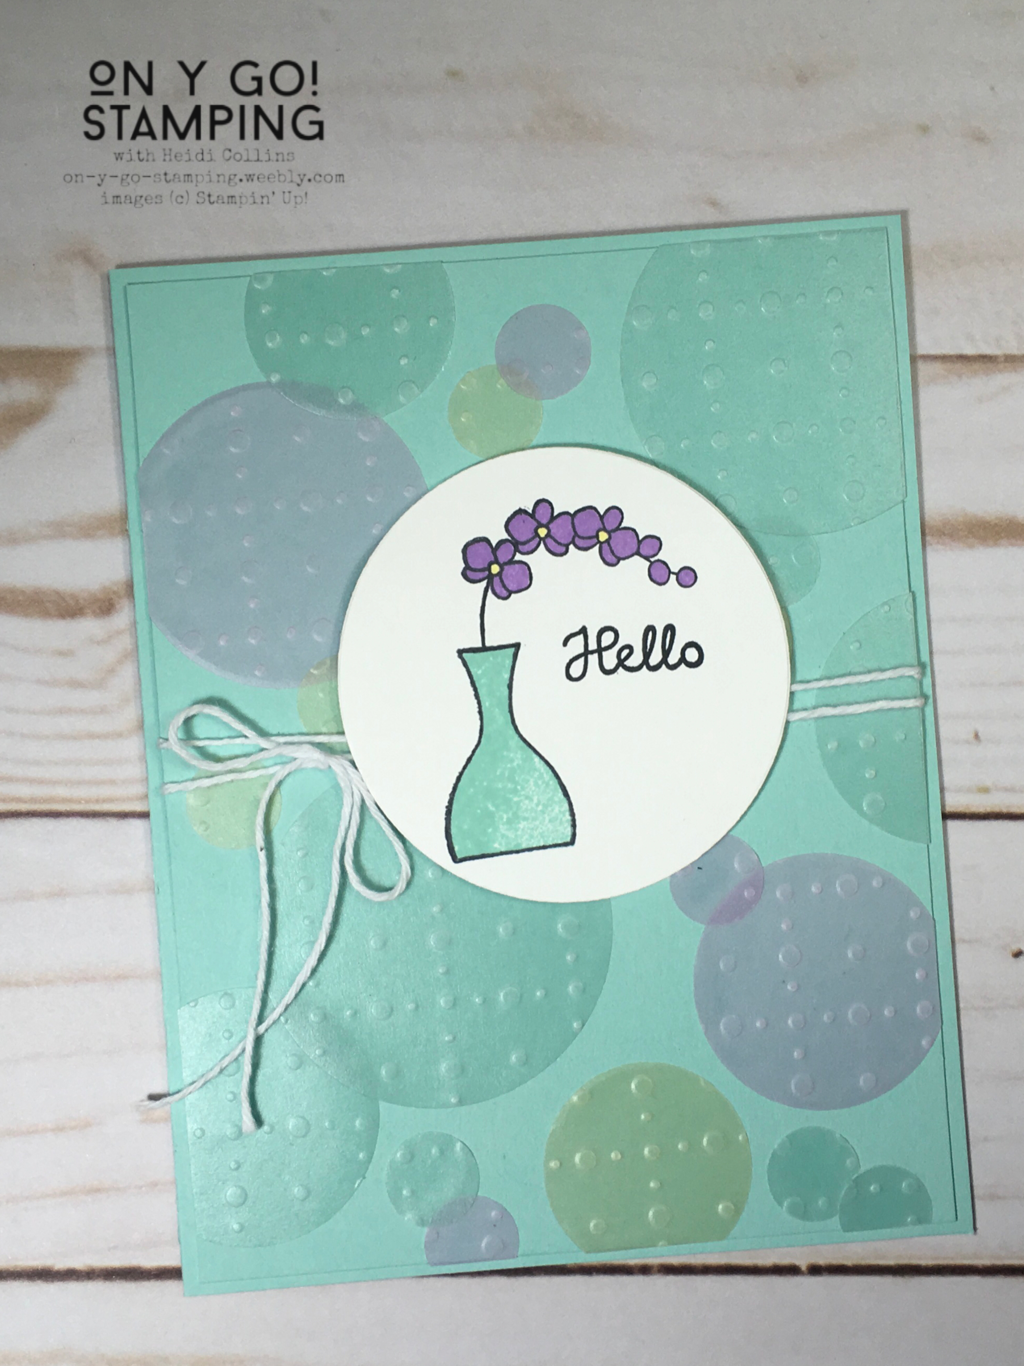
New Sale-A-Bration items are coming in March! Stampin’ Up! is releasing a second batch of brand-new limited-edition FREEbies will be here soon, including the So Very Vellum pack. There are three different colors, Pool Party, Soft Sea Foam, and Purple Posy, and each one features this cool dot pattern that feels both delicate and industrial mixed in with a little pop. I pushed the design in each of these directions for these cards featuring the So Very Vellum.

Picture
A Circle of Pops:
The dots on the vellum seem almost like 1950s Pop Art. I tried to use this feel to make a card with clean lines. I cut the three colors of vellum into various sized circles using the Layering Circles dies and a 1/2" circle punch. I adhered the circles to a piece of Pool Party cardstock by sponging a thin layer of liquid adhesive on the back of each circle. Vellum is translucent and will show where it is glued to cardstock, so it is important that the glue is applied evenly to the entire circle. This way, the vellum circles have a uniform appearance.


I combined this with a simple image from the Varied Vases stamp set stamped with Pool Party and Highland Heather ink with the outline stamped in Jet Black Memento. I added the centers to the flowers with the Light Daffodil Delight Stampin' Blend and tied a piece of Baker's Twine around the front. The card front is attached to a Pool Party card base. ​

Elegant Floral Dots:
For the second card, I wanted to create something soft and delicate like the vellum itself. I chose soft colors with lots of layers.

I started by sponging Soft Sea Foam ink onto Soft Sea Foam cardstock using a dotted Basic Pattern Mask. I didn't cover the whole card front but let the dots fade away on the outsides. 
Picture

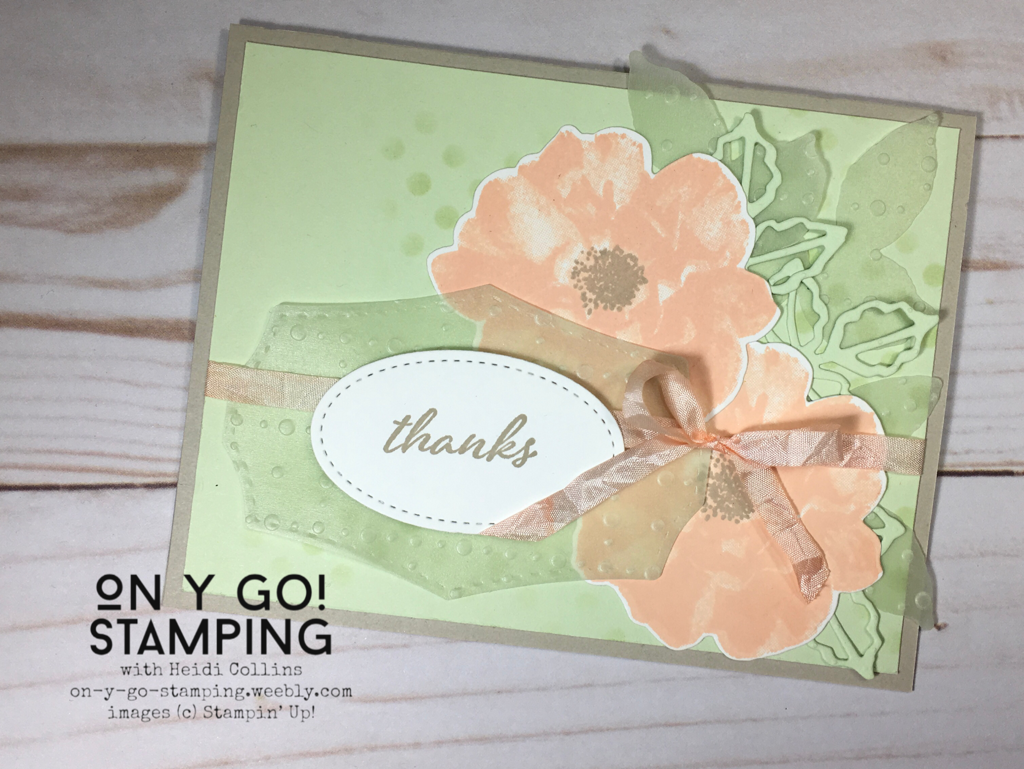
I stamped the roses from the To A Wild Rose stamp set in Petal Pink ink on Whisper White cardstock. I added the centers with Crumb Cake ink. I cut these out with the Wild Rose dies. I also cut leaves from the Soft Sea Foam So Very Vellum as well as other leaves from Soft Sea Foam cardstock. I layered these on the card front. 

I cut a tag from the Soft Sea Foam So Very Vellum using the Wild Rose dies. I adhered this to the card front by putting liquid adhesive where the greeting would be added. This way, the sides of the vellum are loose and you can't see where it is attached. I tied the card front with a piece of White Seam Binding that I colored using a Light Petal Pink Stampin' Blend. Then, I added an oval cut with the Stitched Shape dies and stamped with "thanks" from the Here's a Card Stamp Set. Finally, I adhered the card front to card base using Crumb Cake cardstock.

Picture
Paris Industrial at Dusk:
The pattern on the So Very Vellum reminds me of steel plate. Because of this, I wanted the last card to have an industrial feel to it. What's more industrial and beautiful than the Eiffel Tower? 

I sponged a piece of Whisper White cardstock with Daffodil Delight, Melon Mambo, and Highland Heather using sponge daubers. I overlapped the colors and let them run into each other. I attached the Whisper White cardstock to a piece of Basic Black cardstock and then added a piece of the Purple Posy So Very Vellum by punching holes in the corners and inserting miniature brads. 
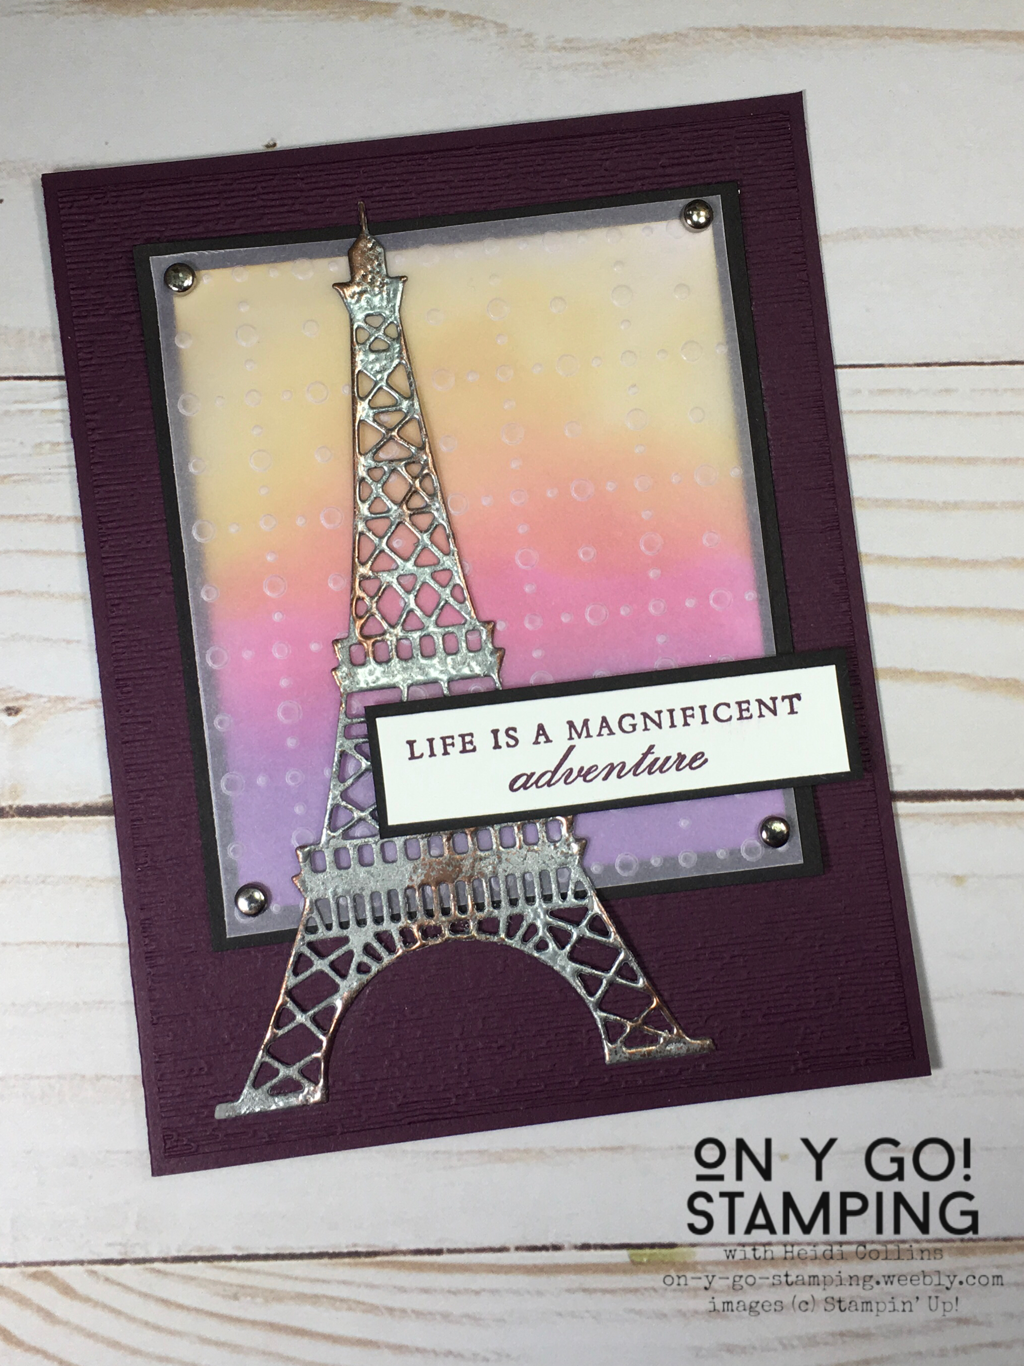
For the Eiffel Tower itself, I used the Parisian Dies from the January-June 2020 Mini Catalog. I cut the tower from Gray Granite cardstock then I heat embossed it by sponging the front with Versmark ink and covering it with silver embossing powder. To age the Eiffel Tower, while the silver embossing powder was still hot, I sprinkled on Copper embossing powder and heated it again.

To a Blackberry Bliss card base I added a Blackberry Bliss card front that I had run through my Big Shot with the Subtle 3D embossing folder. I added the sunset to the front of that and then the Eiffel Tower.

The sentiment is from the Parisian Beauty stamp set. I stamped it in Blackberry Bliss ink on Whisper White cardstock and layered it on Basic Black cardstock. I attached it to the card front using Stampin' Dimensionals.

I can't wait for these products to become available for FREE in March! Check back here on March 3 for more details.
0 Comments

My Favorite Things

2/20/2020

17 Comments

 
Picture
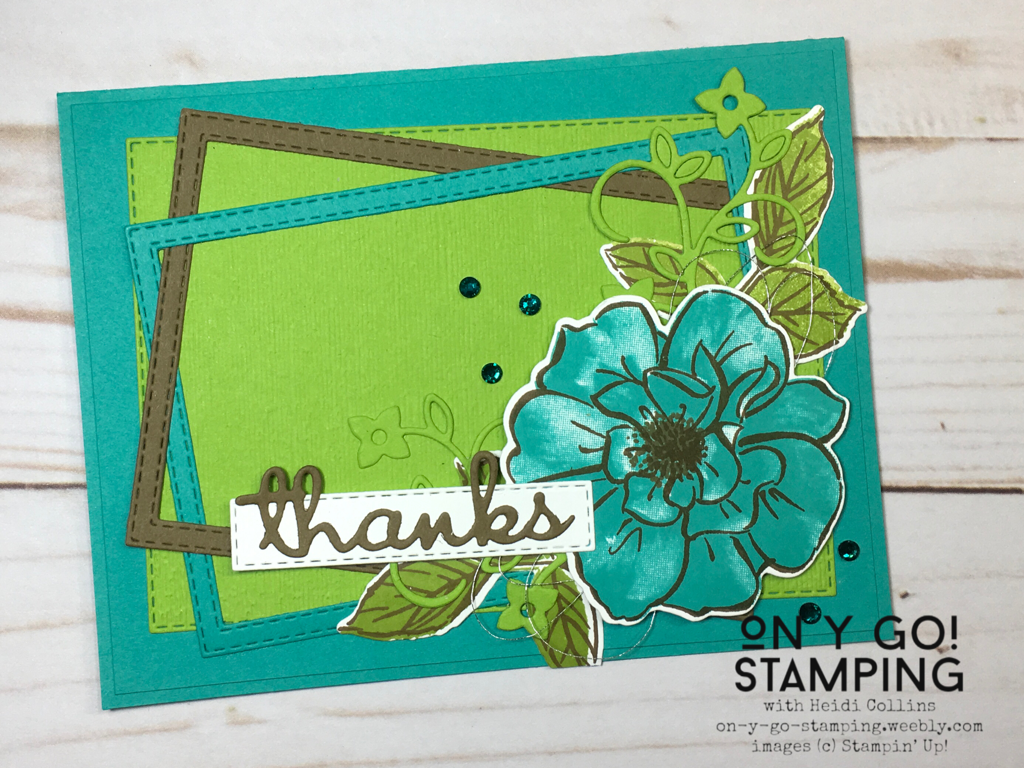
This month's Stampin' Friends blog hop is all about our favorites. If you're following the hop, you've joined me from Cheryl Taylor. I hope after you've read through my blog that you'll continue through the whole hop. You'll find a list at the bottom of this post with links to all the blogs.

I have soooo many favorites that it's hard to choose just one or two. Here are some of my favorite design elements and accessories that I included in these projects:
  1. Layers - I love layers! Layers and layers and more layers. I love depth. These cards have lots of layers.
  2. Texture - my cards are all about texture and layers. I love embossing folders, particularly the Subtle 3D embossing folder. I seem to use it on so many things and when a card needs a little something, it's usually the Subtle 3D embossing folder.
  3. Bold colors - While pastels and earthy tones can be nice too, there's nothing quite as awesome as bold colors! I love this adjacent color scheme of Granny Apple Green and Bermuda Bay. The colors just pop!
  4. Bling - I love a little bit of bling, not too much, just a little sparkle. That's why I love the metallic thread. It's so fine that it adds just a hint of shimmer. And who can resist some rhinestones? Not too many, just a few to jazz things up a bit. 
  5. Dies - I particularly love the Stitched Rectangle dies. The Well Written dies are a close second. I love being able to add a die-cut word to my projects. 
​Many of my cards incorporate these basics, and they are the first things I turned to when I start a card. It was so much fun to be able to combine so many of my favorite things for this blog hop. I hope you'll click through the whole hop to see everyone's favorite things! The next artist is Barbara Welch. You can see the complete list after the descriptions of the cards. 
Thank You
It's a little hard to see in the photo, but the vine on this card is cut from the Bermuda Blue cardstock with the Granny Apple Green cardstock showing through. The Bermuda Blue front piece is raised up using Stampin' Dimensionals so that there is depth between the blue and the green. The Gorgeous Grape flowers are then added on top. Finally, rhinestones were added to the flower centers for a little bling.

Cardstock:
  • Bermuda Bay: 8 1/2 x 5 1/2 folded in half, other pieces cut with dies
  • Granny Apple Green: Cut with dies
  • Gorgeous Grape: scraps for flowers
Picture
Ink: Gorgeous Grape
Stamps: Check You Out
Dies:
  • Stitched Rectangle
  • Well Written
Embossing Folder​: Subtle 3D

Picture
Thanks
For this card, I created frames using the Stitched Rectangle dies. Two frames are layered on another full rectangle. This card also uses one of my favorite little tricks which is to have a layer of cardstock in the same color as the base cut only 3/16" smaller than the card base (5 5/16" x 4 1/16"). On top of the frames I layered a die cut of the same vine that I used in the first card as well as leaves, silver thread, and a large rose. 
​
Cardstock:
  • Bermuda Bay
  • Granny Apple Green
  • Soft Suede
  • Whisper White
Inks:
  • Bermuda Bay
  • Granny Apple Green
  • Soft Suede​
Stamps: To a Wild Rose
​Dies
:
  • Stitched Rectangle
  • Wild Rose
  • Well Written
Accessories:
  • Silver Thread
  • Noble Peacock Rhinestones
​
Picture
Picture
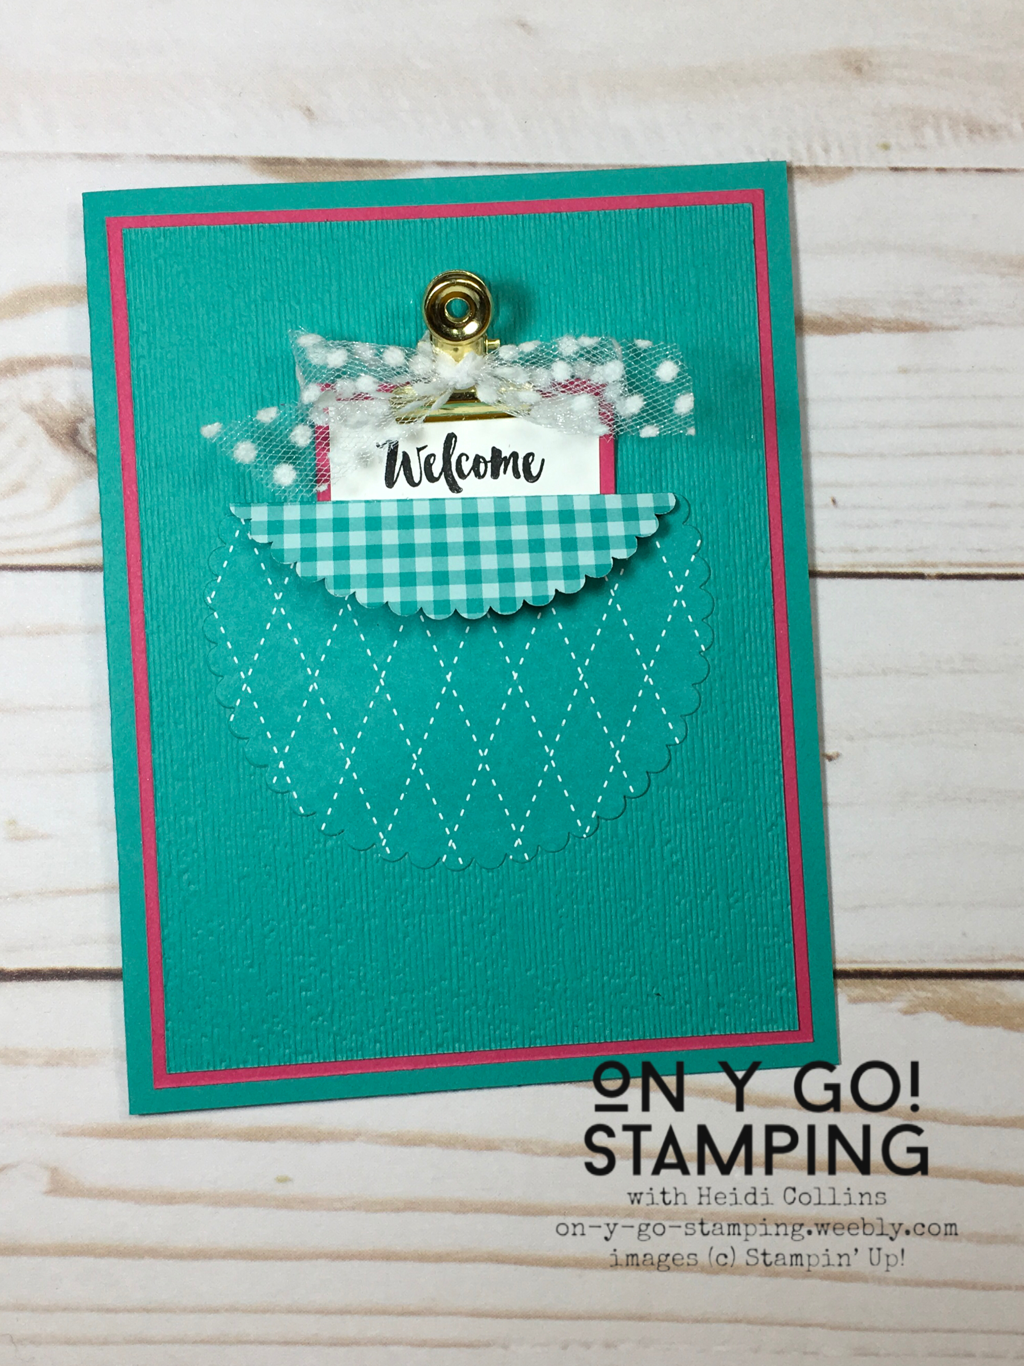
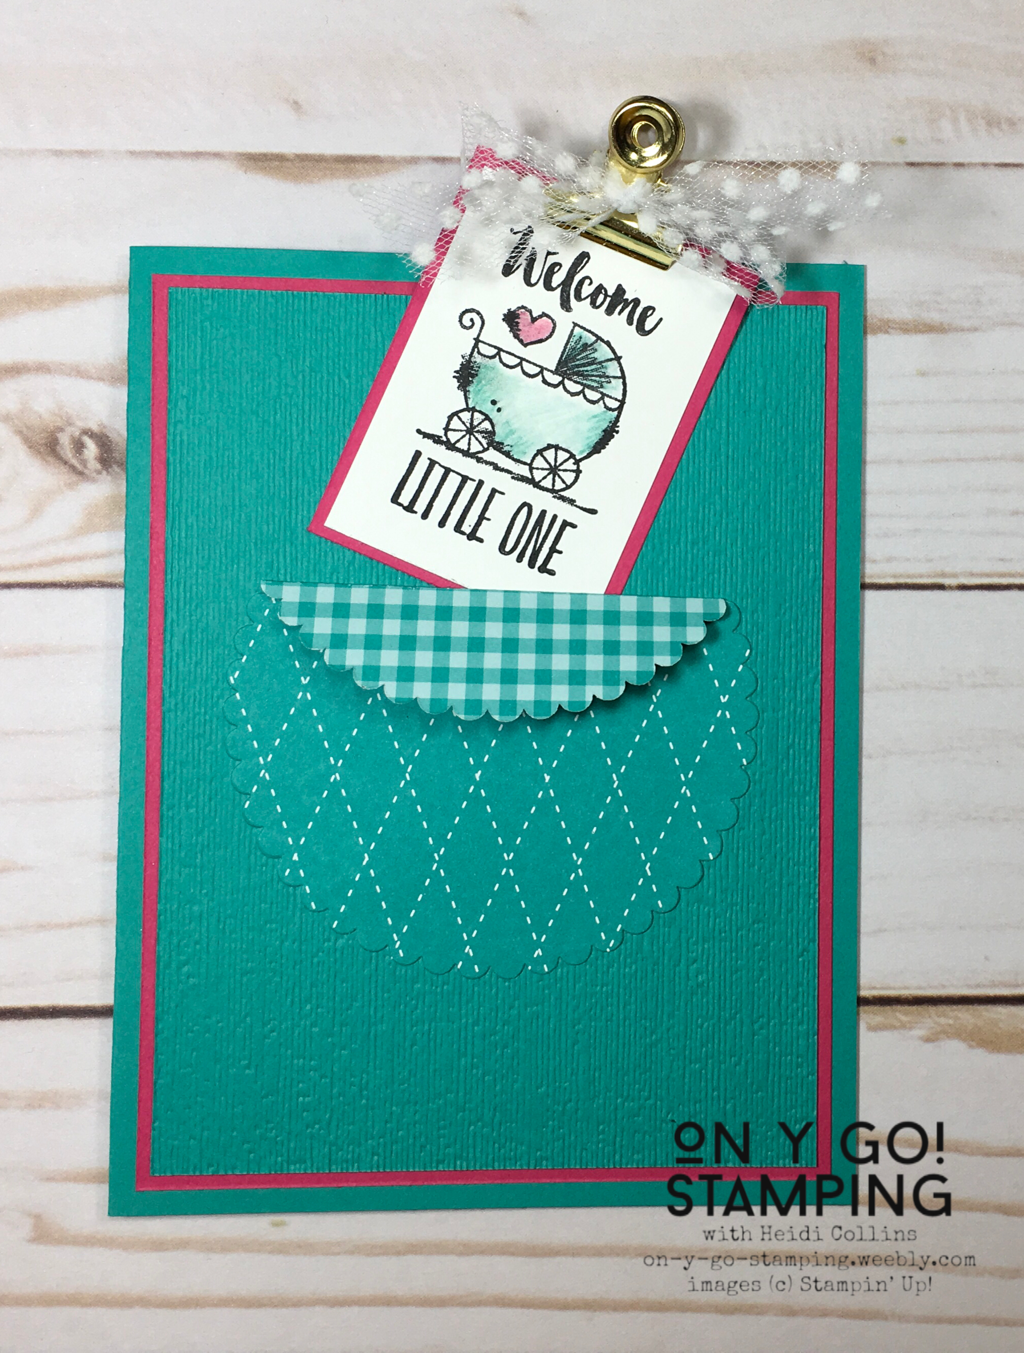
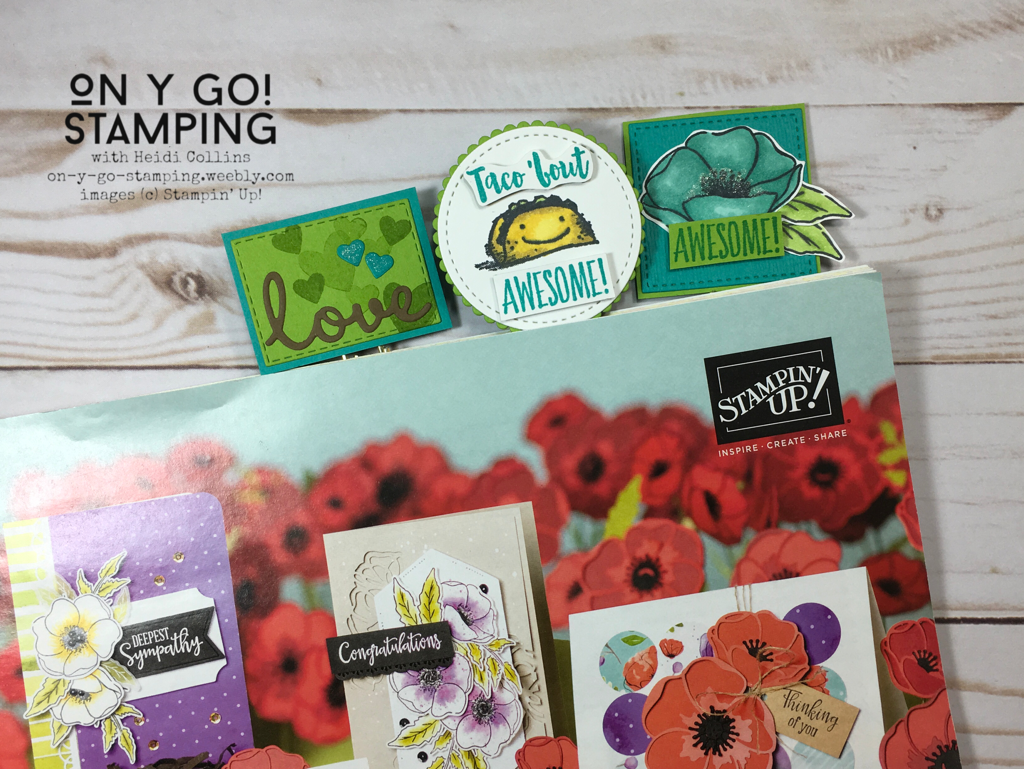
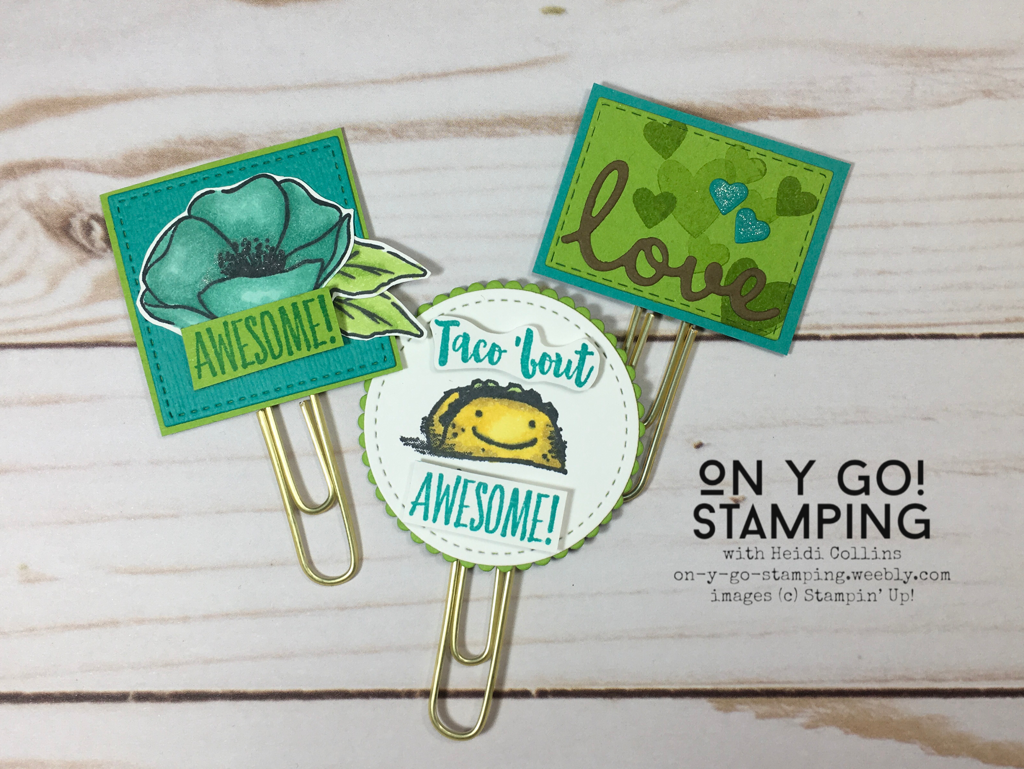
In addition to the cards, I also created some fun bookmarks using my favorite design elements and accessories. I purchased these slightly oversized, gold-coated paper clips during back-to-school clearance last fall. I think I got the jar of 70 for $1. What a steal! I created the toppers using dies and stamps and adhered them to the paper clips with sticky strip. The backs have an additionally piece of cardstock so that the paper clips are sandwiched between the layers. They are great for marking pages in your Stampin’ Up! Catalogs!

Picture
Stampin' Friends February Blog Hop:
  1. Rachael Rife
  2. Jo Blackman
  3. Teri Pocock
  4. Jean Bolan Beaulieu
  5. Stephanie Jandrow
  6. Katja Ettig
  7. Tiziana Milano
  8. ​Kim Quade
  9. Kim Lamos​
  10. Anne Marie Hile
  11. Cheryl Taylor
  12. Heidi Collins <-- YOU ARE HERE!
  13. Barbara Welch
  14. Maureen Rauchfuss
17 Comments
<<Previous
    Heidi Collins, Independent Stampin' Up! Demonstrator with On Y Go! Stamping
    Get updates and ideas on my Facebook group
    Heidi Collins, Independent Stampin' Up! Demonstrator and Owner of On Y Go! Stamping
    Shop for Stampin' Up! stamps, inks, paper, tools, and embellishments with Heidi Collins and earn points towards FREE stamps!
    Picture
    Picture
    On Y Go! Stamping YouTube channel with Card Making Videos on how to do rubber stamping, card making, scrapbooking, and paper crafting

    Archives

    January 2023
    December 2022
    November 2022
    October 2022
    September 2022
    August 2022
    July 2022
    June 2022
    May 2022
    April 2022
    March 2022
    February 2022
    January 2022
    December 2021
    November 2021
    October 2021
    September 2021
    August 2021
    July 2021
    June 2021
    May 2021
    April 2021
    March 2021
    February 2021
    January 2021
    December 2020
    November 2020
    October 2020
    September 2020
    August 2020
    July 2020
    June 2020
    May 2020
    April 2020
    March 2020
    February 2020
    January 2020
    December 2019
    November 2019
    October 2019
    September 2019
    August 2019
    July 2019
    June 2019

Powered by Create your own unique website with customizable templates.
  • About
  • Online Card Classes
  • Card Making Ideas
  • Stampin' Up! Catalogs
  • Card Tutorials
  • Contact
  • Shopping Rewards
  • Shop
  • Join Stampin' Up!