• About
  • Online Card Classes
  • Card Making Ideas
  • Stampin' Up! Catalogs
  • Card Tutorials
  • Contact
  • Shopping Rewards
  • Shop
  • Join Stampin' Up!
ON Y GO! STAMPING
  • About
  • Online Card Classes
  • Card Making Ideas
  • Stampin' Up! Catalogs
  • Card Tutorials
  • Contact
  • Shopping Rewards
  • Shop
  • Join Stampin' Up!

So Very Vellum

2/21/2020

0 Comments

 
Picture
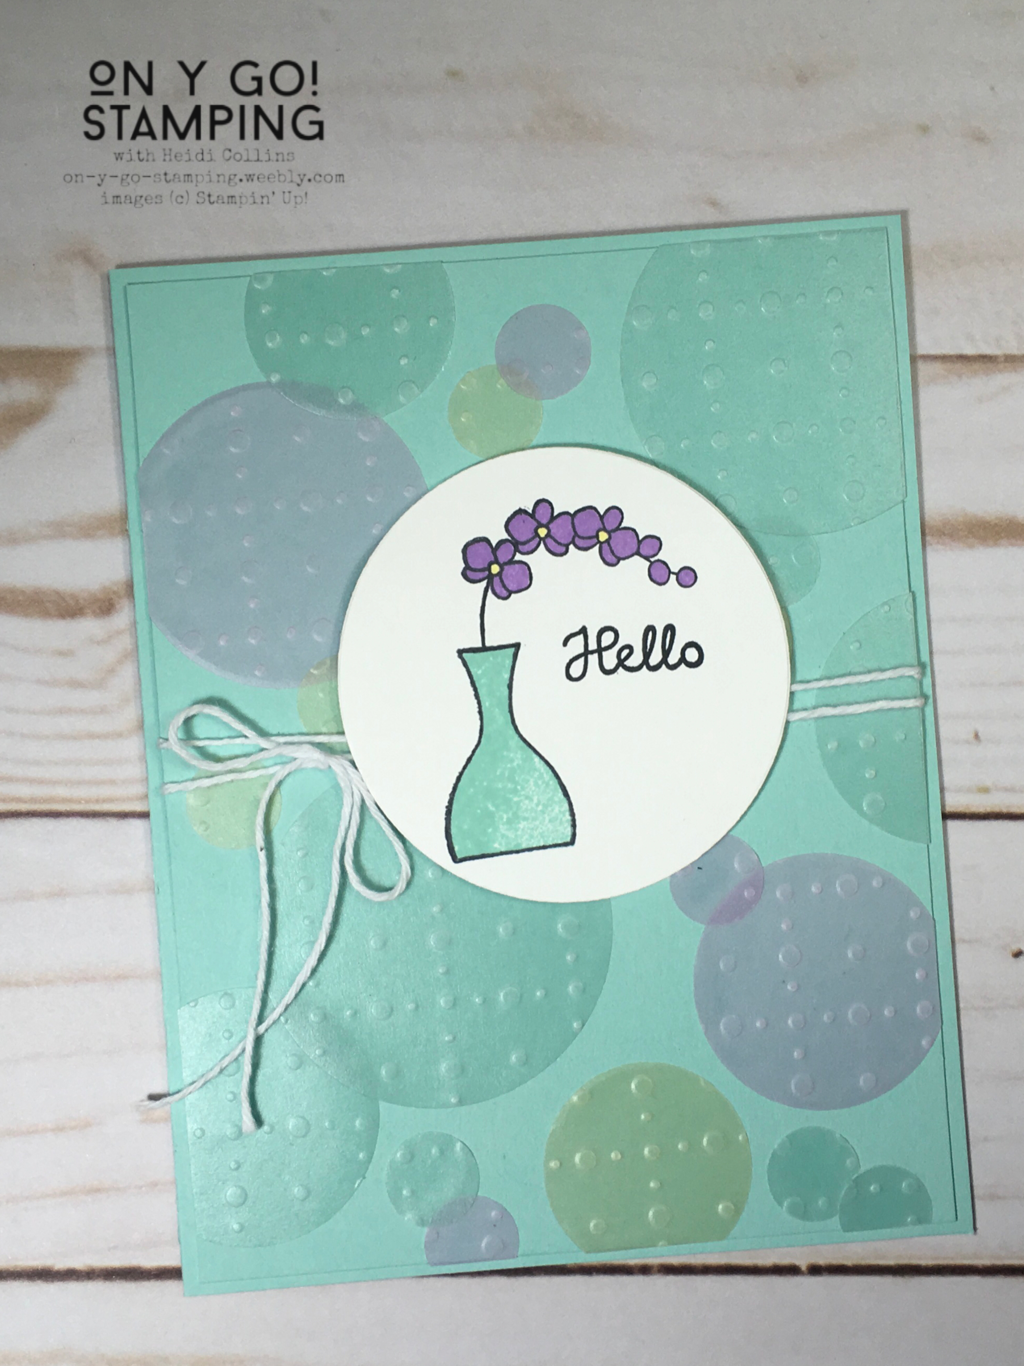
New Sale-A-Bration items are coming in March! Stampin’ Up! is releasing a second batch of brand-new limited-edition FREEbies will be here soon, including the So Very Vellum pack. There are three different colors, Pool Party, Soft Sea Foam, and Purple Posy, and each one features this cool dot pattern that feels both delicate and industrial mixed in with a little pop. I pushed the design in each of these directions for these cards featuring the So Very Vellum.

Picture
A Circle of Pops:
The dots on the vellum seem almost like 1950s Pop Art. I tried to use this feel to make a card with clean lines. I cut the three colors of vellum into various sized circles using the Layering Circles dies and a 1/2" circle punch. I adhered the circles to a piece of Pool Party cardstock by sponging a thin layer of liquid adhesive on the back of each circle. Vellum is translucent and will show where it is glued to cardstock, so it is important that the glue is applied evenly to the entire circle. This way, the vellum circles have a uniform appearance.


I combined this with a simple image from the Varied Vases stamp set stamped with Pool Party and Highland Heather ink with the outline stamped in Jet Black Memento. I added the centers to the flowers with the Light Daffodil Delight Stampin' Blend and tied a piece of Baker's Twine around the front. The card front is attached to a Pool Party card base. ​

Elegant Floral Dots:
For the second card, I wanted to create something soft and delicate like the vellum itself. I chose soft colors with lots of layers.

I started by sponging Soft Sea Foam ink onto Soft Sea Foam cardstock using a dotted Basic Pattern Mask. I didn't cover the whole card front but let the dots fade away on the outsides. 
Picture

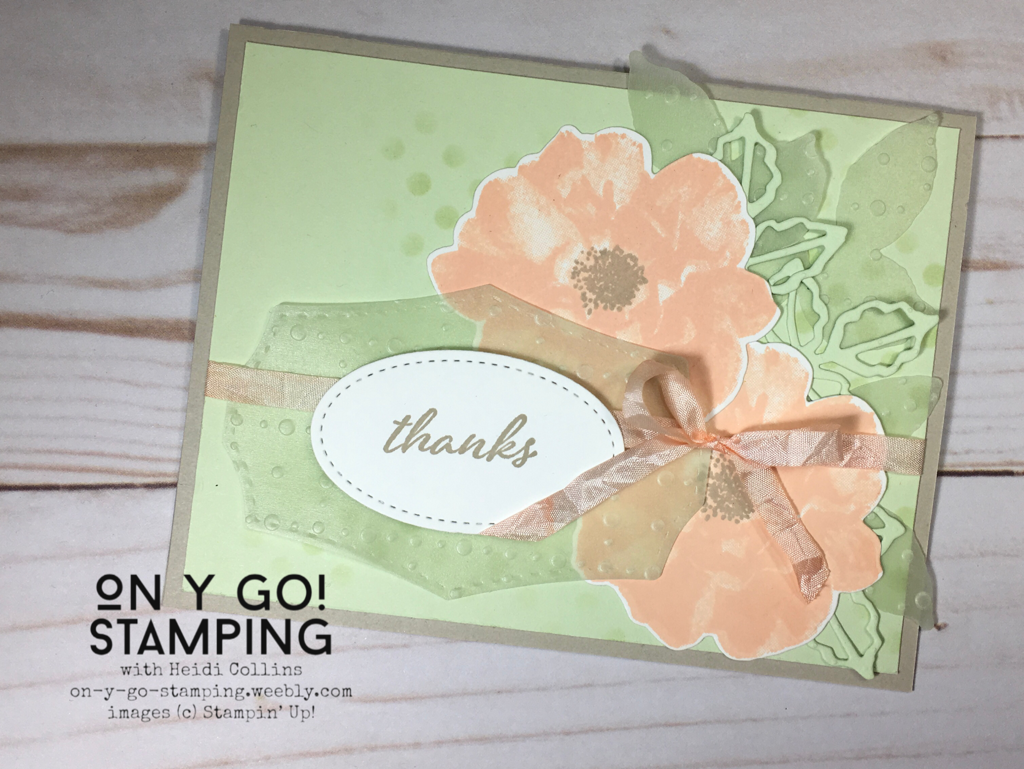
I stamped the roses from the To A Wild Rose stamp set in Petal Pink ink on Whisper White cardstock. I added the centers with Crumb Cake ink. I cut these out with the Wild Rose dies. I also cut leaves from the Soft Sea Foam So Very Vellum as well as other leaves from Soft Sea Foam cardstock. I layered these on the card front. 

I cut a tag from the Soft Sea Foam So Very Vellum using the Wild Rose dies. I adhered this to the card front by putting liquid adhesive where the greeting would be added. This way, the sides of the vellum are loose and you can't see where it is attached. I tied the card front with a piece of White Seam Binding that I colored using a Light Petal Pink Stampin' Blend. Then, I added an oval cut with the Stitched Shape dies and stamped with "thanks" from the Here's a Card Stamp Set. Finally, I adhered the card front to card base using Crumb Cake cardstock.

Picture
Paris Industrial at Dusk:
The pattern on the So Very Vellum reminds me of steel plate. Because of this, I wanted the last card to have an industrial feel to it. What's more industrial and beautiful than the Eiffel Tower? 

I sponged a piece of Whisper White cardstock with Daffodil Delight, Melon Mambo, and Highland Heather using sponge daubers. I overlapped the colors and let them run into each other. I attached the Whisper White cardstock to a piece of Basic Black cardstock and then added a piece of the Purple Posy So Very Vellum by punching holes in the corners and inserting miniature brads. 
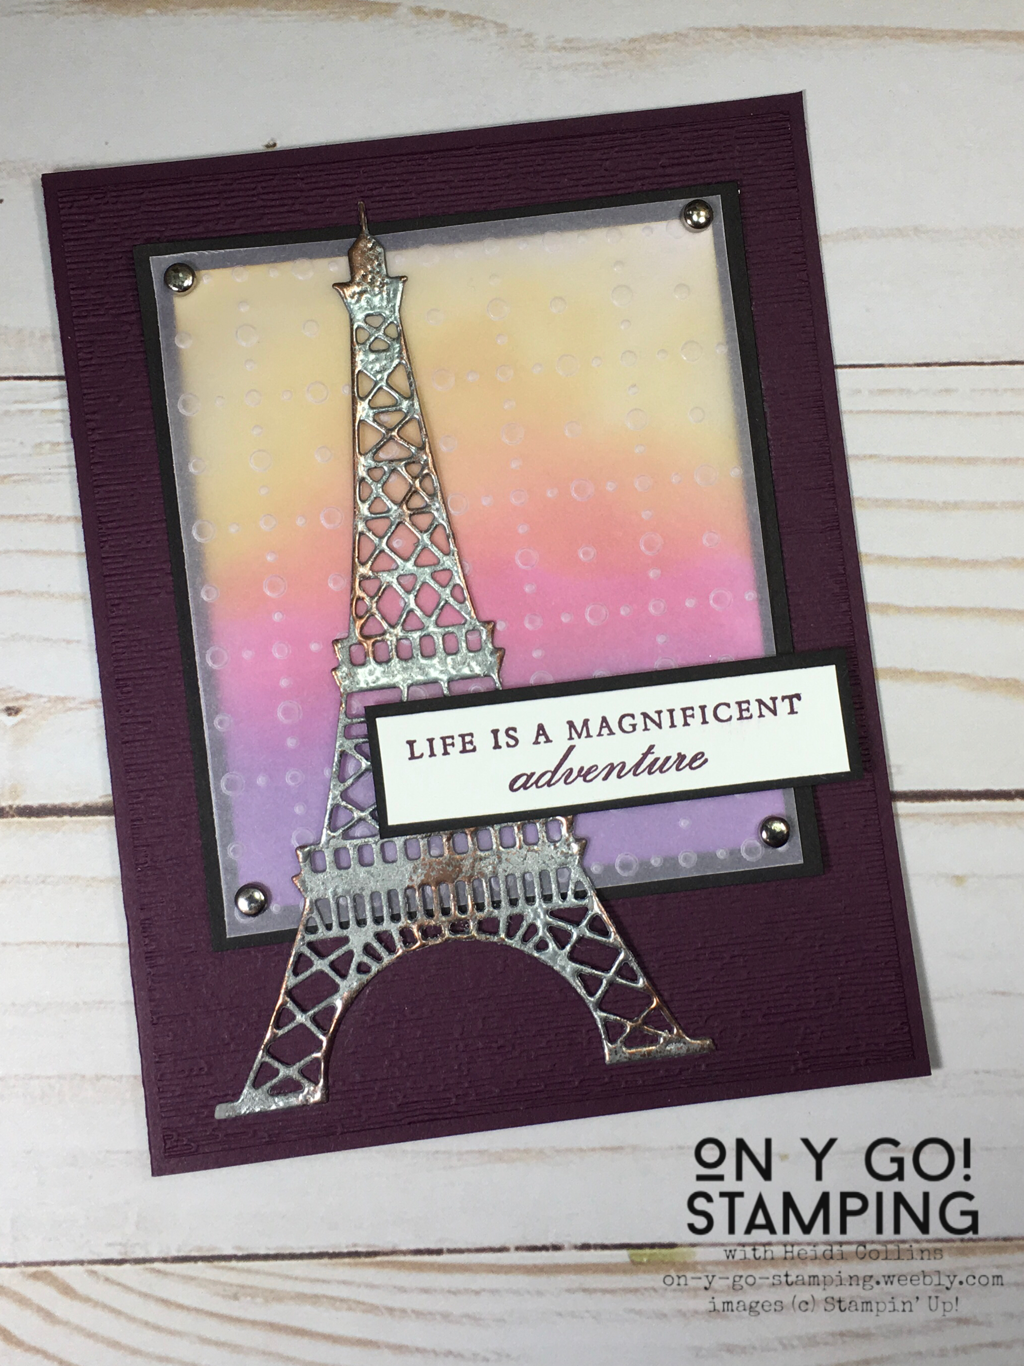
For the Eiffel Tower itself, I used the Parisian Dies from the January-June 2020 Mini Catalog. I cut the tower from Gray Granite cardstock then I heat embossed it by sponging the front with Versmark ink and covering it with silver embossing powder. To age the Eiffel Tower, while the silver embossing powder was still hot, I sprinkled on Copper embossing powder and heated it again.

To a Blackberry Bliss card base I added a Blackberry Bliss card front that I had run through my Big Shot with the Subtle 3D embossing folder. I added the sunset to the front of that and then the Eiffel Tower.

The sentiment is from the Parisian Beauty stamp set. I stamped it in Blackberry Bliss ink on Whisper White cardstock and layered it on Basic Black cardstock. I attached it to the card front using Stampin' Dimensionals.

I can't wait for these products to become available for FREE in March! Check back here on March 3 for more details.
0 Comments

Your comment will be posted after it is approved.


Leave a Reply.

    Heidi Collins, Independent Stampin' Up! Demonstrator with On Y Go! Stamping
    Get updates and ideas on my Facebook group
    Heidi Collins, Independent Stampin' Up! Demonstrator and Owner of On Y Go! Stamping
    Shop for Stampin' Up! stamps, inks, paper, tools, and embellishments with Heidi Collins and earn points towards FREE stamps!
    Picture
    Picture
    On Y Go! Stamping YouTube channel with Card Making Videos on how to do rubber stamping, card making, scrapbooking, and paper crafting

    Archives

    January 2023
    December 2022
    November 2022
    October 2022
    September 2022
    August 2022
    July 2022
    June 2022
    May 2022
    April 2022
    March 2022
    February 2022
    January 2022
    December 2021
    November 2021
    October 2021
    September 2021
    August 2021
    July 2021
    June 2021
    May 2021
    April 2021
    March 2021
    February 2021
    January 2021
    December 2020
    November 2020
    October 2020
    September 2020
    August 2020
    July 2020
    June 2020
    May 2020
    April 2020
    March 2020
    February 2020
    January 2020
    December 2019
    November 2019
    October 2019
    September 2019
    August 2019
    July 2019
    June 2019

Powered by Create your own unique website with customizable templates.
  • About
  • Online Card Classes
  • Card Making Ideas
  • Stampin' Up! Catalogs
  • Card Tutorials
  • Contact
  • Shopping Rewards
  • Shop
  • Join Stampin' Up!