• About
  • Online Card Classes
  • Card Making Ideas
  • Stampin' Up! Catalogs
  • Card Tutorials
  • Contact
  • Shopping Rewards
  • Shop
  • Join Stampin' Up!
ON Y GO! STAMPING
  • About
  • Online Card Classes
  • Card Making Ideas
  • Stampin' Up! Catalogs
  • Card Tutorials
  • Contact
  • Shopping Rewards
  • Shop
  • Join Stampin' Up!

Color Challenge: Real Red, Pumpkin Pie, & Mint Macaron

5/18/2020

0 Comments

 
Picture

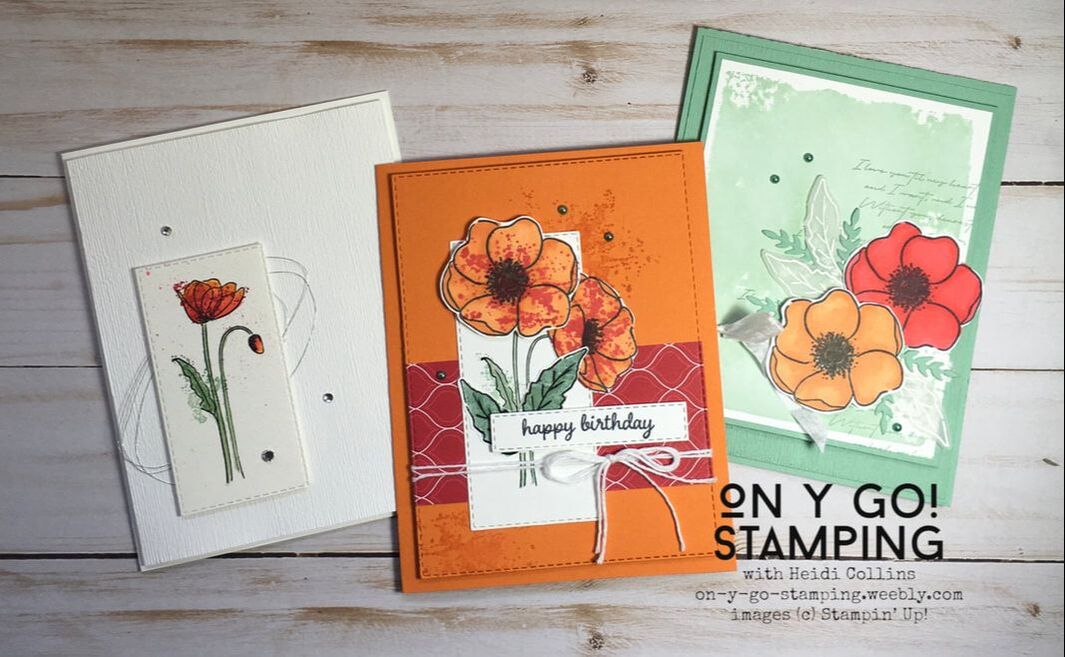
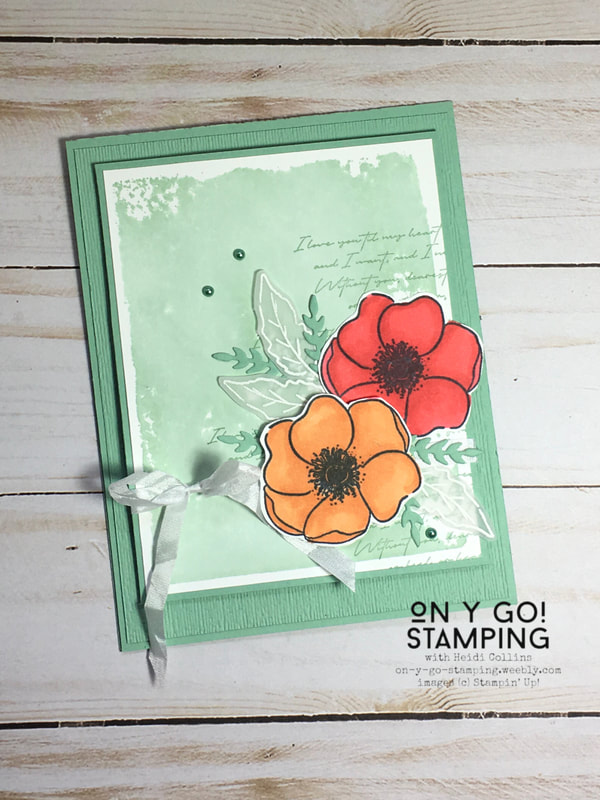
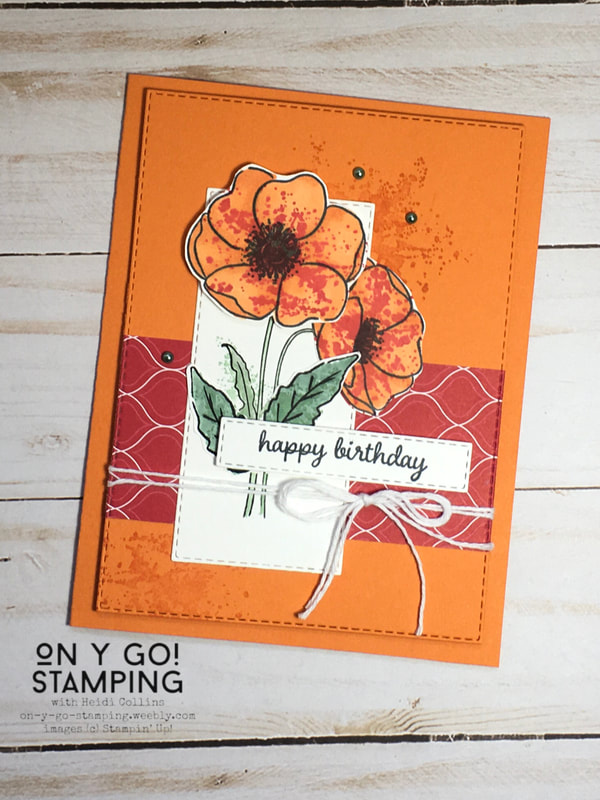
I was challenged recently to use the colors Real Red, Pumpkin Pie, and Mint Macaron. At first glance, these colors don't seem like they would work together, but surprisingly, I think the cards turned out beautifully. 

All of these cards use the Painted Poppies stamp set. I am so happy that this stamp set will still be available in the 2020-21 Annual Catalog. I just love poppies and one of my favorite parts of traveling in France was seeing the fields full of wild poppies. So, on y go! Let's get stamping.
Picture
 Mint Poppies​
I love the soft look of this first card. I used the same faux watercoloring technique I described on Friday, but this time I used Clear Block E and only Mint Macaron ink. I put ink all over the block and then spritzed it with water before stamping it on a piece of Whisper White cardstock. When it was dry, I stamped the greeting from the Parisian Beauty stamp set with Mint Macaron ink along the right side. Then, I adhered this piece to a layer of Mint Macaron cardstock and tied a piece of White Seam Binding around it.


I stamped the poppies on scrap pieces of Whisper White cardstock using Tuxedo Black Memento ink. I colored them with the light and dark Pumpkin Pie and Poppy Parade Stampin' Blends. I had to cheat and use Poppy Parade instead of Real Red because I don't have the Real Red Stampin' Blends. There are dies that match the poppies, but since I don't have those either, I fussy cut the flowers instead.

I heat embossed the leaves on vellum cardstock using white embossing powder. I also cut some extra leafy pieces using the retired All-Around Wreath dies. 

I adhered all this to the card front I had stamped. I embossed a 5 1/4" x 4" piece of Mint Macaron cardstock using the Subtle 3D embossing folder. I adhered this to the Mint Macaron card base. Then, using Stampin' Dimensionals, I adhered my card front on top of this.  Finally, I added a few colored pearls for a little extra bling.
​
Pumpkin Pie Poppies
My second card is primarily Pumpkin Pie with Real Red and Mint Macaron accents. I started by cutting a piece of Whisper White cardstock using the Stitched Rectangle dies. I stamped the pair of poppies on this piece using Jet Black Stazon ink.

I colored the leaf and stems using an Aqua Painter and some Mint Macaron ink. Normally, you would want to use watercolor paper when using an Aqua Painter, but since this was a very small area, I used a fairly dry brush and went very quickly. After the leaf was dry, I stamped the small splotchy stamp over top of it with Mint Macaron ink.
Picture
On some scrap Whisper White cardstock, I stamped additional leaves using the Jet Black Stazon and colored them with Aqua Painters and Mint Macaron ink. Once again, I stamped over these pieces with the splotches using Mint Macaron ink. Then, I stamped the poppies with Tuxedo Black Memento ink and colored them using light and dark Pumpkin Pie Stampin' Blends. Remember, it's important to use the Memento ink when you are coloring with Stampin' Blends. I used the larger splotches to stamp over these images with Real Red ink. Finally, I fussy cut the blossoms and leaves and adhered them over the poppies I had stamped on the piece of Whisper White cardstock. 

I adhered a piece of Real Red 6" x 6" DSP to a piece of Pumpkin Pie cardstock that I had stamped splotches on using Pumpkin Pie ink. I ran both pieces together through my die cutting machine using the largest Stitched Rectangle die. I adhered the flowers and the greeting and tied this piece with a double piece of Whisper White Baker's Twine. I used Stampin' Dimensionals to adhere this to the Pumpkin Pie card base. 
Picture
Watercolor Poppies on White
The final card is a deceivingly simple white on white card. I started by stamping the poppies on a piece of watercolor paper using Jet Black Stazon ink. I watercolored the flowers, stems, and leaves using an Aqua Painter and Pumpkin Pie, Real Red, and Mint Macaron ink. I stamped over the poppies using the small splotch and Real Red ink. Similarly, I stamped over the leaf with the small splotch in Mint Macaron ink. I added a few more ink droplets by dipping a paintbrush in Real Red ink and flicking the bristles over the image. I cut the watercolor paper using a Stitched Rectangle die. 


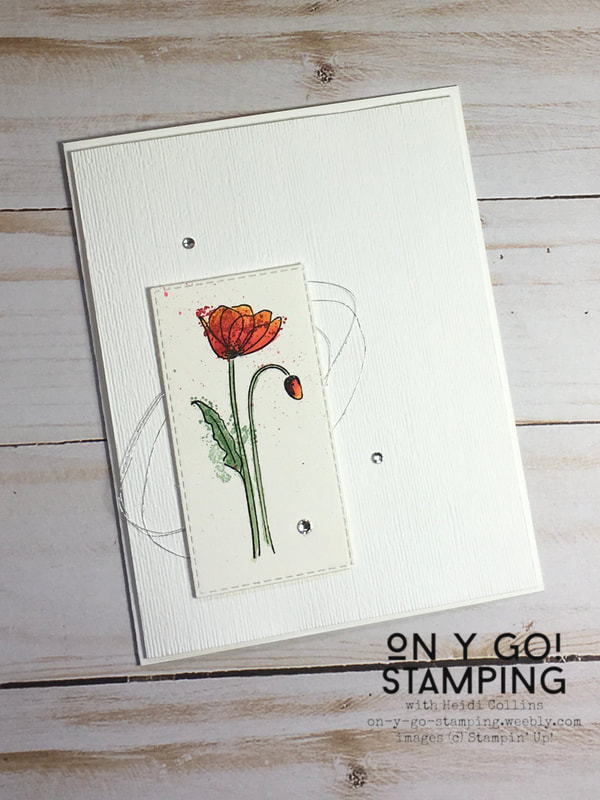
I took a 5 1/4" x 4" piece of Whisper White cardstock and embossed it with the Subtle 3D embossing folder. I adhered it with Stampin' Dimensionals to a Whisper White card base. I laid down a swirl of Silver Metallic Thread and adhered the poppy image over this with more Stampin' Dimensionals. To give the card a little sparkle, I added a few Basic Rhinestone Jewels.
​
Mint Macaron Card Product List
Painted Poppies Cling Stamp Set
[151599]
$23.00
Mint Macaron 8-1/2" X 11" Cardstock
[138337]
$8.75
Mint Macaron Classic Stampin' Pad
[147106]
$7.50
Tuxedo Black Memento Ink Pad
[132708]
$6.00
Vellum 8-1/2" X 11" Cardstock
[101856]
$10.00
Versamark Pad
Versamark Pad
[102283]
$9.50
White Stampin' Emboss Powder
[109132]
$6.00
Heat Tool (Us And Canada)
[129053]
$30.00
Subtle 3D Embossing Folder
[151775]
$10.00
Clear Block E
Clear Block E
[118484]
$12.00
Share What You Love Artisan Pearls
[146927]
$6.00
Pumpkin Pie Stampin' Blends Markers Combo Pack
[144599]
$9.00
Poppy Parade Stampin' Blends Markers Combo Pack
[147275]
$9.00
Parisian Beauty Cling Stamp Set (English)
[151466]
$21.00
Whisper White 1/4" (6.4 Mm) Crinkled Seam Binding Ribbon
[151326]
$7.50
All-Around Wreath Dies
[150641]
$34.00
Whisper White 8-1/2" X 11" Cardstock
[100730]
$9.75
Pumpkin Pie Card Product List
Painted Poppies Cling Stamp Set
[151599]
$23.00
Mint Macaron Classic Stampin' Pad
[147106]
$7.50
Tuxedo Black Memento Ink Pad
[132708]
$6.00
Pumpkin Pie Stampin' Blends Markers Combo Pack
[144599]
$9.00
Whisper White 8-1/2" X 11" Cardstock
[100730]
$9.75
Pumpkin Pie 8-1/2" X 11" Cardstock
[105117]
$8.75
Pumpkin Pie Classic Stampin' Pad
[147086]
$7.50
Subtles Stampin' Write Markers
[147156]
$30.00
Brights 6" X 6" (15.2 X 15.2 Cm) Designer Series Paper
[149613]
$11.50
Real Red Classic Stampin' Pad
[147084]
$7.50
Whisper White Solid Baker's Twine
[124262]
$3.50
Share What You Love Artisan Pearls
[146927]
$6.00
Timeless Tulips Photopolymer Stamp Set (English)
[151534]
$18.00
Whisper White Card Product List
Mint Macaron Classic Stampin' Pad
[147106]
$7.50
Whisper White 8-1/2" X 11" Cardstock
[100730]
$9.75
Pumpkin Pie Classic Stampin' Pad
[147086]
$7.50
Real Red Classic Stampin' Pad
[147084]
$7.50
Fluid 100 Watercolor Paper
[149612]
$9.00
Aqua Painters
Aqua Painters
[103954]
$17.00
Subtle 3D Embossing Folder
[151775]
$10.00
Stitched Rectangle Dies
[148551]
$35.00
Rhinestone Basic Jewels
[144220]
$5.00
Silver Metallic Thread
[138402]
$3.50
Painted Poppies Cling Stamp Set
[151599]
$23.00
0 Comments

Graduation Celebration

5/15/2020

0 Comments

 
Picture
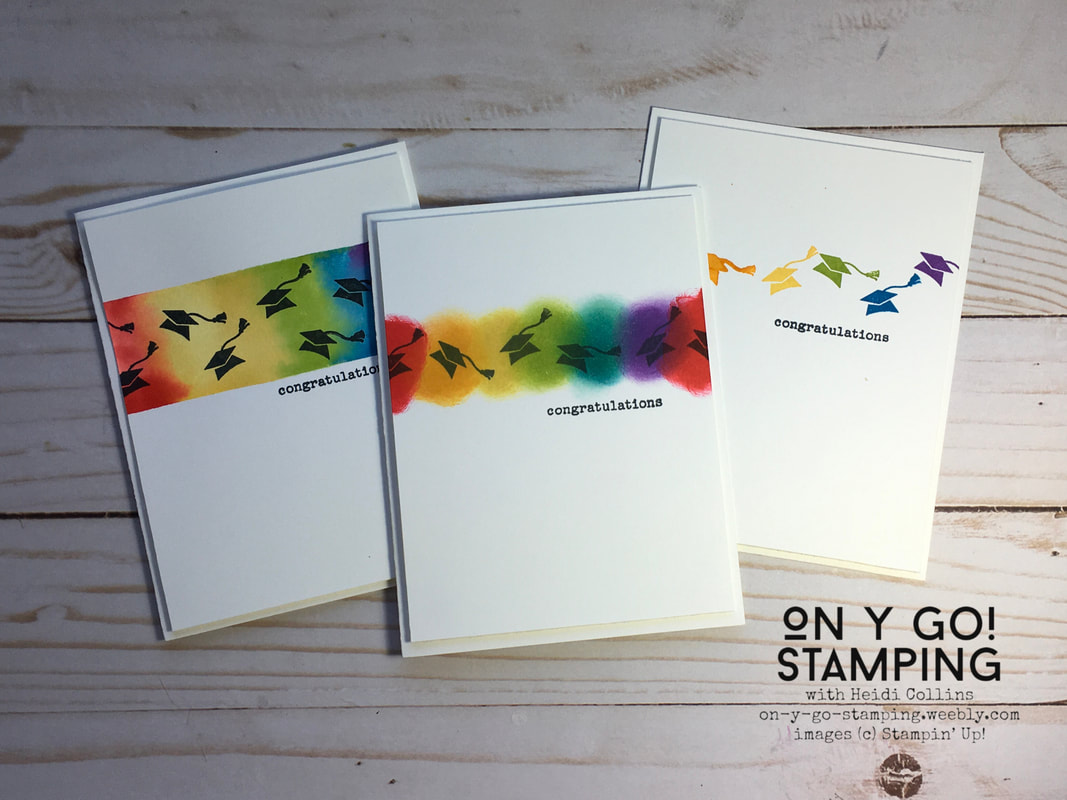
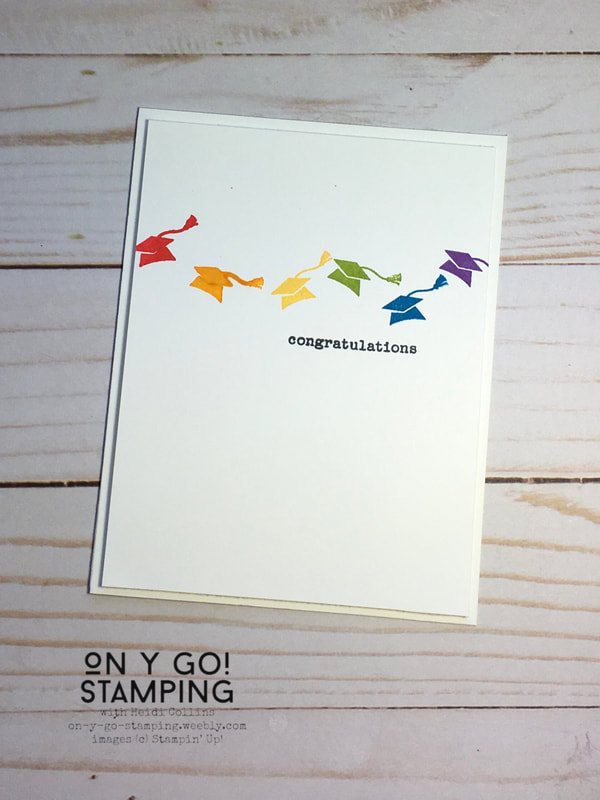
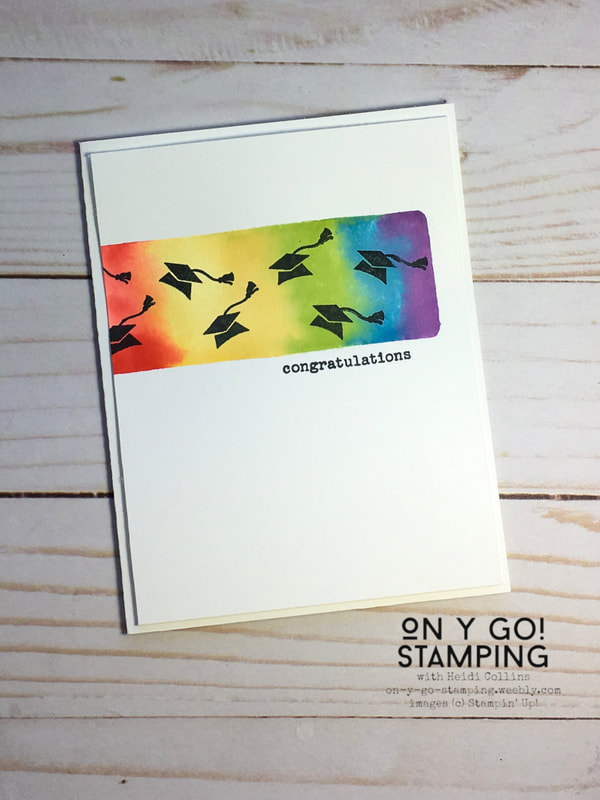
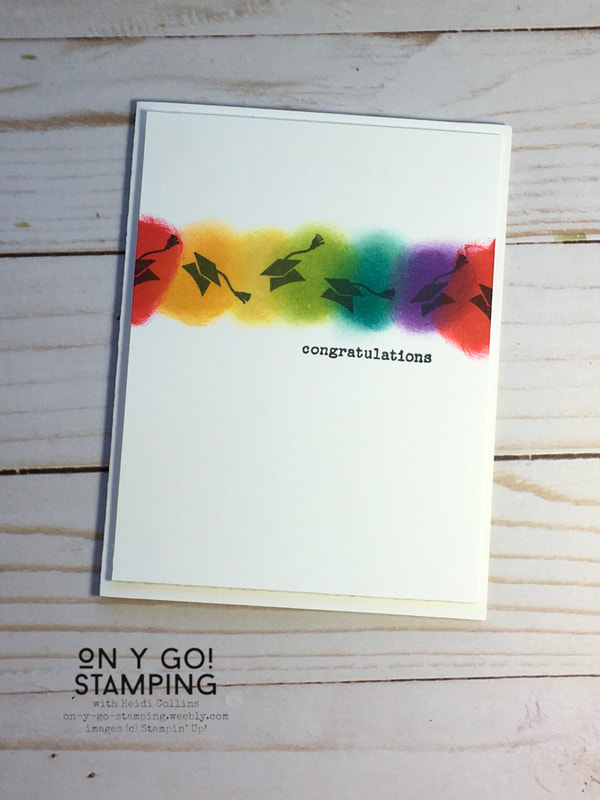
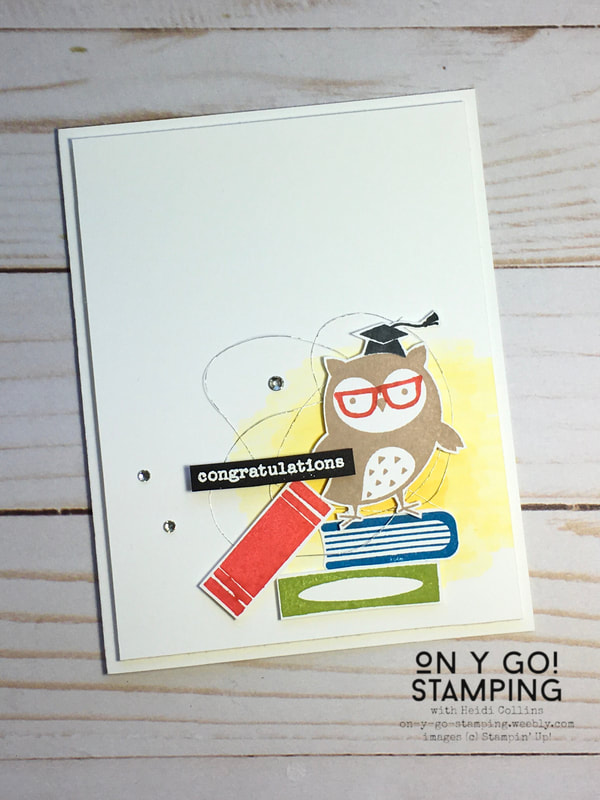
Even though everything looks a little different this year, it's still the time to celebrate graduations! I love the use of rainbows lately to show love and support to people while we're social distancing, so I thought some rainbow graduation cards would be really fun. I made three different cards using the same basic layout, stamps, and colors, but each card uses a different technique. For these cards I used the retiring Check You Out stamp set. This stamp set has only been around for a year and it was one of my absolute favorites from this catalog. I'm so sad to see it go! Because I just couldn't put the set down, check out a 4th, very different graduation card using the same set at the bottom of this post.

While I chose a rainbow for my cards, they could be done in any color combination you like or even in just one color. 

Stamping in Color
This first card has the graduation hats simply stamped in Poppy Parade, Mango Melody, Daffodil Delight, Granny Apple Green, Pacific Point, and Gorgeous Grape in a line across a piece of Whisper White cardstock. I added the simple congratulations greeting under the stamped hats.

The piece of 5 1/4" x 4" Whisper White cardstock is then adhered with Stampin' Dimensionals to a Whisper White card base. Super quick and super easy.

Picture
Picture
Faux Watercolor
For the second card, I used a faux watercolor technique using a clear block. I used clear block H, a long skinny clear block, and applied the same 6 colors to it in the same rainbow order. The ink covered the whole block. Then I spritzed it with a little water, tilted the block in both directions to let the colors run a little, and stamped it down on my Whisper White cardstock. For this card, I chose to not let the colors go all the way across the card front.

After I added the faux watercolor background and let it dry, I stamped the graduation hats with Jet Black stazon ink. Again, I added the simple congratulations under the rainbow and adhered the whole card front using Stampin' Dimensionals to a Whisper White card base.
Sponge Daubers
For the last card, I started by stamping a line of graduation caps with Jet Black Stazon ink. Then I used sponge daubers to color spots of each of the same 6 colors. I finished the card in the same way as the other two. 
Picture
Picture
Owl Graduate
Finally, the surprise card! This card uses much of the same color scheme, but is completely different and much less simple, although not hard to make. 

Once again, I started with a piece of 5 1/4" x 4" Whisper White cardstock. With a light Daffodil Delight Stampin' Blend I colored a circle in the lower right corner. I added some dark Daffodil Delight to the center. Colored over this with the light Daffodil Delight again but didn't go all the way to the edge of the original Daffodil Delight circle. Then, I went over the whole thing with a color lifter a few times, especially towards the outer edges, to soften the color and help blend it out more into the white.
On scraps of Whisper White cardstock, I stamped the owl with Crumb Cake ink and added a graduation hat and glasses. I also stamped the books. I fussy cut all of these images. For the greeting, I heat embossed it with white embossing powder on Basic Black cardstock. Before I attached all of these pieces with Stampin' Dimensionals, I laid down a little nest of Silver Metallic Thread over the Daffodil Delight circle. Then, I added the stamped images and a few basic rhinestones. 
Product List
Check You Out Photopolymer Stamp Set
[149462]
$16.00
Whisper White 8-1/2" X 11" Cardstock
[100730]
$9.75
Poppy Parade Classic Stampin' Pad
[147050]
$7.50
Mango Melody Classic Stampin' Pad
[147093]
$7.50
Daffodil Delight Classic Stampin' Pad
[147094]
$7.50
Granny Apple Green Stampin' Pad
[147095]
$7.50
Pacific Point Classic Stampin' Pad
[147098]
$7.50
Gorgeous Grape Classic Stampin' Pad
[147099]
$7.50
Jet Black Stāzon Ink Pad
[101406]
$10.00
Stampin' Dimensionals
[104430]
$4.00
Clear Block H
Clear Block H
[118490]
$8.50
Sponge Daubers
Sponge Daubers
[133773]
$5.00
Crumb Cake Classic Stampin' Pad
[147116]
$7.50
Silver Metallic Thread
[138402]
$3.50
Rhinestone Basic Jewels
[144220]
$5.00
Versamark Pad
Versamark Pad
[102283]
$9.50
White Stampin' Emboss Powder
[109132]
$6.00
Heat Tool (Us And Canada)
[129053]
$30.00
Basic Black 8-1/2" X 11" Cardstock
[121045]
$8.75
0 Comments

Barn Door Fun Fold

5/13/2020

0 Comments

 
Picture
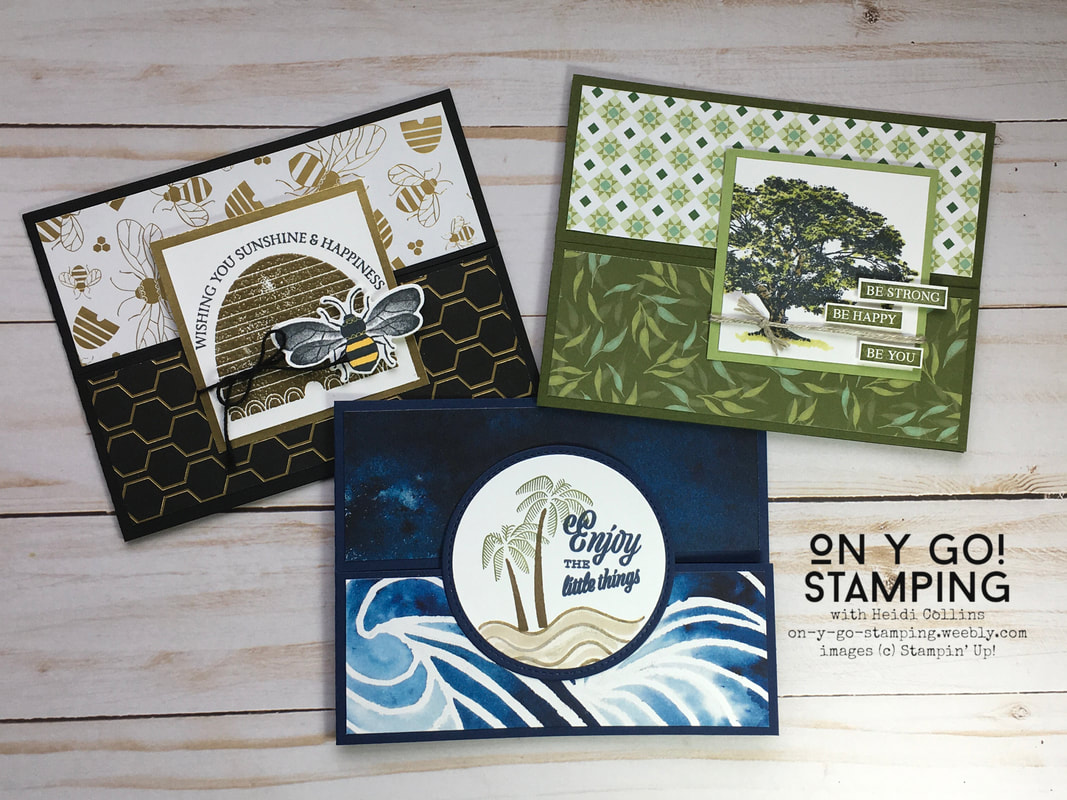
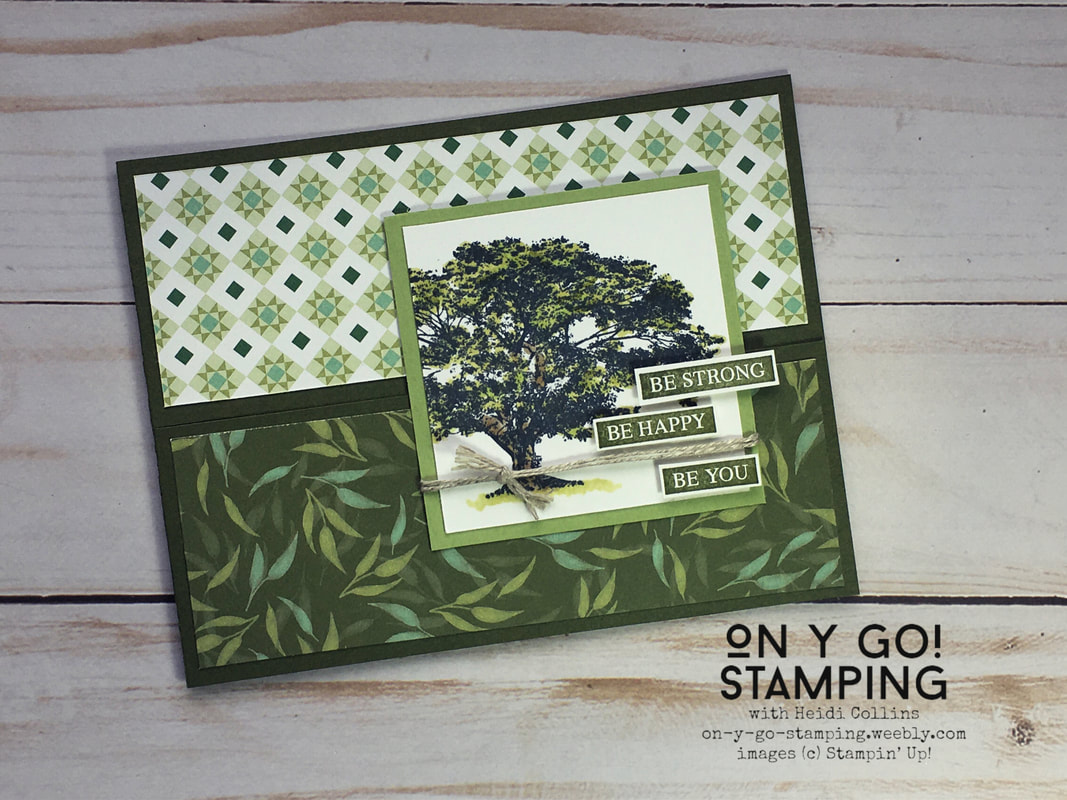
Big shout out to my Mom for being the guest designer for this week's Mystery Stamping! She created an awesome card using the barn door fun fold. To see her card, be sure to check out the On Y Go! Stamping Facebook group. The bottom half of this card swings open while the top half stays put. It's quick and easy to make!
Picture
Here is the basic sketch of the card. You can make this as a barn door card, or just use the sketch to make your own design. 

Measurements to create the barn door:
Cardstock:
  • 11" x 4 1/4", scored at 5 1/2"
  • 2 3/4" x 2 3/4"
Whisper White or Very Vanilla cardstock:
  • 2 1/2" x 2 1/2"
  • 1 7/8" x 5 1/4"
Designer Series Paper (2 different patterns):
  • 2 pieces - 1 7/8" x 5 1/4"
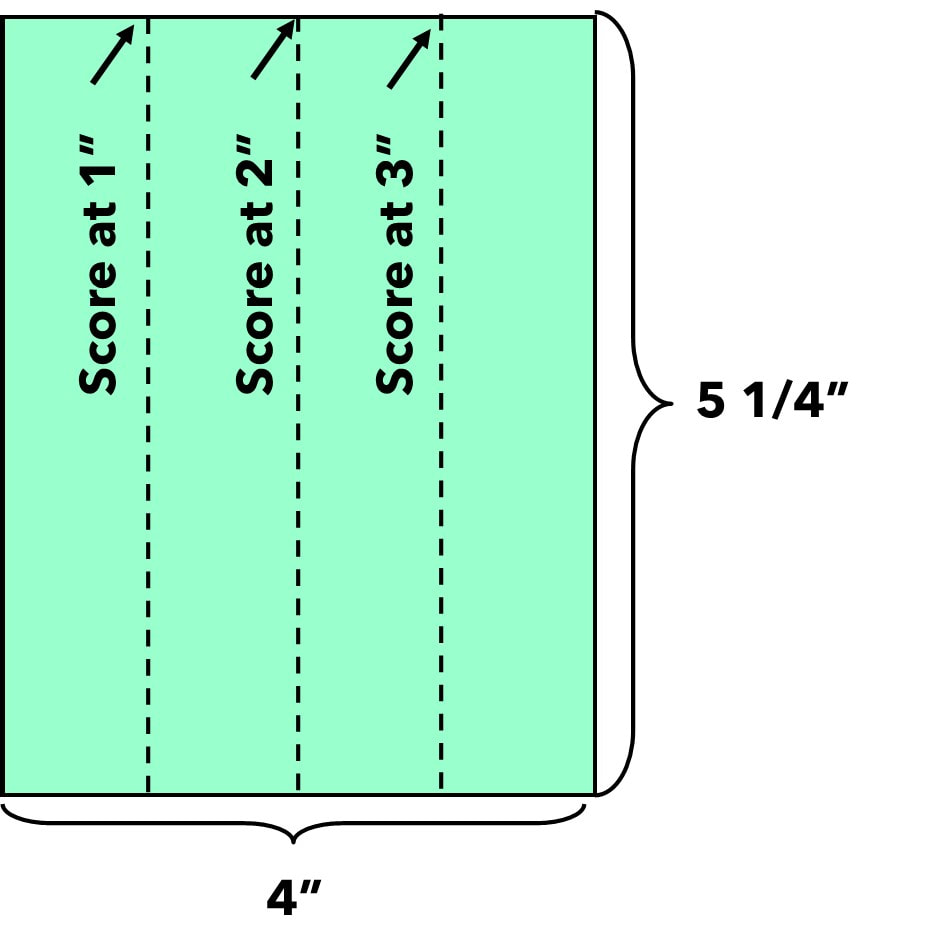
Fold the piece of 11" x 4 1/4" cardstock in half along the scored line. Open the cardstock back up. On the 4 1/4" side, carefully cut from the edge of the cardstock to the fold line. Fold the card again.

You should now have a card that has two flaps on the front. Glue the top flat shut so that it is flat against the back of the card.

Adhere the Designer Series Paper pieces to the front of the flaps and the long piece of 1 7/8" x 5 1/4" White or Vanilla cardstock to the inside of the card. Add you images as desired to the front of the card.

I made three different samples using this card design and three different packages of Designer Series Paper.
Picture
Rooted in Nature
My first card uses the Rooted in Nature stamp set and the Garden Lane DSP. I stamped the tree with Tuxedo Black Memento ink, then I colored it with Stampin' Blends. The greeting is stamped with Mossy Meadow ink and cut apart before being added to the card front with Stampin' Dimensionals. I used Mossy Meadow and Pear Pizzazz cardstock to match the DSP.
Product List
Rooted In Nature Cling-Mount Stamp Set
[148217]
$42.00
Garden Lane Designer Series Paper
[149488]
$11.50
Mossy Meadow 8-1/2" X 11" Cardstock
[133676]
$8.75
Mossy Meadow Classic Stampin' Pad
[147111]
$7.50
Pear Pizzazz 8-1/2" X 11" Cardstock
[131201]
$8.75
Whisper White 8-1/2" X 11" Cardstock
[100730]
$9.75
Tuxedo Black Memento Ink Pad
[132708]
$6.00
Granny Apple Green Stampin' Blends Markers Combo Pack
[147274]
$9.00
Linen Thread
Linen Thread
[104199]
$5.00
Mini Stampin' Dimensionals
[144108]
$4.00
Golden Honey Bee
​For this card, I used the Honey Bee stamp set and the Golden Honey Specialty Designer Series Paper that was only available during Sale-A-Bration. I embossed the hive image using gold embossing powder. I stamped the bee with Tuxedo Black Memento ink and cut it using the Detailed Bee dies. To add a pop of color, I colored the body with the light Mango Melody Stampin' Blend. The black baker's twine was borrowed from an old Paper Pumpkin kit.
Picture
Product List
Honey Bee Cling Stamp Set
[151527]
$20.00
Golden Honey Specialty Designer Series Paper
[152311]
$0.00
Detailed Bee Dies
Detailed Bee Dies
[151526]
$26.00
Basic Black 8-1/2" X 11" Cardstock
[121045]
$8.75
Gold Foil Sheets
Gold Foil Sheets
[132622]
$5.00
Whisper White 8-1/2" X 11" Cardstock
[100730]
$9.75
Tuxedo Black Memento Ink Pad
[132708]
$6.00
Mango Melody Combo Pack Stampin' Blends
[147945]
$9.00
Versamark Pad
Versamark Pad
[102283]
$9.50
Gold Stampin' Emboss Powder
[109129]
$6.00
Heat Tool (Us And Canada)
[129053]
$30.00
Picture
Friend Like You
My final card uses the Friend Like You stamp set and the See a Silhouette DSP to create a beach scene. Instead of a square for the stamped images, I cut circles using the Stitched Shapes and Layering Circles dies. To create the sand, I stamped the wavy line image with Soft Suede ink after having stamped off on a piece of scrap paper. Then, I used an Aqua Painter to pull out the color from the lines into the area between the lines. Finally, I drew a line between each of the stamped lines with the Light Crumb Cake Stampin' Blend using the brush tip. I added some shimmer to the waves with a Wink of Stella glitter marker.
Product List
Friend Like You Photopolymer Stamp Set
[149237]
$21.00
See A Silhouette Designer Series Paper
[149443]
$11.50
Stitched Shapes Dies
[152323]
$30.00
Layering Circles Dies
[151770]
$35.00
Night Of Navy 8-1/2" X 11" Cardstock
[100867]
$8.75
Night Of Navy Classic Stampin' Pad
[147110]
$7.50
Mossy Meadow Classic Stampin' Pad
[147111]
$7.50
Soft Suede Classic Stampin' Pad
[147115]
$7.50
Crumb Cake Stampin' Blends Markers Combo Pack
[144601]
$9.00
Whisper White 8-1/2" X 11" Cardstock
[100730]
$9.75
Clear Wink Of Stella Glitter Brush
[141897]
$8.00
Aqua Painters
Aqua Painters
[103954]
$17.00
0 Comments

SunBurst Strips

5/11/2020

0 Comments

 
Picture
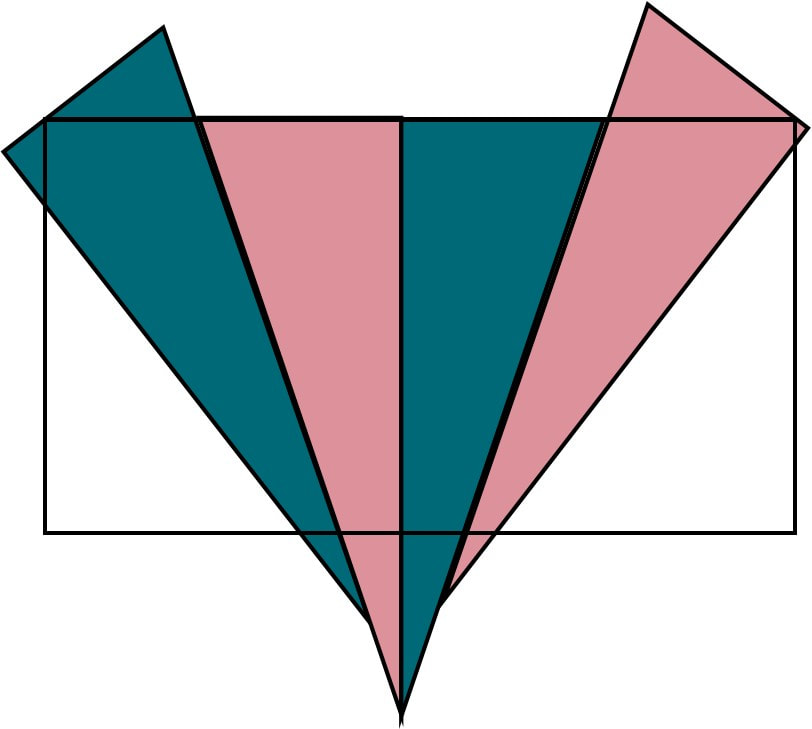
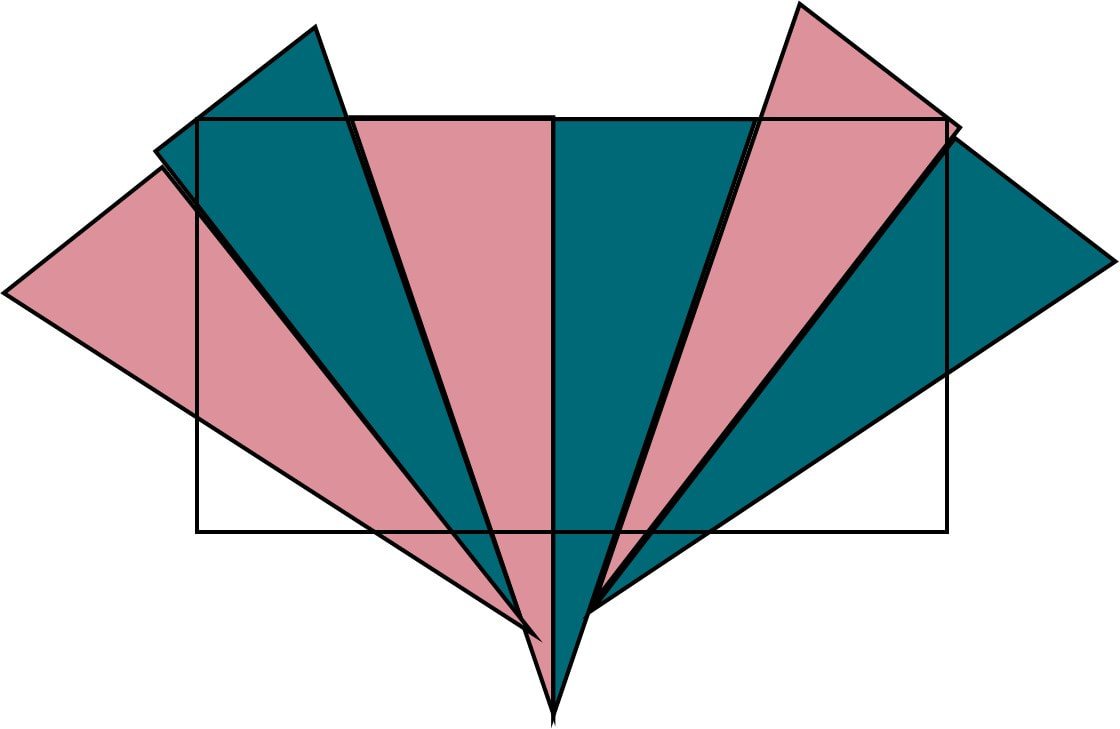
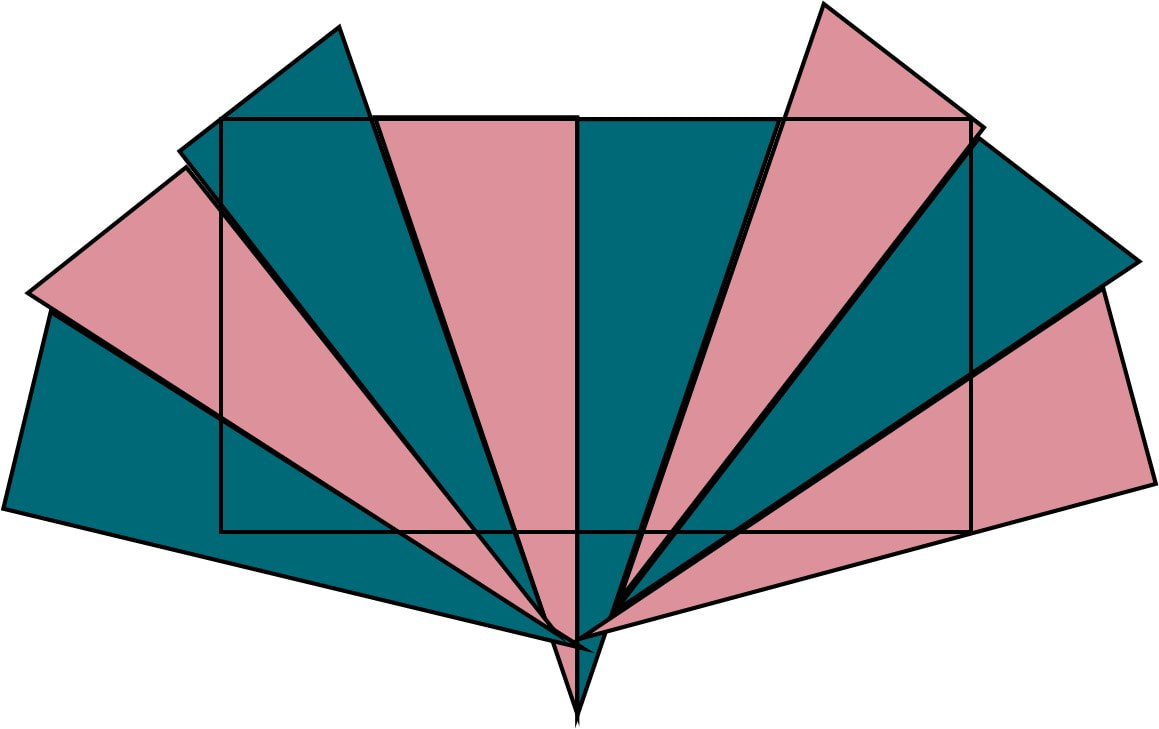
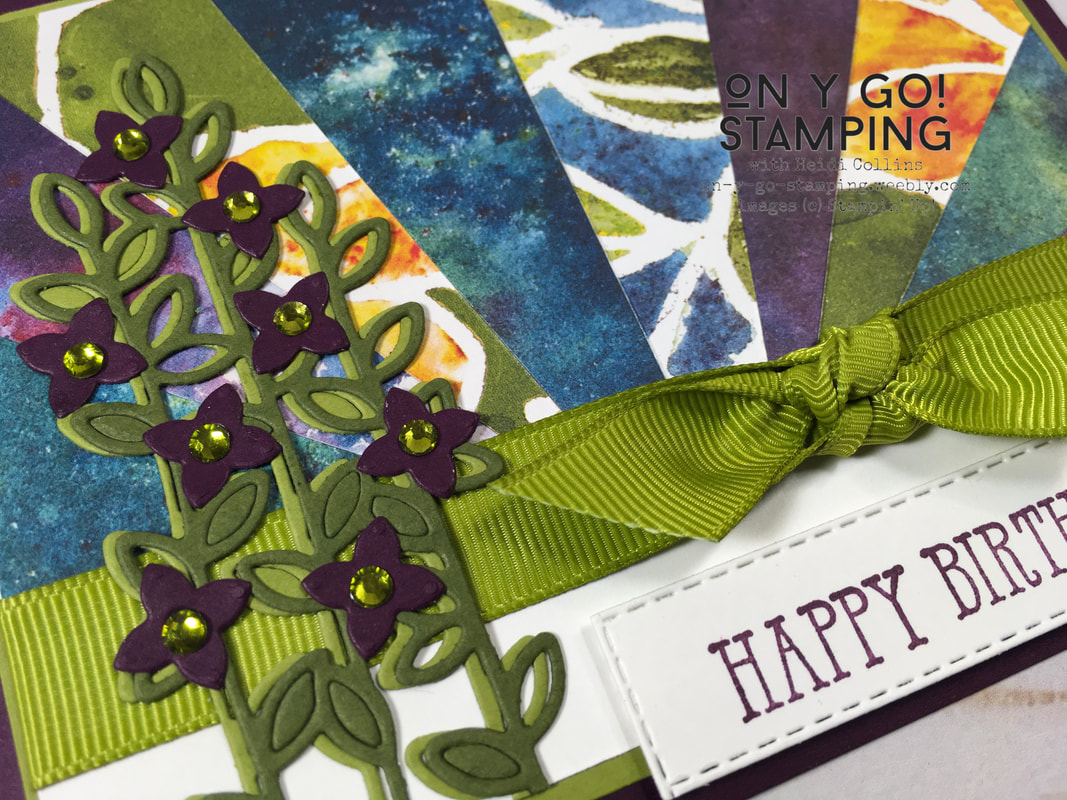
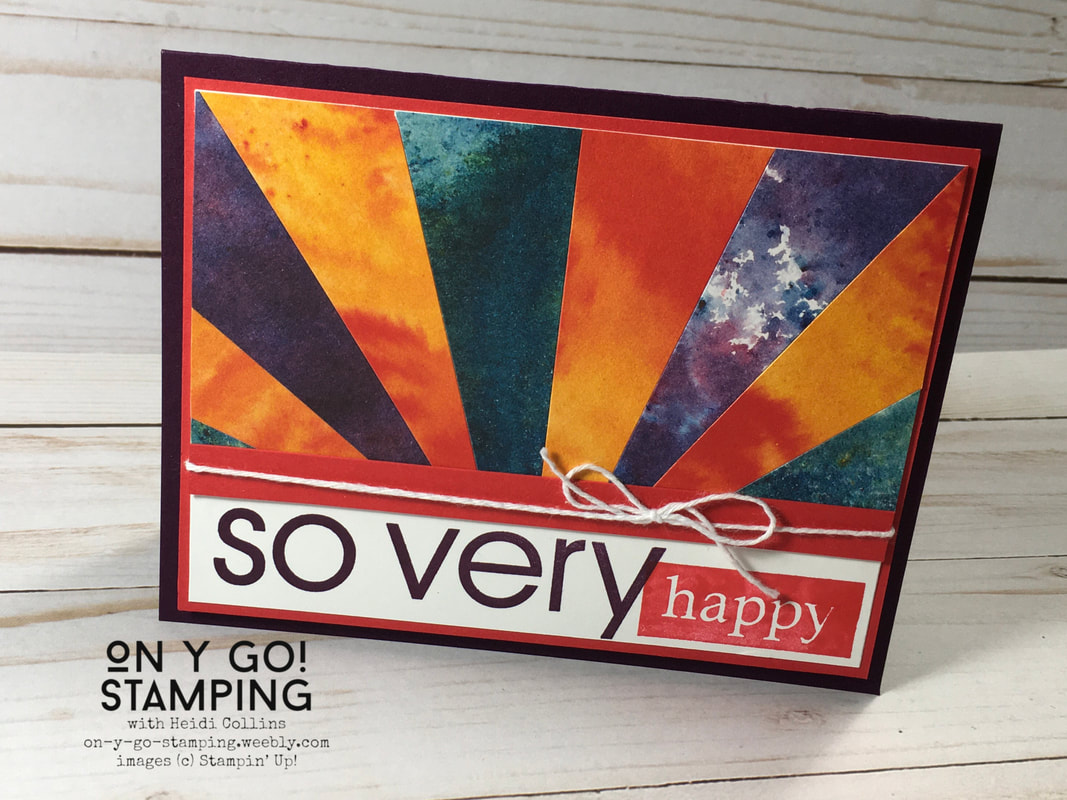
Here is another fun way to use Designer Series Paper. The combination of different pieces of patterned paper from the same pack makes a cool radiating background. 
Picture

Start by cutting 4 - 6 rectangles of DSP that are 1 1/2" x 4". For my card, I used the See a Silhouette Designer Series Paper. The number of rectangles you will use will depend on the patterns and your choice of how to use them. Cut each rectangle in half diagonally, from one corner to the opposite corner.

Also, cut a piece of Whisper white cardstock that is 2 3/4" x 5"

Start by adhering two different triangles of patterned paper to the middle of the piece of Whisper White cardstock. The corners with the right angles should be next to each other. You want the triangles to overlap the edge of the piece of Whisper White cardstock.


Adhere another triangle on either side of these with the diagonal edges together. Then another triangle next to that with the right angles together. Be sure that the patterned paper fully covers the piece of Whisper White cardstock from edge to edge. 
Picture
Picture
Picture
Finally, add one last triangle to either side. Once again, the diagonal edges should be together. Each time you add a triangle, diagonals should be with diagonals and right angle sides should be together. 

Now flip over your piece of cardstock and trim the edges of the patterned paper to match the edges of the Whisper White cardstock.
Picture

To finish the card, cut the following pieces:
  • Blackberry Bliss Cardbase: 8 1/2" x 5 1/2"
  • Whisper White: 3 3/4" x 5"
  • Old Olive: 3 7/8" x 5 1/8"
Adhere the sunburst to the larger piece of Whisper White cardstock. Then tie I piece of ribbon across the place where the edge of the sunburst meets the white cardstock at the bottom. I used an old piece of wide grosgrain ribbon in Old Olive. 
Picture
I cut the vine pieces with the Well Written dies from Old Olive and Mossy Meadow cardstock. The flowers are cut with the same dies from Blackberry Bliss cardstock. I added Nobel Peacock Rhinestones to the centers of the flowers to give it a little bling.

The greeting is from the Well Said stamp set and is stamped in Blackberry Bliss on a piece of Whisper White cardstock cut with the Stitched Rectangle dies.
My second card also uses the See a Silhouette DSP and the same technique. This time, instead of grosgrain ribbon, I added a piece of colored cardstock to the edge of the sunburst and then tied a piece of Whisper White Baker's Twine around it. The greeting is a very old Stampin' Up! stamp set called "So Very." I finished the card with Poppy Parade and Blackberry Bliss cardstock.
Picture
Product List
Whisper White 8-1/2" X 11" Cardstock
[100730]
$9.75
See A Silhouette Designer Series Paper
[149443]
$11.50
Old Olive 8-1/2" X 11" Cardstock
[100702]
$8.75
Blackberry Bliss 8-1/2" X 11" Cardstock
[133675]
$8.75
Blackberry Bliss Classic Stampin' Pad
[147092]
$7.50
Well Written Dies
Well Written Dies
[151816]
$40.00
Well Said Cling Stamp Set
[148796]
$45.00
Mossy Meadow 8-1/2" X 11" Cardstock
[133676]
$8.75
Poppy Parade 8-1/2" X 11" Cardstock
[119793]
$8.75
Poppy Parade Classic Stampin' Pad
[147050]
$7.50
Noble Peacock Rhinestones
[149494]
$5.50
Stitched Rectangle Dies
[148551]
$35.00
Whisper White Solid Baker's Twine
[124262]
$3.50
0 Comments

Pop Up Celebration!

5/8/2020

0 Comments

 
Picture
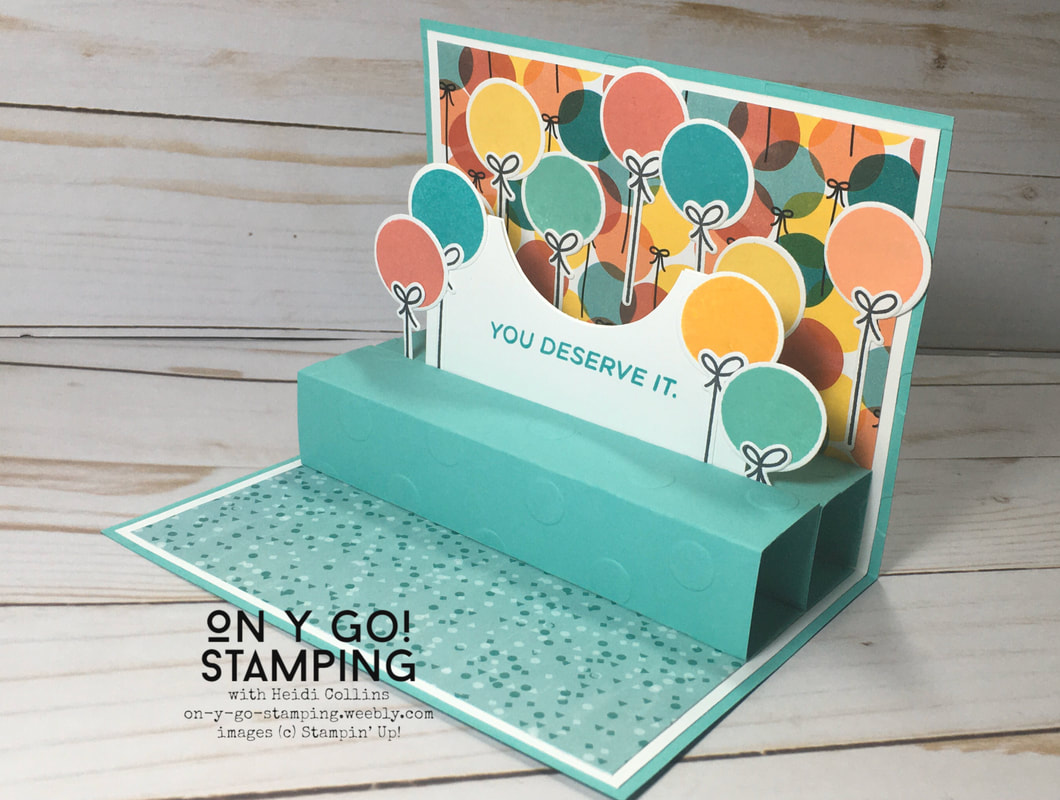
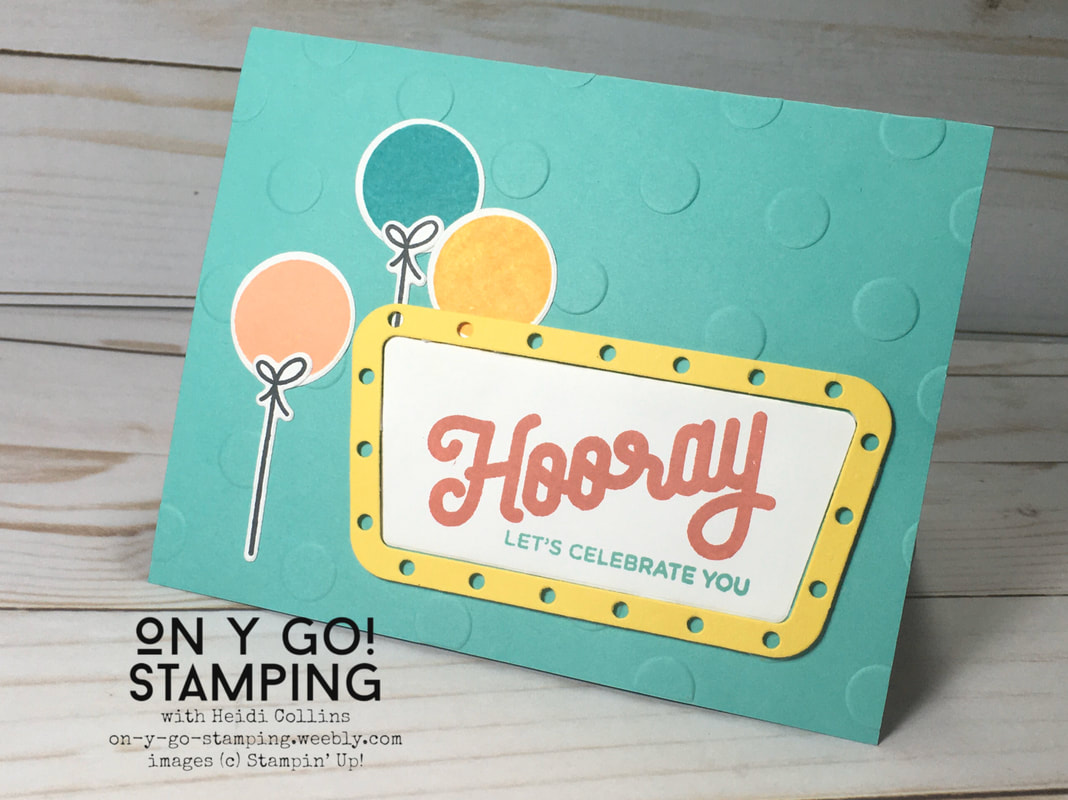
This pop up card was so much fun to make! Once again, it looks a little complicated, but the basic concept is quite easy. I used the Broadway Birthday stamp set and dies with the Birthday Bonanza Designer Series Paper. All of these items are being discontinued in May and are available only while supplies last. So, if they are on your wish list, make sure to order them today!

This card uses the colors from the DSP: Bermuda Bay, Coastal Cabana, Mango Melody, Terracotta Tile, Grapefruit Grove, and Daffodil Delight. The cardstock base is Coastal Cabana. 

I started with a regular card base that is 8 1/2" x 5 1/2". I folded it in half. Then, I ran it through my embossing machine with the retired Polka Dot embossing folder. I only put the front half in the embossing folder so that only the front is embossed and not the back.

The balloons and the marquee are stamped and then cut with the matching dies.
Picture
Picture
The real fun happens when you open the card! I love the way the background paper makes it look like a sea of balloons while the individual balloons jumped off the page.

I added a liner of Whisper White to the inside of the card. This piece is 8 1/4" x 5 1/4". On the top half, I added a piece of the balloon patterned paper that is 5" x 3 3/4". The bottom has another piece of patterned paper that is the same size. 

Hint: the portion with the "You Deserve It" greeting can hold a gift card or money. I made it with a note card envelope. I sealed the envelope and cut it in half. Then, I used my 2" circle punch to punch out the half circle hole that you see. 
I started decorating by adding a few balloons to the background. I stamped these on Whisper White cardstock and cut them with the Broadway Lights dies. 
​
To create the pop up effect, I cut two pieces of Coastal Cabana cardstock that were 4" x 5 1/4". I scored these (along the 4" side) at 1", 2", and 3". These pieces will fold into an elongated cube. They won't close on their own, but when you glue them in place they create a four-sided shape. 

Glue one edge of one piece along the back of the card so that the cut edge lines up with the fold. Then, glue the other end on the bottom so that the other cut edge also lines up with the fold. 


Picture
At this point, you will have one box. Adhere your gift card holder to the front of this box. Add a couple more balloons to the front of the box as well. Be careful with your placement of the balloons. Make sure that you set them in place and then try closing the card. You can't put them very high up because if you do, they will poke out the front of the card when it is closed. When you are sure you have good placement, glue them down. I overlapped balloons and strings to have more areas where they were attached to give them greater stability.

To finish, add the second box in front of the first box. Like the first time, do this in a way so that the open edges are in the back and on the bottom so that they don't show. If you want to, you could add additional images to the front of this box as well.

This was such a fun card to make! I can't wait to give it to someone for a birthday, graduation, or other celebration! If you'd like to order any of the supplies I used for this card, please click the button below or the shop tab at the top and consider using the current Host Code for a special gift from me.
Product List
Broadway Birthday Photopolymer Stamp Set
[147067]
$17.00
Broadway Lights Dies
[146317]
$29.00
Perfect Polka Dots Textured Impressions Embossing Folder
[117335]
$7.95
Coastal Cabana 8-1/2" X 11" Cardstock
[131297]
$8.75
Coastal Cabana Classic Stampin' Pad
[147097]
$7.50
Birthday Bonanza Designer Series Paper
[151313]
$11.50
Bermuda Bay Classic Stampin' Pad
[147096]
$7.50
Daffodil Delight Classic Stampin' Pad
[147094]
$7.50
Grapefruit Grove Classic Stampin' Pad
[147142]
$7.50
Terracotta Tile Classic Stampin’ Pad
[150086]
$7.50
Mango Melody Classic Stampin' Pad
[147093]
$7.50
Whisper White 8-1/2" X 11" Cardstock
[100730]
$9.75
Whisper White Note Cards & Envelopes
[131527]
$7.00
Tuxedo Black Memento Ink Pad
[132708]
$6.00
Daffodil Delight 8-1/2" X 11" Cardstock
[119683]
$8.75
0 Comments
<<Previous
Forward>>
    Heidi Collins, Independent Stampin' Up! Demonstrator with On Y Go! Stamping
    Get updates and ideas on my Facebook group
    Heidi Collins, Independent Stampin' Up! Demonstrator and Owner of On Y Go! Stamping
    Picture
    Picture
    On Y Go! Stamping YouTube channel with Card Making Videos on how to do rubber stamping, card making, scrapbooking, and paper crafting

    Archives

    May 2025
    April 2025
    March 2025
    February 2025
    January 2025
    December 2024
    November 2024
    October 2024
    September 2024
    August 2024
    July 2024
    June 2024
    May 2024
    April 2024
    March 2024
    February 2024
    January 2024
    December 2023
    November 2023
    October 2023
    September 2023
    August 2023
    July 2023
    June 2023
    May 2023
    April 2023
    March 2023
    February 2023
    January 2023
    December 2022
    November 2022
    October 2022
    September 2022
    August 2022
    July 2022
    June 2022
    May 2022
    April 2022
    March 2022
    February 2022
    January 2022
    December 2021
    November 2021
    October 2021
    September 2021
    August 2021
    July 2021
    June 2021
    May 2021
    April 2021
    March 2021
    February 2021
    January 2021
    December 2020
    November 2020
    October 2020
    September 2020
    August 2020
    July 2020
    June 2020
    May 2020
    April 2020
    March 2020
    February 2020
    January 2020
    December 2019
    November 2019
    October 2019
    September 2019
    August 2019
    July 2019
    June 2019

Proudly powered by Weebly
  • About
  • Online Card Classes
  • Card Making Ideas
  • Stampin' Up! Catalogs
  • Card Tutorials
  • Contact
  • Shopping Rewards
  • Shop
  • Join Stampin' Up!