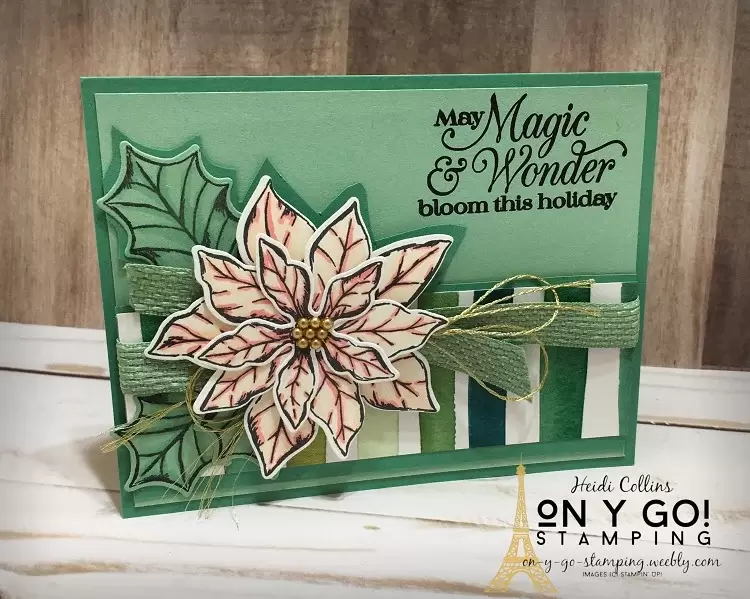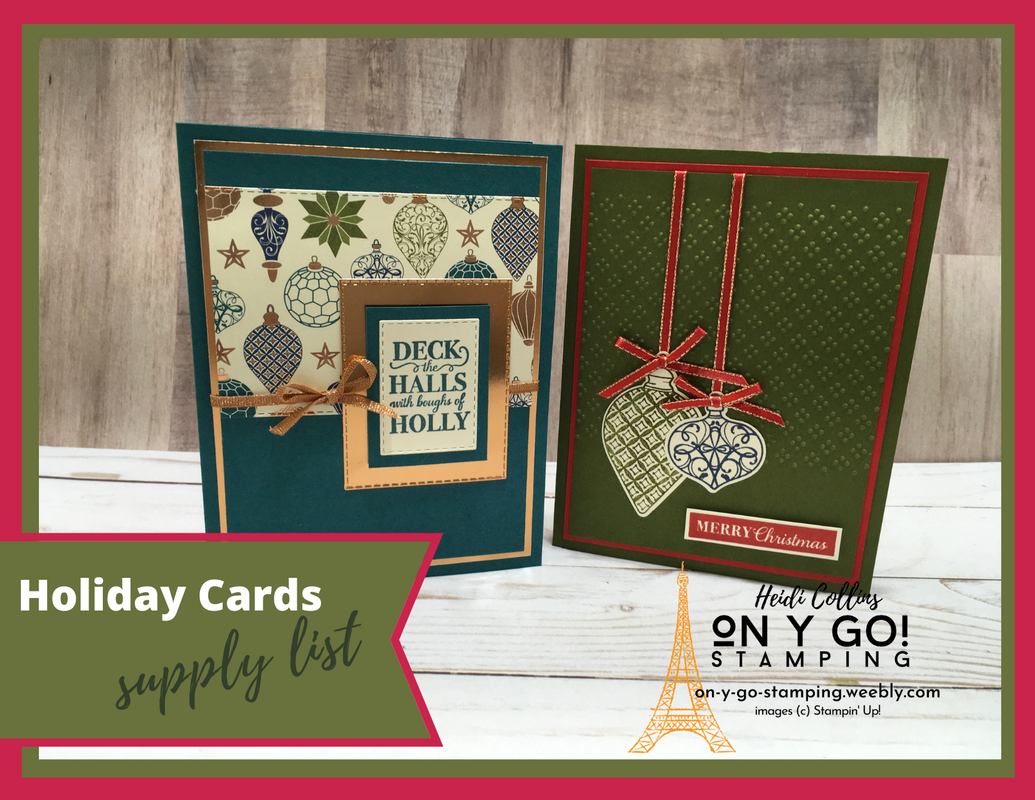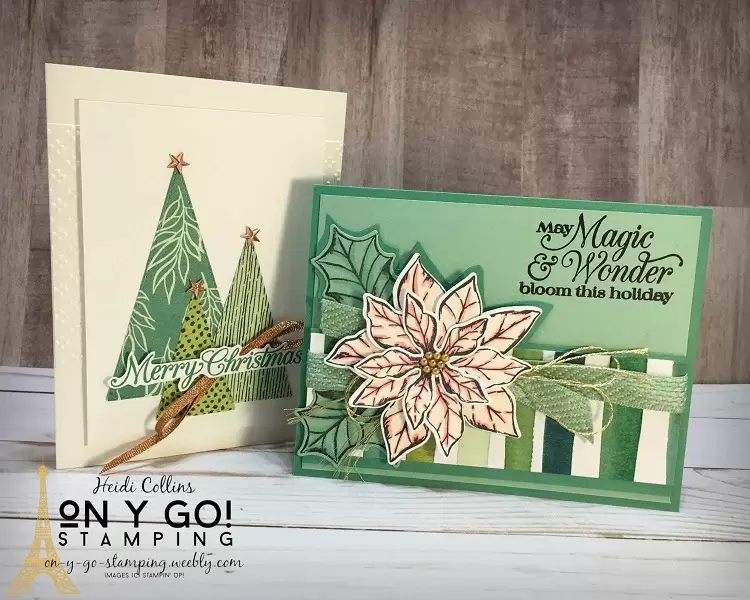
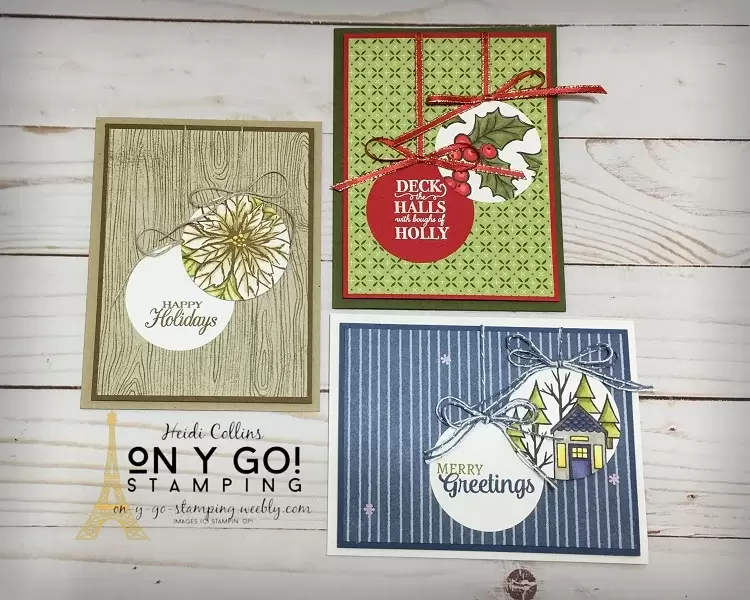
Who says you can only use patterned paper designed for the holidays to create Christmas cards? The gorgeous Forever Greenery Designer Series Paper looks fabulous with the Forever Fern stamp set, but that doesn't mean it won't work for Christmas cards. I've paired it with the Poinsettia Petals stamp set and Stitched Triangle dies to create two beautiful holiday cards.
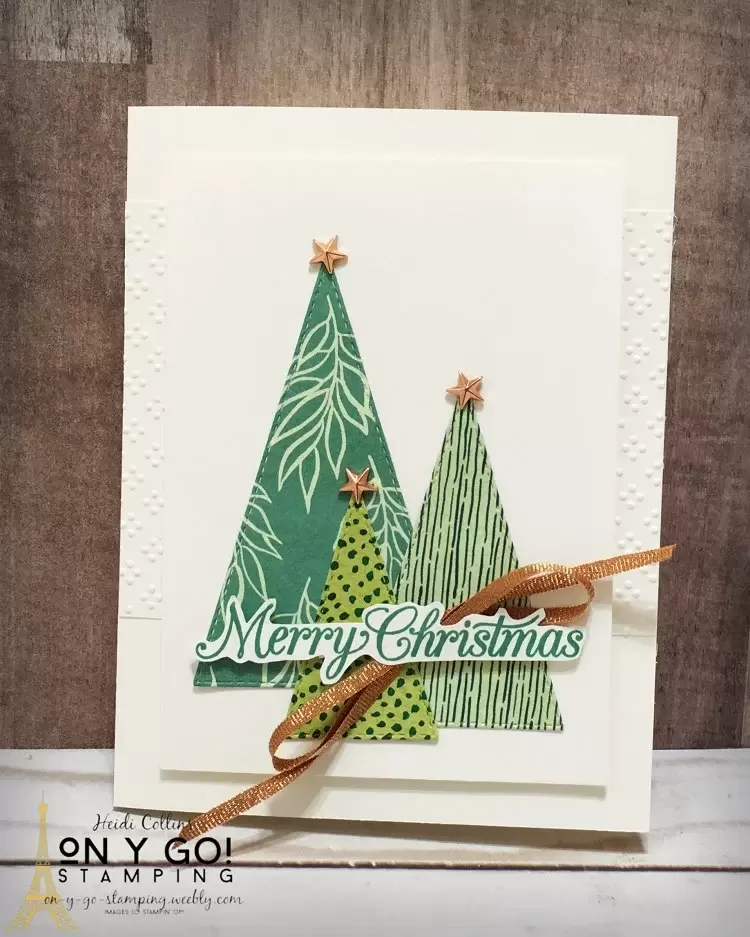
I embossed the piece of Whisper White cardstock with one of the Wrapped in Texture Embossing Folders. This is layered on the card front. The three triangle Christmas Trees are adhered to the piece of 3 1/2" x 4 3/4" Whisper White cardstock. I tied a piece of the copper ribbon from the Basket Weave Metallic Ribbon Combo Pack and used a Mini Glue dot to adhere it over the trees. Then, I stamped the sentiment from the Poinsettia Petals stamp set with Just Jade ink. I fussy cut the sentiment and adhered it over the bow using Mini Stampin' Dimensionals. The piece of 3 1/2" x 4 3/4" Whisper White cardstock to the card front with Stampin' Dimensionals as well.
I stamped the poinsettia pieces with Tuxedo Black Memento ink. Then, I colored it with light and dark Petal Pink and dark Flirty Flamingo Stampin' Blends. For the leaves, I stamped them on Mint Macaron cardstock and colored them with Pool Party Stampin' Blends alcohol markers because I didn't have the Just Jade ones. I layered the flower and ribbon on a piece of the Forever Greenery patterned paper and then on a piece of Just Jade cardstock. I carefully fussy cut around the top of the flower and layered it again on a piece of Mint Macaron cardstock and then on a Just Jade card base. I just love all the depth, texture, and lushness of this card. The Just Jade cardstock looks almost like a shadow around the poinsettia.

1 Comment
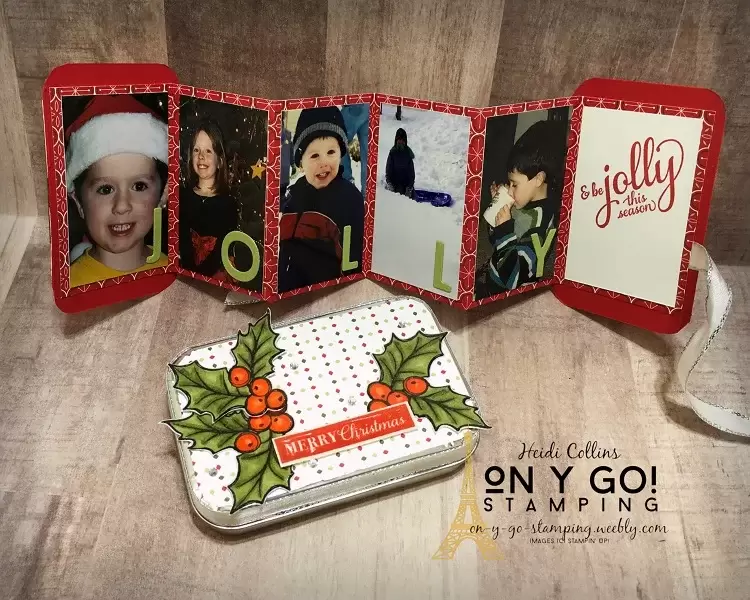
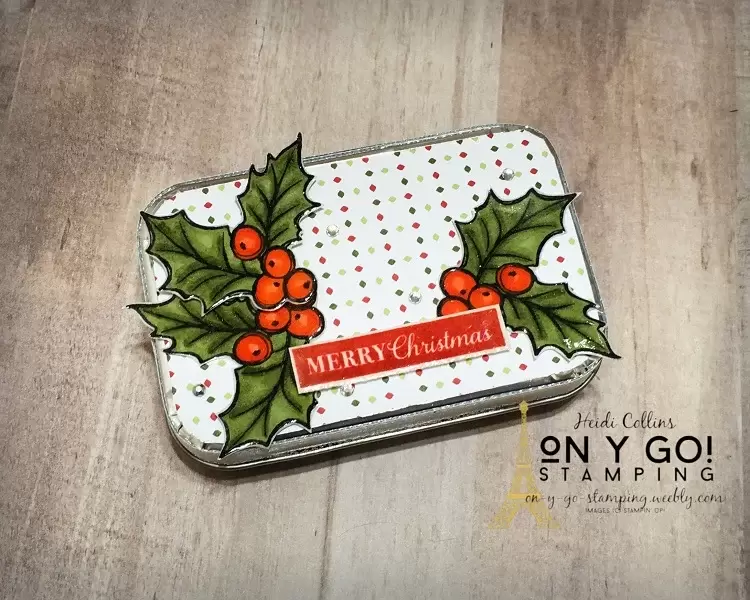
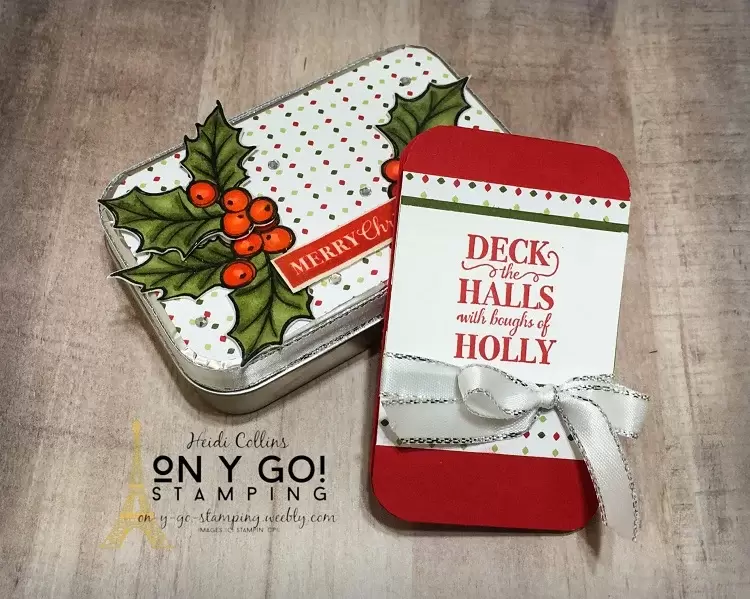
Gift Card Holder TinThis adorable tin is the perfect size to fit a gift card. They are available in the 2020 August-December Mini Catalog and come in packs of 4. Sometimes, giving a gift card can feel a little impersonal, but a festive box like this one can make it much more exciting! Instructions for the Gift Card Tin
I stamped the holly and berries 3 times on a scrap piece of Whisper White cardstock with Tuxedo Black Memento ink. I colored the images in with Poppy Parade and Old Olive Stampin' Blends alcohol markers. I carefully fussy cut the images living a thin edge of white around the outside edges. I also stamped the sentiment with Real Red ink on a scrap of Whisper White cardstock and cut it out. Then, I covered the images in Versamark ink and dipped them in clear embossing powder. I heat emboss the front of each image 3 times in clear embossing powder giving it a really thick and shiny look. Fold-Out Photo Card
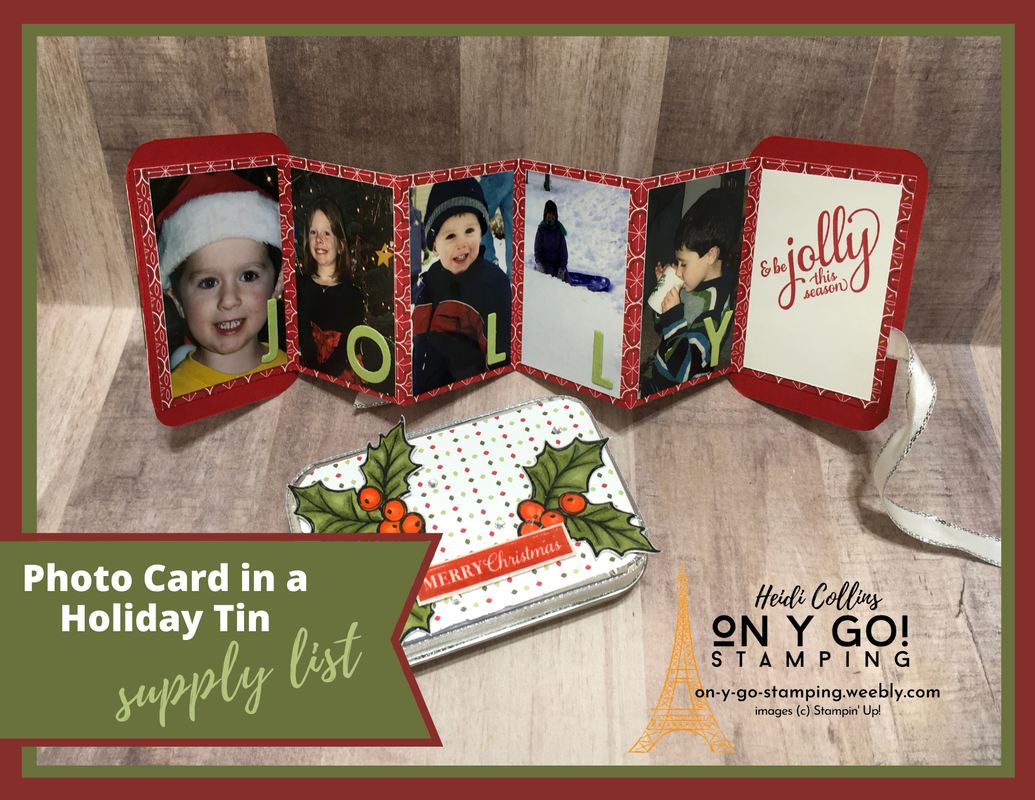
Cutting Dimensions for this fun Fold-out Photo CardHeartwarming Hugs patterned paper: 3" x 12", scored at 2", 4", 6", 8", 10" Real Red (card covers): (2) 3 5/8" x 2 1/4" Interior photos: 2 3/4" x 1 3/4" Whisper White (interior): 2 3/4" x 1 3/4" Whisper White (sentiment): 1 1/2" x 2 1/4" Mossy Meadow: 1 3/4" x 2 1/4" Heartwarming Hugs patterned paper: 1" x 2 1/4" Instructions to create a fold-out Card
I stamped the piece of 1 1/2" x 2 1/4" Whisper White cardstock with the front sentiment using Real Red ink. I adhered the two small strips of Heartwarming Hugs patterned paper to one of the pieces of Real Red cardstock. I placed them so that when I added the sentiment, it would appear that it was once piece of patterned paper. (Basically, I had a strip of paper that I could make work if I used it as two strips. This way, I didn't have to cut into a larger piece of the patterned paper!) I adhered the Mossy Meadow cardstock over this and then the sentiment on top of that. I adhered the strip of ribbon to the inside of the other piece of Real Red cardstock. Then, I accordion folded the piece of 3" x 12" patterned paper and adhered the front and back panel to the pieces of Real Red cardstock. I adhered photos to each of the first 5 panels of patterned paper. Then, I stamped another sentiment on the piece of 2 3/4" x 1 3/4" Whisper White cardstock and adhered that to the last panel. I cut the word Jolly from Pear Pizzazz cardstock using the Playful Alphabet dies. I used Multipurpose adhesive to adhere these to the lower right corner of each photo. I closed the photo card and tied the ribbon on the front. This little card is so quick and easy to put together, but the photos really make it something special! Bonus card Ideas using the Christmas Gleaming Stamp setI love this set and it pairs fabulously with the Brightly Gleaming patterned paper. If you missed this paper last year, be sure to pick some up now because it is so yummy-liscious gorgeous! The copper foil on the paper is so shiny and pretty. Plus, there is a punch pack to quickly punch out the ornament images.
 Thank you so much for stopping by my blog today! I hope you'll take a few minutes and click through the whole blog hop. There are so many amazing projects!
Complete Supply Lists for the Holiday Gift Card Tin, Photo Card, and Bonus Card IdeasClick the images below to see the complete supply lists for the projects. If you need any of the stamps, inks, papers, dies, or embellishments to recreate these project ideas, simple check the items you need and click "Add to Cart." Be sure to enter the host code (found in the side bar) to earn Frequent Shopper Points.
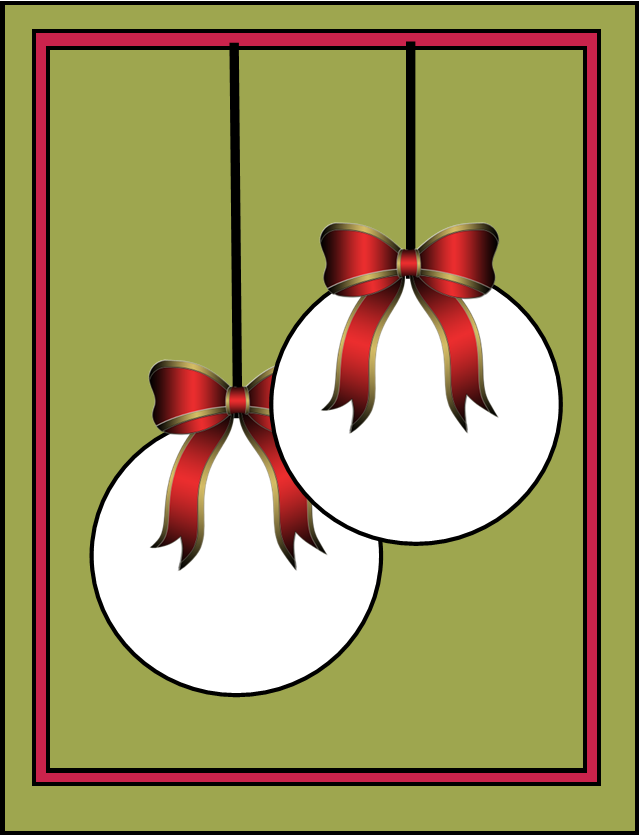
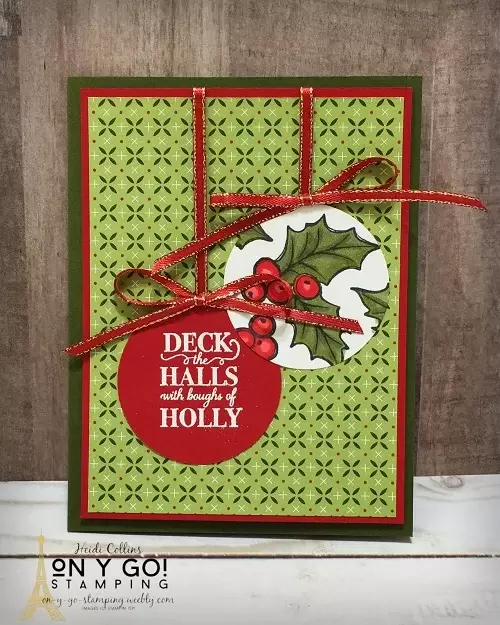
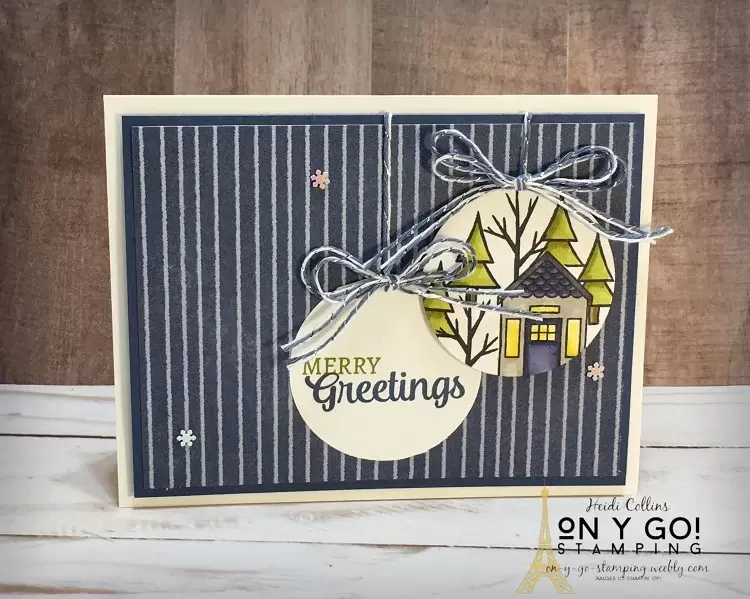
 Here is a simple card sketch and instructions to create an ornament card using a 2" circle punch. You could create a similar effect using a slightly different sized circle using either a punch or dies. It would look great with two different sized circles as well! This card design idea is quick and easy to make and can be done with a variety of stamps and patterned paper.
Instructions for creating this easy Christmas Card
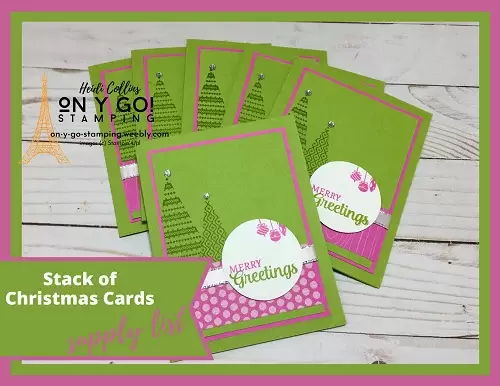
Order the supplies for these Easy Ornament CardsClick the images below to see the complete supply list for each card. Want the supplies to complete the cards? Simply check the stamps, ink, and papers you need, then click "Add to Cart." Remember to use the host code (in the side bar) to earn Frequent Shopper Points. 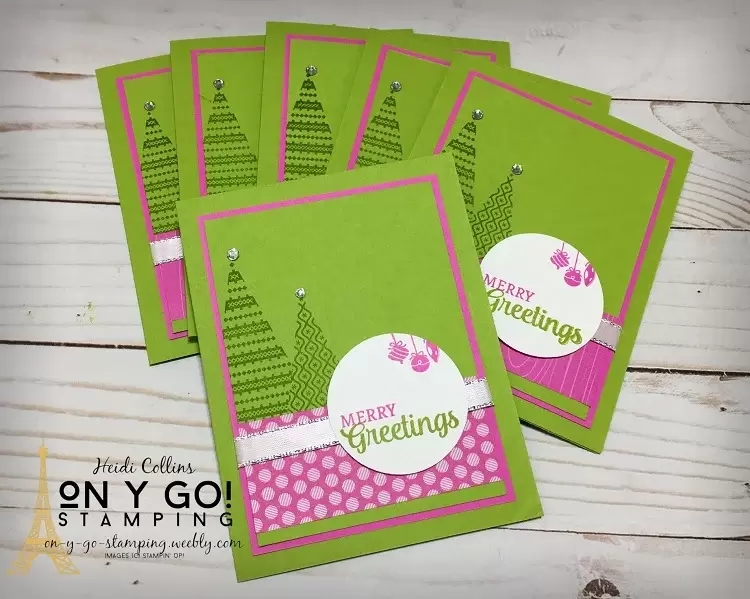 If you'd like to make your own holiday cards this year and you haven't yet started, it's still possible! Today, I have tips for creating a stack of holiday cards quickly. It's surprisingly quicker to mass produce cards than to create individual cards. So, on y go! Let's get stamping.
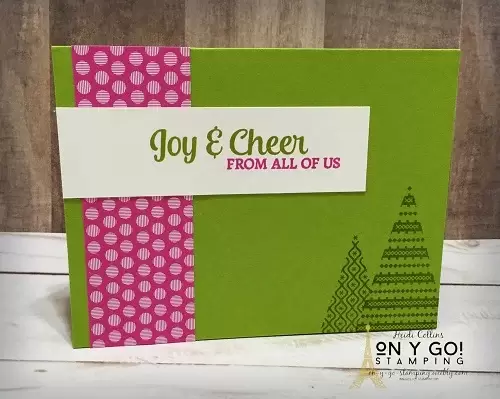
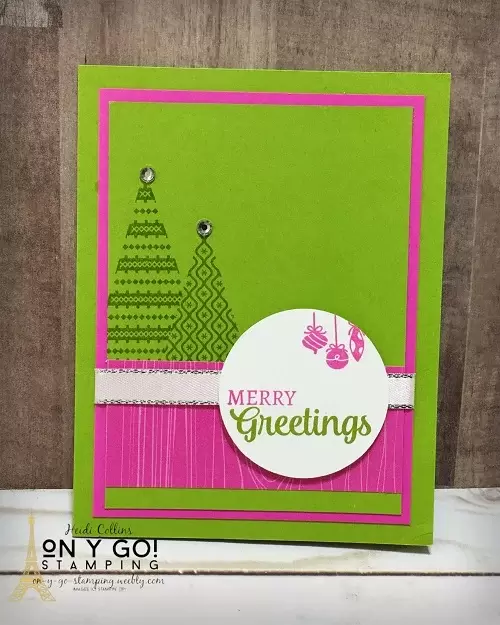
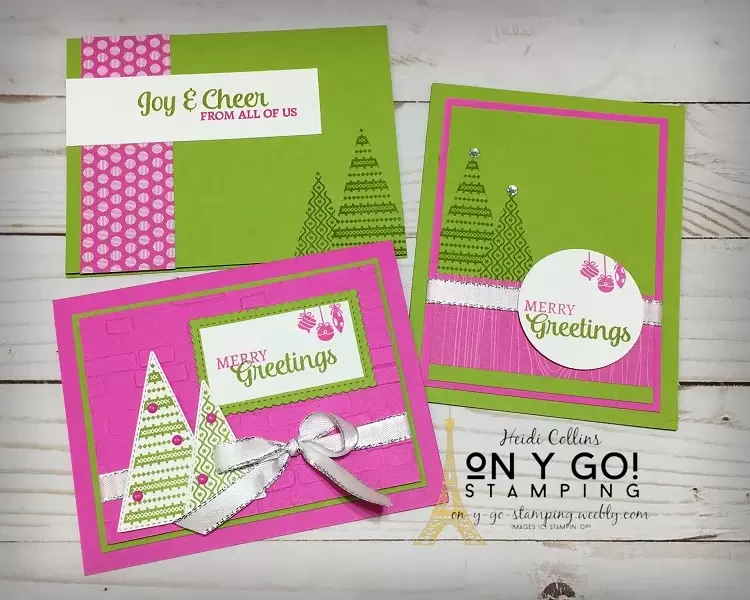
3b. Replace die-cuts with punched shapesInstead of the die-cut Christmas trees and greeting, I stamped the trees on the background and the greeting on a circle punched with the 2" circle punch. Much faster than die-cutting! 4. Use Assembly-line TechniquesNow that you have your prototype, determine the steps to complete your card. Then complete each step for all of the cards before moving on to the next step. In other words, start by cutting all of your cardstock. For my card, I cut all of the Granny Apple Green, then all of the Magenta Madness, and then pieces of the Whisper White. Then, move on to stamping. Stamp all of your Christmas Trees, then stamp all of your greetings, etc.
When the stamping was done, I assembled the cards step by step. You can see exactly how I quickly put together 6 cards in the video. I hope this has inspired and helped you in creating your own stack of holiday cards whether you want to make 10, 50, 100, or more!
Dimensions for the Sample Card DesignGranny Apple Green: 3 1/2" x 4 3/4"
Granny Apple Green: 8 1/2" x 5 1/2", scored at 4 1/4" Magenta Madness: 3 11/16" x 4 15/16" Whisper White: 2" x 2" (or 7" x 4 3/4" to create 6) 2020-2022 In Color 6" x 6" Designer Series Paper: 1 1/2" x 3 1/2" 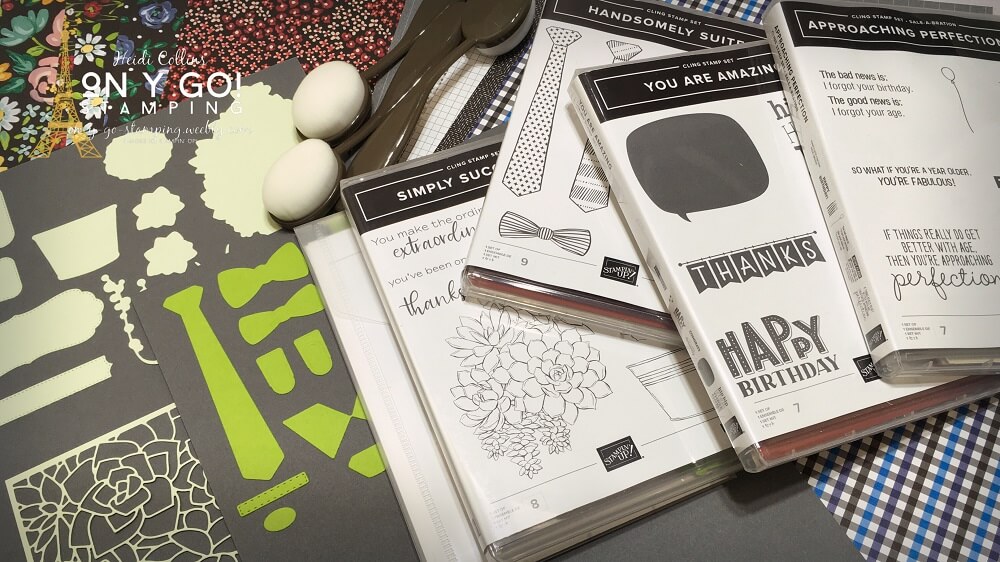 It's only November, but I'm already thinking about January and all of the amazing stamps, dies, patterned papers, and accessories coming in the NEW 2021 January-June Mini Catalog and Sale-A-Bration Catalog from Stampin' Up! I think this may be one of my favorite Mini Catalogs ever! If you have placed an order through me in the last 6 months, I will automatically send you a catalog in December. If you haven't and would like to receive one of these beautiful catalogs, please let me know so that I can add you to my mailing list. There are so many gorgeous stamps and papers and more. I was able to pre-order a few things and quickly inked up the stamps and put them to paper. I also did a YouTube Live to show you all of the goodies I received. So, on y go! Let's get stamping.
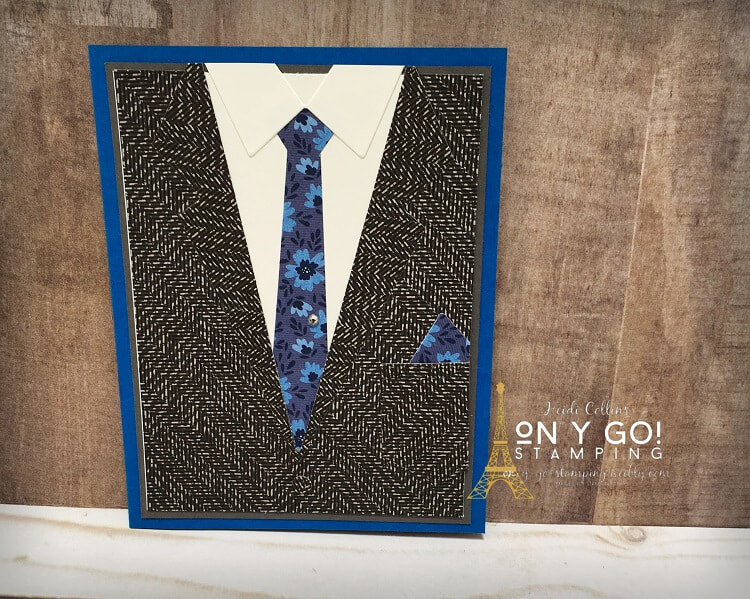
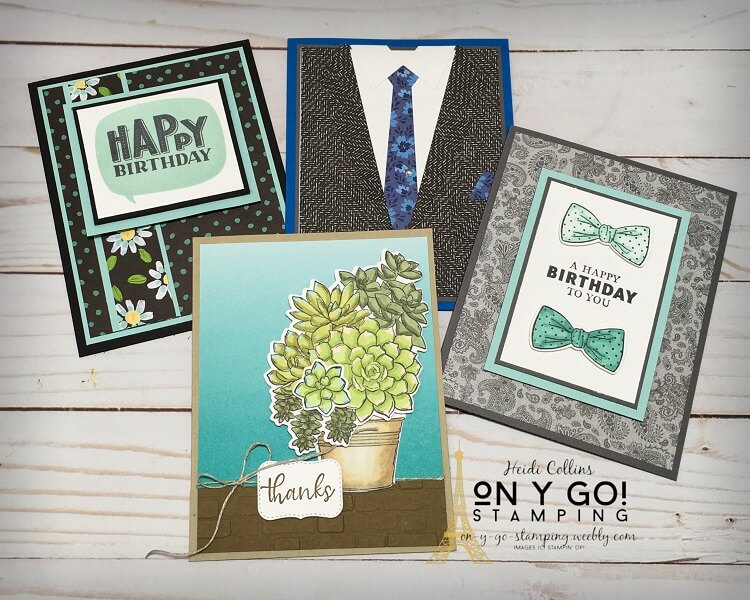 The amazing new Well Suited suite comes with the Handsomely Suited stamp set, Suit & Tie dies, Well Suited Designer Series Paper, and a package of Baker's Twine in Night of Navy and Basic Gray. The stamp set has 2 bowtie and 2 straight tie images with a variety of greetings. The dies really make this suite! You can use them with the stamped images or use them on their own to create shirt fronts and suit jackets. There are even suspenders! And the patterned paper is gorgeous! It works fabulously with the stamps and dies but is extremely versatile and will work well for so many other projects!
Pssst. Have you heard the news? Don't tell anyone, but there's going to be 2 Sale-a-Brations this year! Who am I kidding? This news is too amazing to keep to yourself. THERE'S GOING TO BE 2 SALE-A-BRATIONS THIS YEAR! Like normal, Sale-a-Bration will kick off in January. This year though, it will only last for January and February. This first Sale-a-Bration will feature lots of patterned paper and stamps. Like years past, you can earn FREE items with $50 and $100 purchases (or multiples of those)! Who doesn't love FREE stamps and papers?! The second Sale-a-Bration will happen in July and August to coincide with the 2021 July-December Mini Catalog. This second Sale-a-Bration will have a larger variety of FREE items, but they will only be available while supplies last.
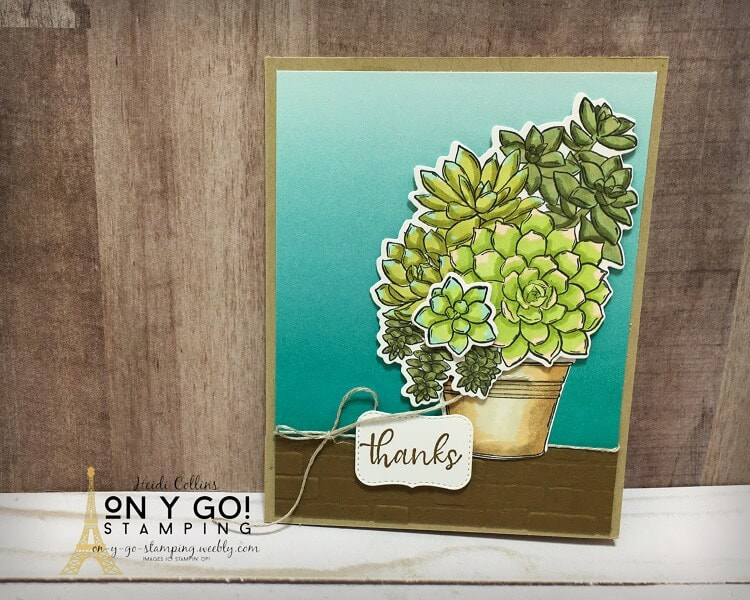
Here are two of the patterned papers you can earn FREE starting in January with any $50 purchase. On the left is the Flower & Field patterned paper. This paper features flowers and patterns on a striking black background! On the right is the Oh So Ombre paper. With two patterns and 4 colors, these 6"x6" papers have beautiful ombre effects. I love how it looks as the background to these succulents.
Speaking of succulents, I'm in love with the Simply Succulents Bundle from the upcoming Mini Catalog. There are beautiful stamped images and the dies include a very cool background die. I show it in the video and I can't wait to try it out on a card. Maybe you'll see that in the next day or two... |


Archives
July 2024
|