• About
  • Online Card Classes
  • Card Making Ideas
  • Stampin' Up! Catalogs
  • Card Tutorials
  • Contact
  • Shopping Rewards
  • Shop
  • Join Stampin' Up!
ON Y GO! STAMPING
  • About
  • Online Card Classes
  • Card Making Ideas
  • Stampin' Up! Catalogs
  • Card Tutorials
  • Contact
  • Shopping Rewards
  • Shop
  • Join Stampin' Up!

Fun Fold Card Idea: Bridge Fold

1/20/2021

0 Comments

 
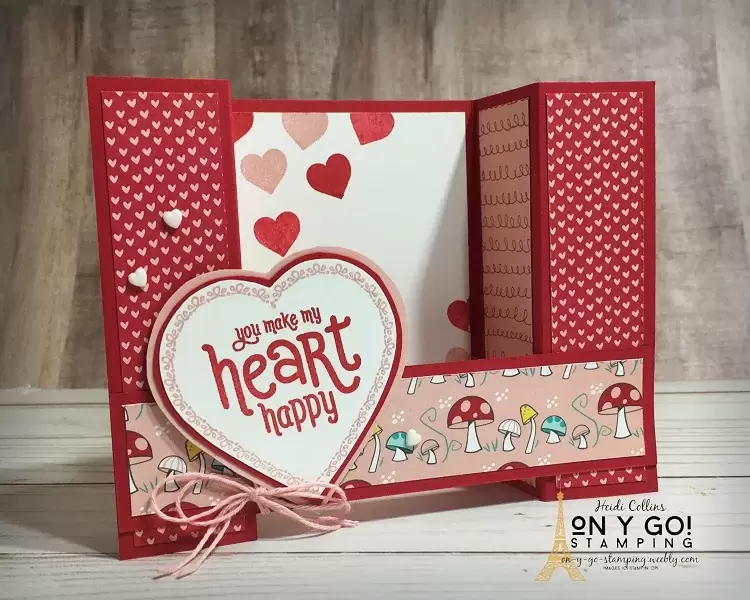
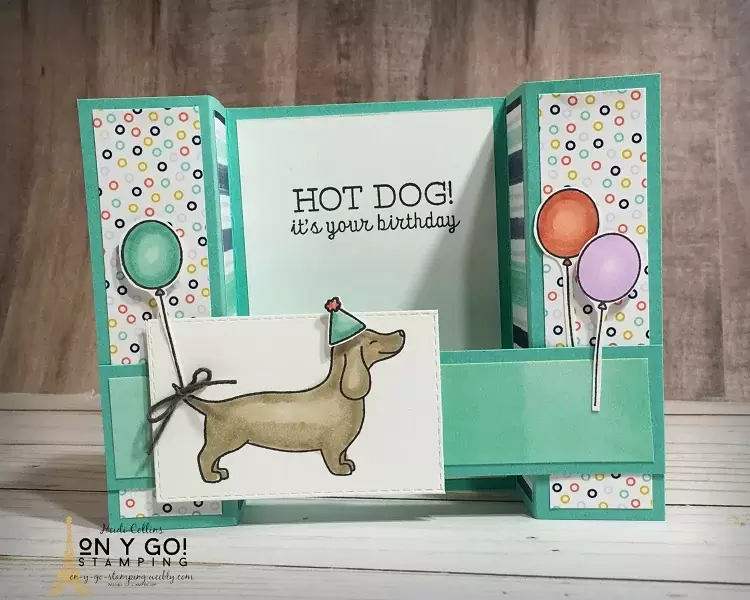
Today, I have another fun fold card idea for you that is easy to make. For last night's Mystery Stamping event, we created Bridge Fold cards. I love this card because it has so much dimension to it. It fits in a regular sized envelope, but will pop out to stand nicely on someone's mantel or windowsill. Today's samples use three different stamp sets and packs of patterned paper. So, on y go! Let's get stamping.
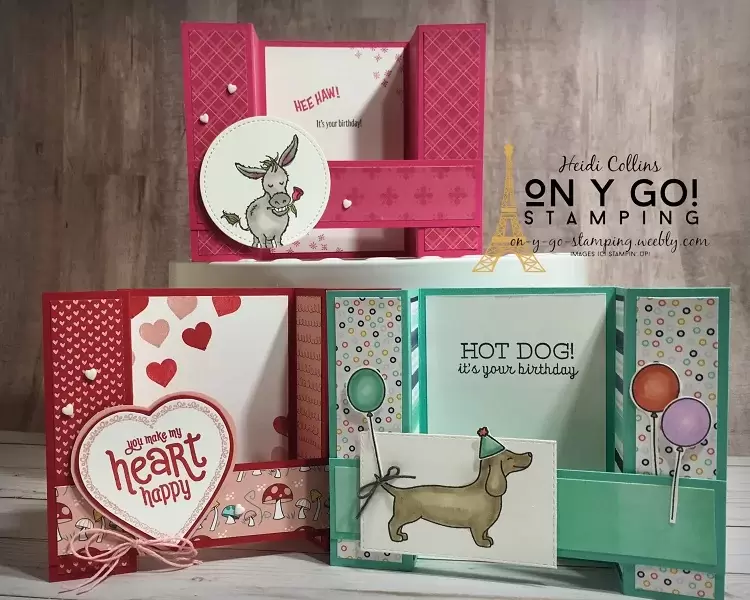
Fold fold cards using Stampin' Up! stamps and papers from the Sale-A-Bration 2021 and January-June Mini Catalogs. These bridge cards are simple to create!
Supply List for these Fun Fold Cards
Valentine's card idea using the Punch Party stamp set that is free during Sale-A-Bration. This fun fold card is the perfect something extra for someone special!

Cutting Dimensions for this easy Fun Fold Card

Cardstock:
  • 8” x 4 ¼”, scored at 1 ¼”, 2 ½”, 5 ½”, and 6 ¾”
  • 1 ¼” x 5 ½”
Patterned Paper: (2) 1” x 4”
Coordinating Patterned Paper: (2) 1” x 4”
3rd Patterned Paper: 1” x 5 ¼”
White or Vanilla cardstock:
  • 4” x 2 ¾”
  • 2” circle or other shape

Valentine's Card Idea

My first card sample for this bridge fold card uses the Snail Mail patterned paper and the new Punch Party stamp set. This stamp set is available FREE during Sale-A-Bration when you host a class or party with at least $350 in sales. I would love to help you earn it, be sure to check out the different types of events you could host and send me an email!

Hot Dog, it's your birthday card idea!

My second sample card features the new Hot Dog stamp set. This time, the puppy is all decked out for a party with a hat and a balloon. I also used the Playing with Patterns patterned paper for this Coastal Cabana birthday card.
Fun fold birthday card idea using the Hot Dog stamp set and Playing with Patterns patterned paper from Stampin' Up! This bridge card is quick and easy to make!
Birthday Card idea using the Darling Donkeys stamp set which is FREE during Sale-A-Bration. This fun fold card is quick and easy to make!

Hee Haw, it's your Birthday Card Idea

My last sample card for this bridge fold card design, uses the Darling Donkeys stamp set. This set is available FREE during Sale-A-Bration 2021 with a $50 purchase. This card idea also uses the new 6" x 6" Melon Mambo patterned paper that will be available in the 2021-2022 Annual Catalog or get it FREE during Sale-A-Bration when you join Stampin' Up! (See more details.)

Directions for Creating a Bridge Card

  1. Adhere 2 matching pieces of patterned paper (1” x 4”) to the two outside panels of the piece of 8" x 4 1/4" cardstock.
  2. Adhere the other 2 matching patterned papers (1” x 4”) to the next two panels.
  3. Adhere the last piece of patterned paper (1” x 5 ¼”) to the piece of 1 ¼” x 5 ½” cardstock.
  4. Stamp an image or a sentiment on the circle (or other shape) of white or vanilla cardstock.
  5. Decorate the piece of 4” x 2 ¾” white or vanilla cardstock. 
  6. Adhere the piece of white or vanilla cardstock to the center panel of your card base.
  7. Lay your piece of 8” x 4 ¼” cardstock in front of you horizontally.
  8. On the 2nd score line from the left (at 2 ½”), fold the cardstock towards the right. Then, on the first score line (at 1 ¼”), fold the cardstock back towards the left.
  9. On the right side, fold the cardstock on the second score line from the right (at 5 ½”) towards the center of the card.
  10. Then, fold the cardstock on the furthest right score line (at 6 ¾”) back towards the right.
  11. You should have 2 folded sides that don’t quite meet in the center of your card.
  12. Unfold the right side of your cardstock. Leave the left side folded.
  13. Adhere the piece of 1 ¼” x 5 ½” cardstock to the farthest left and right panels of your card base. Be careful not to put glue in the center!
  14. Adhere your stamped image to the piece of 1 ¼” x 5 ½” cardstock so that it overlaps one of the outside panels. Only adhere it to the 1 ¼” x 5 ½” cardstock and an outside panel.
  15. Embellish as desired and open your card!

0 Comments

Your comment will be posted after it is approved.


Leave a Reply.

    Heidi Collins, Independent Stampin' Up! Demonstrator with On Y Go! Stamping
    Get updates and ideas on my Facebook group
    Heidi Collins, Independent Stampin' Up! Demonstrator and Owner of On Y Go! Stamping
    Shop for Stampin' Up! stamps, inks, paper, tools, and embellishments with Heidi Collins and earn points towards FREE stamps!
    Picture
    Picture
    On Y Go! Stamping YouTube channel with Card Making Videos on how to do rubber stamping, card making, scrapbooking, and paper crafting

    Archives

    January 2023
    December 2022
    November 2022
    October 2022
    September 2022
    August 2022
    July 2022
    June 2022
    May 2022
    April 2022
    March 2022
    February 2022
    January 2022
    December 2021
    November 2021
    October 2021
    September 2021
    August 2021
    July 2021
    June 2021
    May 2021
    April 2021
    March 2021
    February 2021
    January 2021
    December 2020
    November 2020
    October 2020
    September 2020
    August 2020
    July 2020
    June 2020
    May 2020
    April 2020
    March 2020
    February 2020
    January 2020
    December 2019
    November 2019
    October 2019
    September 2019
    August 2019
    July 2019
    June 2019

Powered by Create your own unique website with customizable templates.
  • About
  • Online Card Classes
  • Card Making Ideas
  • Stampin' Up! Catalogs
  • Card Tutorials
  • Contact
  • Shopping Rewards
  • Shop
  • Join Stampin' Up!