• About
  • Online Card Classes
  • Card Making Ideas
  • Stampin' Up! Catalogs
  • Card Tutorials
  • Contact
  • Shopping Rewards
  • Shop
  • Join Stampin' Up!
ON Y GO! STAMPING
  • About
  • Online Card Classes
  • Card Making Ideas
  • Stampin' Up! Catalogs
  • Card Tutorials
  • Contact
  • Shopping Rewards
  • Shop
  • Join Stampin' Up!

Hershey Bar Wrapper

3/19/2020

0 Comments

 
Picture
Picture
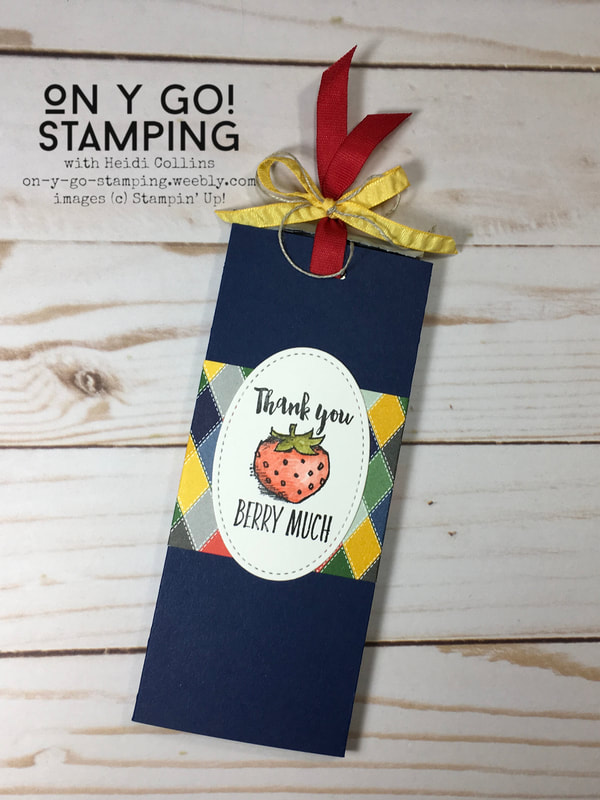
Wow! It's been a crazy time these last few days, hasn't it? I have been pretty quiet on the blog because I have been busy transitioning my college class to online learning. I'm hoping to step-it-up a bit though in the next few days and bring you lots of great ideas for stamping and crafting while we're all hunkered down at home.

Last week (was it only last week!?), during my Facebook Virtual Stamp Class, I shared how to make this cute candy bar wrapper. It'd make a great little gift for someone and is very easy to make. 
Picture
I started with a piece of Night of Navy cardstock that was 6" x 6 1/4". I scored it at 1", 1 1/4", 3 3/4", and 4". Next, I also scored a  2 1/4" x 6 1/4" piece of Country Club DSP at 1", 1 1/4", 3 3/4", and 4".

I cut a piece of Whisper White cardstock using the Stitched Shapes dies. I stamped this piece with an image from the Witty-Cisms stamp set and colored it with watercolor pencils and a blender pen. 


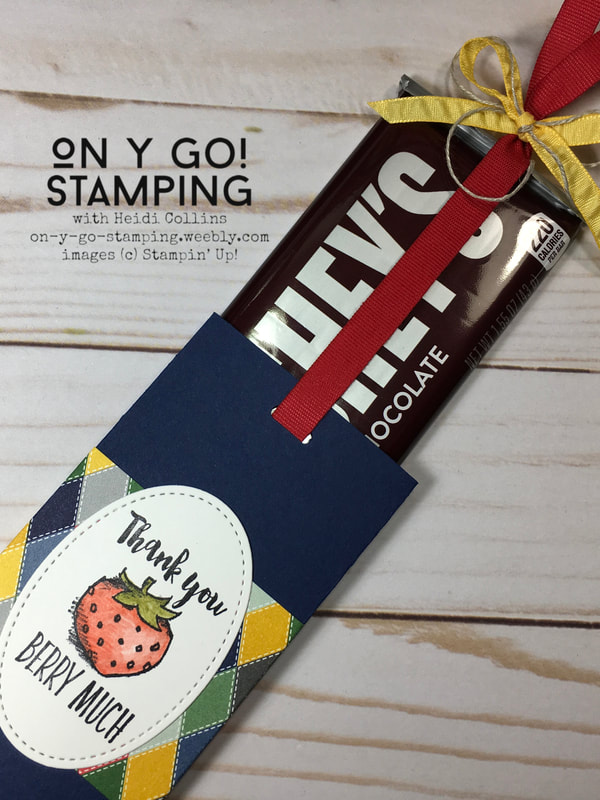
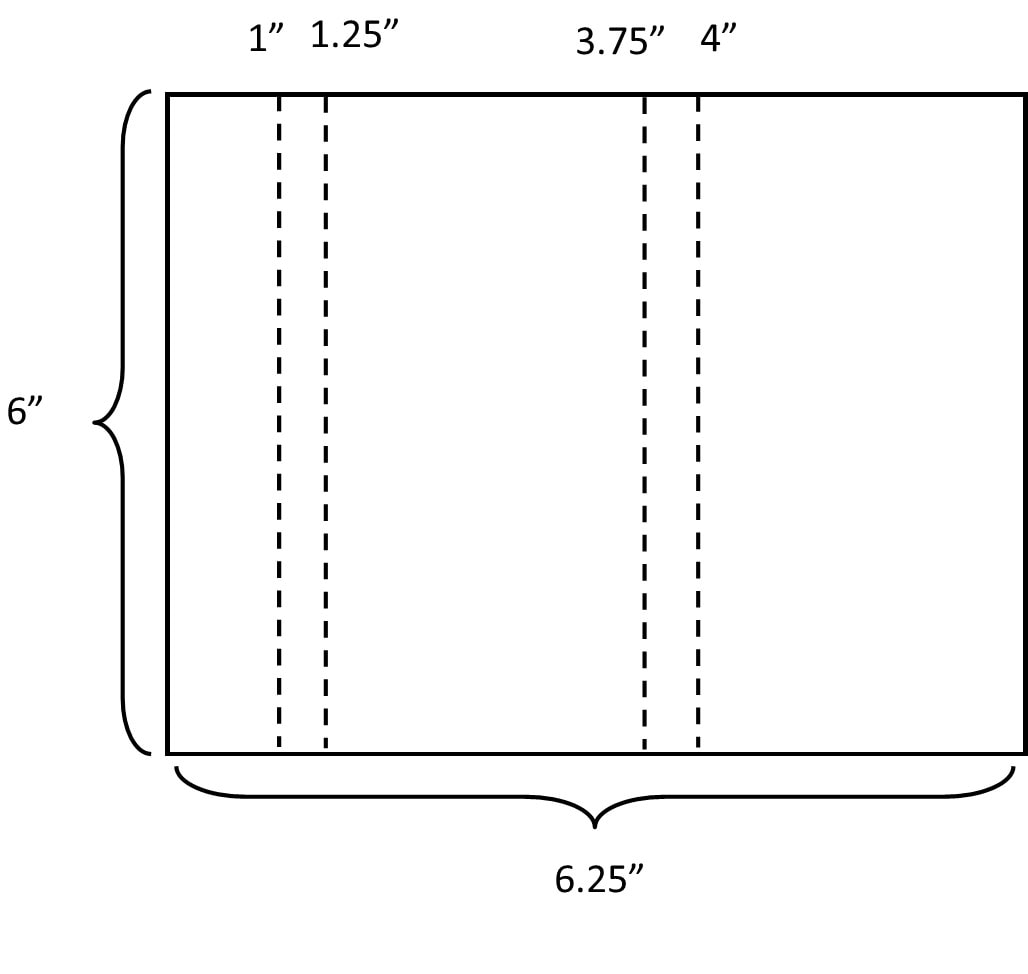
I adhered the Country Club DSP to the piece of Night of Navy and folded and scored both. Then I attached the back flaps to each other using Tear & Stick tape. I adhered the stamped oval to the front. 

Next, I punched a hole through the front and back layers of the Night of Navy cardstock using the retired slot punch. You could use a 1/2" circle punch instead. I threaded a piece of Real Red cotton ribbon through both holes going from front to back. Then, I began to slide my Hershey's candy bar into the wrapper so that the red ribbon that passed between the front and back was pushed down to the bottom of the wrapper. When the candy bar was fully inserted in the wrapper, I tied the ends of the ribbon with rushed Daffodil Delight ribbon and Linen Thread. 

The directions may sound a little complicated, but I think when you are putting it together it will all make sense. 
Purchase Stampin' Up! Product
0 Comments

Your comment will be posted after it is approved.


Leave a Reply.

    Heidi Collins, Independent Stampin' Up! Demonstrator with On Y Go! Stamping
    Get updates and ideas on my Facebook group
    Heidi Collins, Independent Stampin' Up! Demonstrator and Owner of On Y Go! Stamping
    Shop for Stampin' Up! stamps, inks, paper, tools, and embellishments with Heidi Collins and earn points towards FREE stamps!
    Picture
    Picture
    On Y Go! Stamping YouTube channel with Card Making Videos on how to do rubber stamping, card making, scrapbooking, and paper crafting

    Archives

    January 2023
    December 2022
    November 2022
    October 2022
    September 2022
    August 2022
    July 2022
    June 2022
    May 2022
    April 2022
    March 2022
    February 2022
    January 2022
    December 2021
    November 2021
    October 2021
    September 2021
    August 2021
    July 2021
    June 2021
    May 2021
    April 2021
    March 2021
    February 2021
    January 2021
    December 2020
    November 2020
    October 2020
    September 2020
    August 2020
    July 2020
    June 2020
    May 2020
    April 2020
    March 2020
    February 2020
    January 2020
    December 2019
    November 2019
    October 2019
    September 2019
    August 2019
    July 2019
    June 2019

Powered by Create your own unique website with customizable templates.
  • About
  • Online Card Classes
  • Card Making Ideas
  • Stampin' Up! Catalogs
  • Card Tutorials
  • Contact
  • Shopping Rewards
  • Shop
  • Join Stampin' Up!