• About
  • Online Card Classes
  • Card Making Ideas
  • Stampin' Up! Catalogs
  • Card Tutorials
  • Contact
  • Shopping Rewards
  • Shop
  • Join Stampin' Up!
ON Y GO! STAMPING
  • About
  • Online Card Classes
  • Card Making Ideas
  • Stampin' Up! Catalogs
  • Card Tutorials
  • Contact
  • Shopping Rewards
  • Shop
  • Join Stampin' Up!

Playful Birthday Cards with lots of Variations

8/14/2020

0 Comments

 
Picture
Today, I used the same basic supplies and colors to create four different cards. They all look very similar, but each one is a little different. This is a great way to make different cards quickly. Since you are using all the same materials, you only have to pull them out and clean them up once. So, on y go! Let's get stamping.
Get the Supply List
For these cards I used Pretty Peacock, Pumpkin Pie, and Bumblebee inks and cardstocks. I pulled the colors from a piece of the Plaid Tidings Designer Series Paper which is also used on each card. I chose the Well Said stamp set, but paired it with the Playful Alphabet dies instead of its coordinating dies. 
Picture

Picture
Picture
Cardstock Dimensions:
Pretty Peacock:
  • 8 1/2" x 5 1/2", scored at 4 1/4"
  • 2 1/2" x 5 1/4"
  • 1" x 5 1/4"
Plaid Tidings Designer Series Paper: 1 1/4" x 5 1/4"
Pumpkin Pie: 1" x 4 1/2" (or scraps)
Bumblebee: 1/2" x 1 1/2"

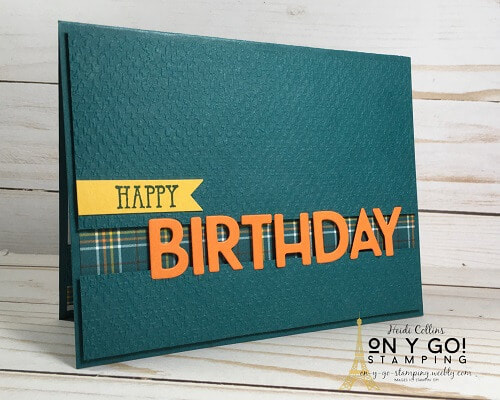
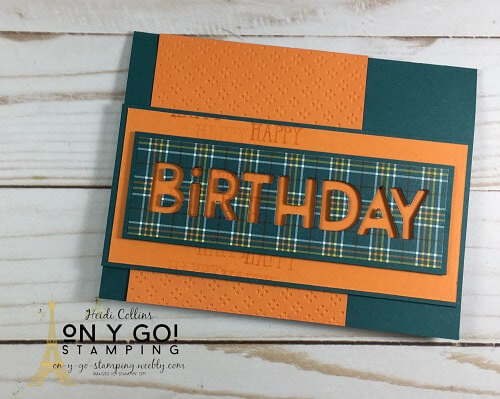
For my first card, I started by adhering the strip of Plaid Tidings towards the bottom of my card front leaving about a half inch or so of space towards the bottom. Then, I adhered the two pieces of Pretty Peacock cardstock that I had embossed with the Tasteful Textile 3D embossing folder to the card front using Black Stampin' Dimensionals and leaving a gap so that the Plaid Tidings DSP shows through. I carefully adhered the die-cut letters over the gap by adding a little multipurpose liquid glue to the top and bottom edges of the letters so that they are attached to the edges of the two pieces of Pretty Peacock cardstock but not the Plaid Tidings DSP. 

​Cutting Dimensions:

Pumpkin Pie:
  • 8 1/2" x 5 1/2", scored at 4 1/4"
  • 1" x 4 1/2" (or scraps)
Pretty Peacock: 3 11/16" x 4 15/16"
Plaid Tidings DSP: 3 1/2" x 4 3/4"
​Bumblebee: 1/2" x 4"
Picture
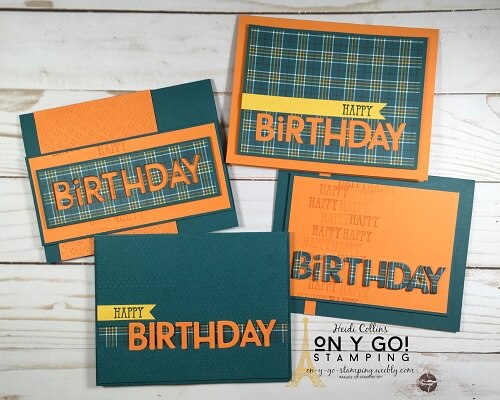
I still cut the "Birthday" greeting with the Playful Alphabet dies, but for this card, I created a longer flag for the "Happy" from the Well Written stamp set. I simply layered this greeting on a piece of the Plaid Tidings DSP and then mounted on Pretty Peacock. This layer is then mounted to the Pumpkin Pie card base using Stampin' Dimensionals. This is a pretty quick and easy card with minimal stamping. 
Picture
Cutting Dimensions:
Pretty Peacock:
  • 8 1/2" x 5 1/2", scored at 4 1/4"
  • 4 13/16" x 4 1/16"
Pumpkin Pie:
  • 4 5/8" x 3 7/8"
  • 5/16" x 4 1/4"
​Plaid Tidings DSP: 1" x 4 1/2" (or scraps)
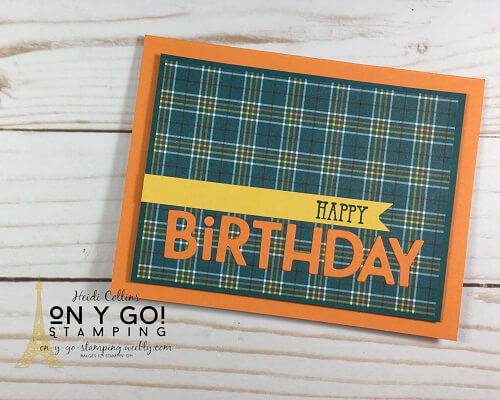
For my third card, I cut the "Birthday" greeting from the Plaid Tidings DSP. It is mounted on a foam adhesive sheet. Normally, when I mount the letters on the foam adhesive sheet, I adhere the foam to the paper before I cut the letters. This time, I didn't decide that I wanted them popped up until after I'd already cut the letters. But, I found a really good trick for getting the paper letters perfectly placed on the foam letters. The foam letters generally stay put when you take the metal die off. Leave them in the rest of the piece of foam and carefully peal off the sticker side on one of the letters. Apply the paper letter to the foam before punching out the foam. because the foam around the letter will still have the sticker backing, it sticks up a little higher and you can nestle the paper letter into place assuring proper placement on the foam letter. (I hope all that made sense!)

For this card, I also stamped "Happy" with Pumpkin Pie ink on the Pumpkin Pie cardstock. I stamped it 2-3 times before reinking the stamp and varied the placement. As I was putting the card together, it felt like it needed a little something, so I added the thin strip of Pumpkin Pie cardstock between the Pretty Peacock layer and card base.

Cutting Dimensions:
Pretty Peacock:
  • 8 1/2" x 5 1/2", scored at 4 1/4"
  • (layer) 2 9/16" x 5 1/2"
  • (greeting) 1 3/16" x 4 15/16"
Pumpkin Pie:
  • (greeting) 2 3/8" x 5 5/16"
  • (layer) 3 3/8" x 4 1/4"
Plaid Tidings DSP: 1 1/2" 4 3/4"
Picture

For my last card, I used the piece of Plaid Tidings DSP from which I had cut the letters for the previous card. (Actually, I made this card first and then used the letters on the other card.) I started by adhere the piece of Plaid Tidings DSP to the Pretty Peacock mat. Then, I cut the greeting. I popped this up on Stampin' Dimensionals when I adhered it to the Pumpkin Pie background on which I had stamped "Happy" with Pumpkin Pie ink. I embossed the large piece of Pumpkin Pie cardstock in the back with one of the Wrapped in Texture embossing folders. (These come as a 2-pack in the August-December Mini Catalog).

These cards were fun and quick to make. The color combination and basic designs make them a perfect gender neutral card perfect for anyone!
0 Comments

Your comment will be posted after it is approved.


Leave a Reply.

    Heidi Collins, Independent Stampin' Up! Demonstrator with On Y Go! Stamping
    Get updates and ideas on my Facebook group
    Heidi Collins, Independent Stampin' Up! Demonstrator and Owner of On Y Go! Stamping
    Picture
    Picture
    On Y Go! Stamping YouTube channel with Card Making Videos on how to do rubber stamping, card making, scrapbooking, and paper crafting

    Archives

    May 2025
    April 2025
    March 2025
    February 2025
    January 2025
    December 2024
    November 2024
    October 2024
    September 2024
    August 2024
    July 2024
    June 2024
    May 2024
    April 2024
    March 2024
    February 2024
    January 2024
    December 2023
    November 2023
    October 2023
    September 2023
    August 2023
    July 2023
    June 2023
    May 2023
    April 2023
    March 2023
    February 2023
    January 2023
    December 2022
    November 2022
    October 2022
    September 2022
    August 2022
    July 2022
    June 2022
    May 2022
    April 2022
    March 2022
    February 2022
    January 2022
    December 2021
    November 2021
    October 2021
    September 2021
    August 2021
    July 2021
    June 2021
    May 2021
    April 2021
    March 2021
    February 2021
    January 2021
    December 2020
    November 2020
    October 2020
    September 2020
    August 2020
    July 2020
    June 2020
    May 2020
    April 2020
    March 2020
    February 2020
    January 2020
    December 2019
    November 2019
    October 2019
    September 2019
    August 2019
    July 2019
    June 2019

Proudly powered by Weebly
  • About
  • Online Card Classes
  • Card Making Ideas
  • Stampin' Up! Catalogs
  • Card Tutorials
  • Contact
  • Shopping Rewards
  • Shop
  • Join Stampin' Up!