• About
  • Online Card Classes
  • Card Making Ideas
  • Stampin' Up! Catalogs
  • Card Tutorials
  • Contact
  • Shopping Rewards
  • Shop
  • Join Stampin' Up!
ON Y GO! STAMPING
  • About
  • Online Card Classes
  • Card Making Ideas
  • Stampin' Up! Catalogs
  • Card Tutorials
  • Contact
  • Shopping Rewards
  • Shop
  • Join Stampin' Up!

Poppies, Poppies, Poppies!

11/25/2019

2 Comments

 
Picture
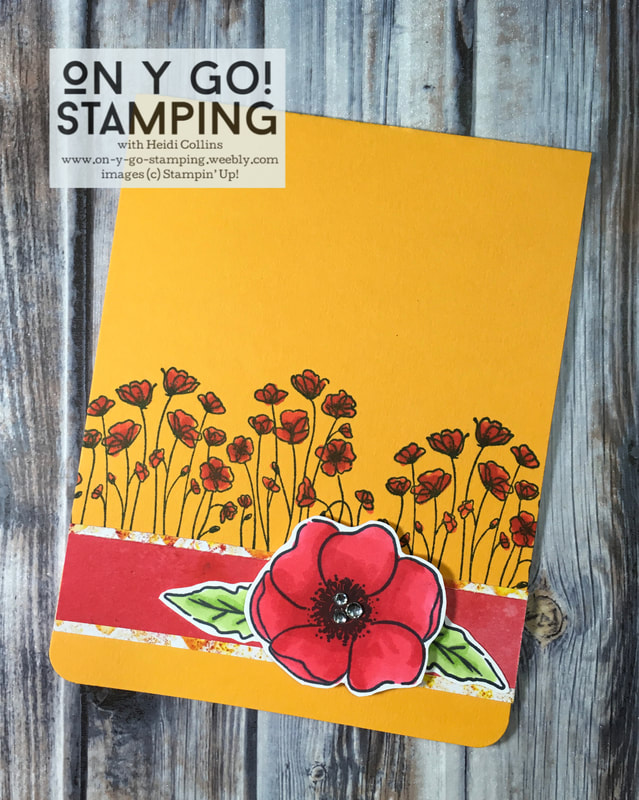
I just couldn't resist playing with these poppies some more! I decided to make a set of four blank cards. These are perfect for sending a note to a friend just because you're thinking of them. I was inspired by the Global Design Project #216 to CASE (Copy and Selectively Edit) the Designer. 

The challenge was to design a card inspired by this card from designer Sarah Berry. I loved the Designer Series Paper and the rounded corners on one side and decided to carry those ideas through to not just one card, but four cards. 

I wanted the four cards to all use the same paper and colors so that they would appear to be a set. However, I wanted each card to be unique as well. So, I mixed up the direction of the cards, changed the coloring method, added some texture and glam on some, and changed the proportions of the patterned paper. 
Picture
Picture
For the first one, I used the stamps in the Painted Poppies stamp set to color in the poppies using Poppy Parade ink. There is a large textured splotch that I used for the general coverage of the flower. Then, there are additional speckle stamps that aren't textured in the same way as the splotch so they stamp darker. I used these to stamp over the splotch and give additional texture to the poppy. I found that this look mimicked the red patterned paper from the See a Silhouette Designer Series Paper pack. 

I stamped the stem in Tuxedo Black Memento ink on Whisper White card stock. The stem actually has a smaller flower and a bud, but I covered these with the poppies that I had stamped on Whisper White and fussy cut. I also stamped the speckles in Mango Melody behind where the flowers are to give it a little texture and added a few rhinestones. 
For the second card, I stamped the splotch in Mango Melody ink and then stamped the speckles in both Mango Melody and Poppy Parade. Once again, I stamped the outline of the poppies with the Tuxedo Black Memento pad. I colored the leaves by stamping the smaller speckle stamp with Granny Apple Green ink. I fussy cut the flowers and the leaves. The Mango Melody card stock is textured with the Subtle 3D embossing folder.
Picture
Picture
For the third card, I stamped the line of poppies in Tuxedo Black Memento ink on Mango Melody card stock and then I used Stampin' Blends in Poppy Parade to color them in. I stamped the poppy image and the leaves with Memento ink on Whisper White and colored those with Stampin' Blends as well. The flower is Poppy Parade and the leaves are Granny Apple Green. I added three rhinestones tot he center of the flower to glam it up a little bit. 
The final card has a Poppy Parade base. I stamped the poppies and leaves with Memento ink again on Whisper White card stock. Like the previous card, I colored them with Stampin' Blends in Poppy Parade and Granny Apple Green. To give the poppies a little sparkle, I colored bits of the flowers with Wink of Stella. Love the glittery look! 

It's hard to see, but I stamped the speckles in Poppy Parade ink behind the flowers to give the card stock a little more texture. Finally, I added a few rhinestones to give that little something extra. 
Picture

The Painted Poppy stamp set will be available in the new Mini Catalog coming in January! If you'd like to receive one, please leave me a message or send me an email (stampin_heidi@yahoo.com) and I will get one out to you!
2 Comments
Kathryn Fleming
12/20/2019 13:19:23

Hello Heidi- I love your Poppy cards! Can you please tell me on the 4th card how you made the bottom strip of the card? The lighter "Poppy Parade" color provides a wonderful contrast the bright Poppy Parade on top and your flowers!

Reply
Heidi Collins
12/20/2019 13:39:53

Thank you! I'm so glad you like them. The bottom strip is patterned paper from the See A Silhouette Designer Series Paper pack. I didn't use any special techniques on these cards, but that package of paper has gorgeous water color pieces that almost look like they were done with the Pigment Sprinkles. It makes is so easy to create interesting backgrounds that add depth to the cards.

Reply

Your comment will be posted after it is approved.


Leave a Reply.

    Heidi Collins, Independent Stampin' Up! Demonstrator with On Y Go! Stamping
    Get updates and ideas on my Facebook group
    Heidi Collins, Independent Stampin' Up! Demonstrator and Owner of On Y Go! Stamping
    Shop for Stampin' Up! stamps, inks, paper, tools, and embellishments with Heidi Collins and earn points towards FREE stamps!
    Picture
    Picture
    On Y Go! Stamping YouTube channel with Card Making Videos on how to do rubber stamping, card making, scrapbooking, and paper crafting

    Archives

    March 2023
    February 2023
    January 2023
    December 2022
    November 2022
    October 2022
    September 2022
    August 2022
    July 2022
    June 2022
    May 2022
    April 2022
    March 2022
    February 2022
    January 2022
    December 2021
    November 2021
    October 2021
    September 2021
    August 2021
    July 2021
    June 2021
    May 2021
    April 2021
    March 2021
    February 2021
    January 2021
    December 2020
    November 2020
    October 2020
    September 2020
    August 2020
    July 2020
    June 2020
    May 2020
    April 2020
    March 2020
    February 2020
    January 2020
    December 2019
    November 2019
    October 2019
    September 2019
    August 2019
    July 2019
    June 2019

Powered by Create your own unique website with customizable templates.
  • About
  • Online Card Classes
  • Card Making Ideas
  • Stampin' Up! Catalogs
  • Card Tutorials
  • Contact
  • Shopping Rewards
  • Shop
  • Join Stampin' Up!