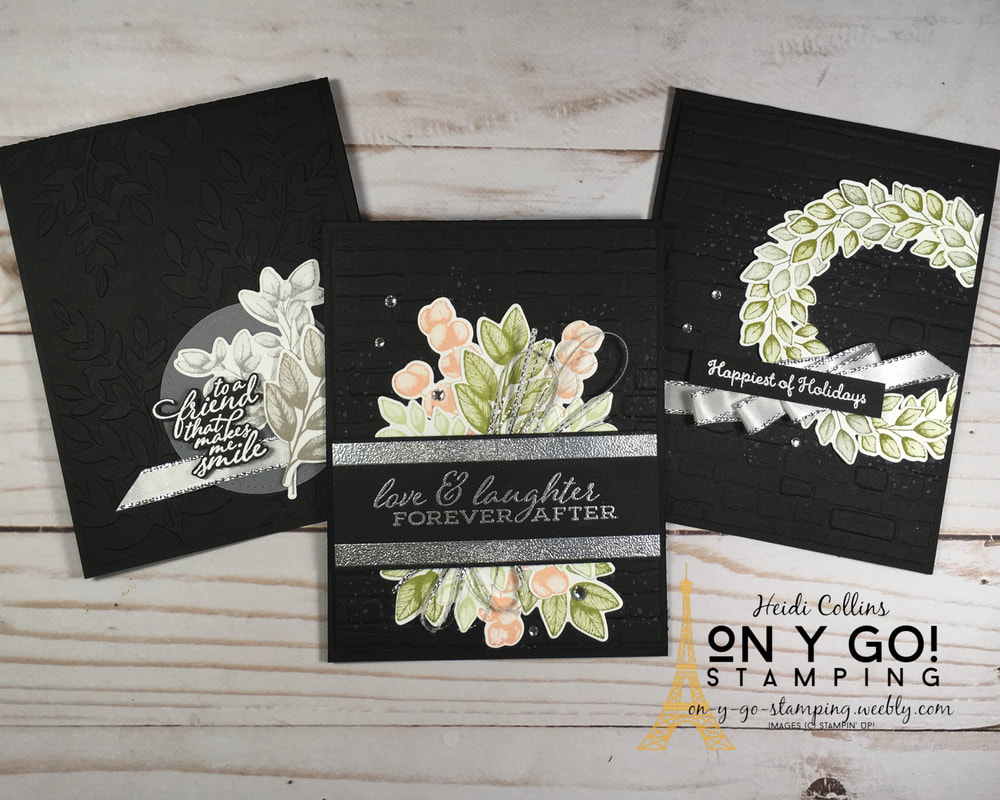
I love the look of simple images on a white card with lots of white-on-white texture which led me to wonder what would happen if I used the same design ideas but did them on black instead of white. The results are dramatic cards that are simple and elegant. For these cards, I used the Forever Fern stamp set from Stampin' Up! It is new in the 2020-2021 Annual Catalog and has an entire suite of products including some really yummy Designer Series Paper. But for these cards, I focused solely on the stamps and dies. So, on y go! Let's get stamping.
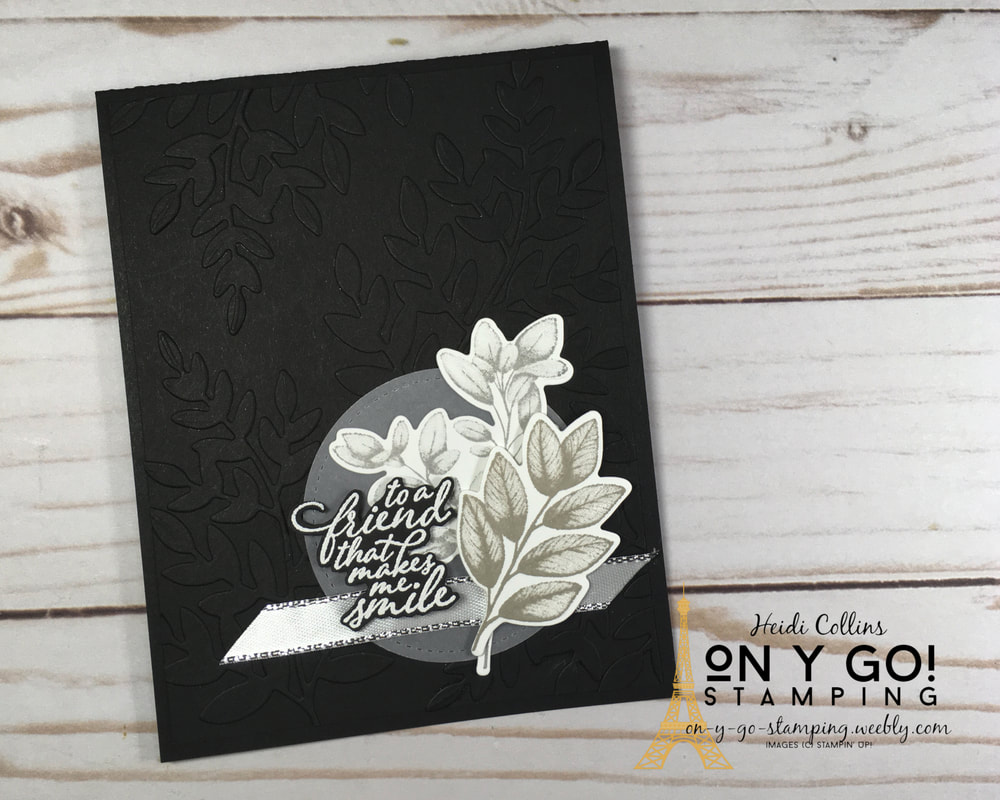
For my first card, I challenged myself to use only black, white, and gray. I created the background by adhering black die-cut ferns to a black card front. I love, love, love the subtle texture this creates. For the focal image, I used a circle of vellum cardstock with Smoky Slate and Granite Gray leaf clusters. I added a length of metallic-edged ribbon and I embossed the sentiment with white embossing powder on Basic Black cardstock and fussy cut it.
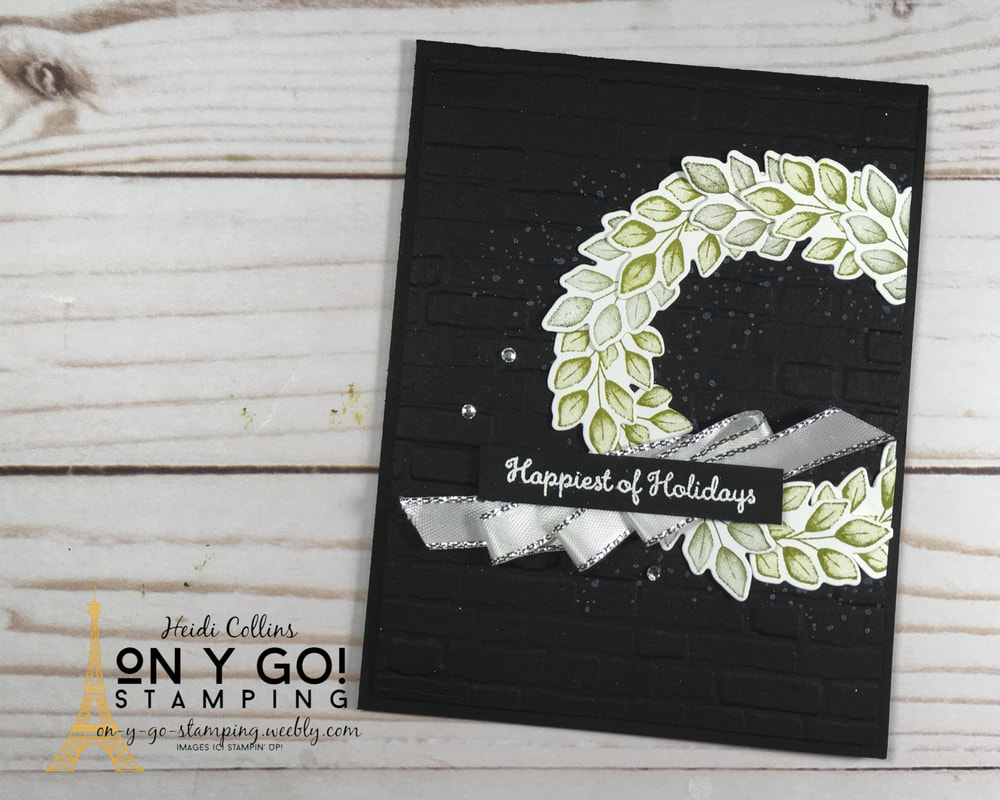
Christmas will be here in only a few short months. Ok, maybe 6. But if you're making your own Christmas cards, it's never to early to start! Black isn't a very traditional Christmas color, but I think this card has a quiet elegance to it that reminds me of snowy night. I stamped the leaves in Old Olive and Mossy Meadow. I added the speckles behind the wreath with the speckle stamp from the set stamped with White Craft ink. I swiped the greeting from the Merry Moose stamp set. I really wanted a greeting that was a little bigger and bolder, but my new Christmas sets aren't arriving until tomorrow.

My final card pulls in a little Petal Pink with Soft Sea Foam and Pear Pizzazz leaves. I've been wanting to try this stamp set with some non-traditional colors, so this seemed like a good time to try the pink. I embossed the greeting with silver embossing powder. For the lines, I added strips of Tear & Tape to hold the embossing powder. I love the dramatic effect of the silver lines. For the hints of ribbon, I carefully cut the edge off of a length of the metallic-edged ribbon. I layered it under the greeting and once it was taped in place, I unraveled it a little more to get the wisps of silver thread.
One last tip, when you're making cards with a black base like these, the black Stampin' Dimensionals are amazing! I often forget to use them. But, with the black-on-black cardstocks, it's sooooo nice to not have the distracting white of the regular Stampin' Dimensionals when the card is turned sideways to open it. I hope you have found these little black cards inspiring. You'll find all of the products I used listed below. Each one links to my online store. If you have any questions or need help ordering Stampin' Up! product, leave a comment or send me an e-mail. I'd love to help you however I can!
Product List
")


")


0 Comments
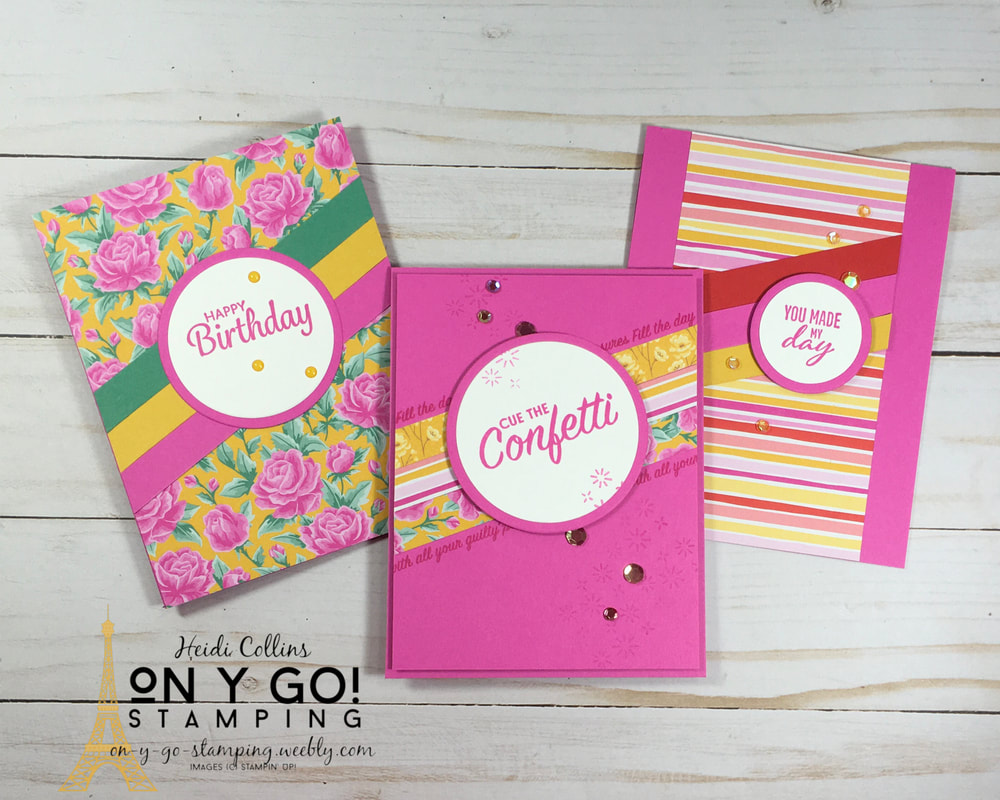
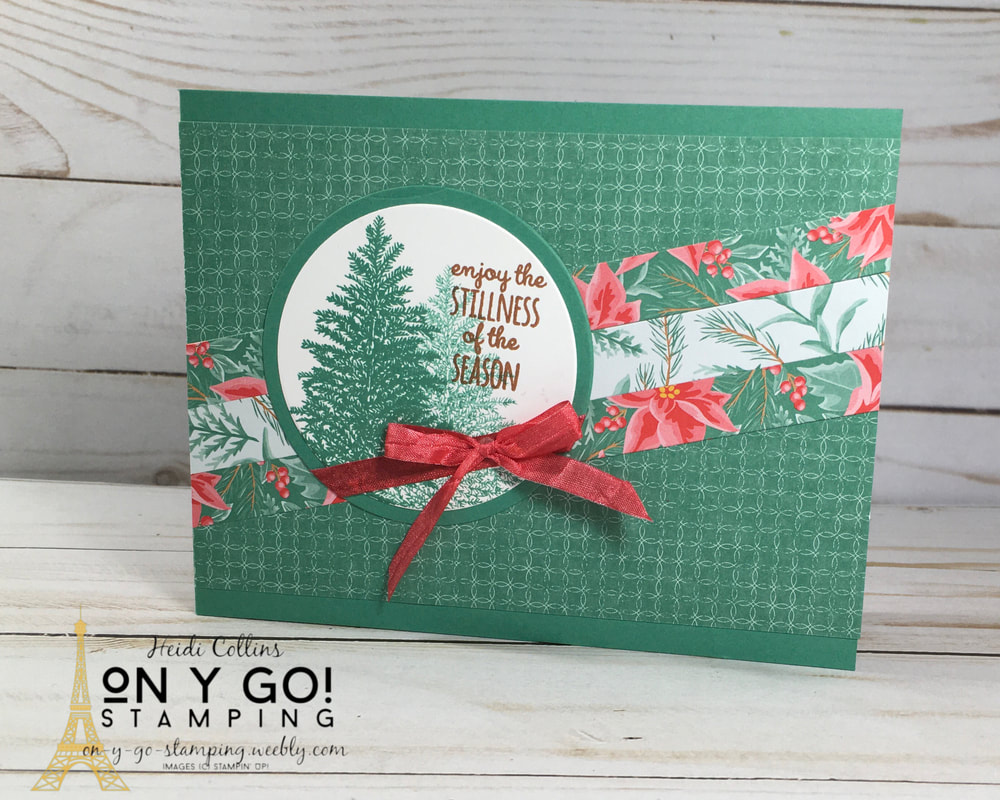
While I love the bright colors, especially the Magenta Madness, there are also some awesome Christmas theme papers in the pack of Flowers for Every Season Designer Series Paper. For my last card, I layered patterns on patterns. I stamped the trees and greeting from the Merry Moose stamp set. This awesome set was in last year's Holiday catalog and it's back again this year! So, you can't order it right now, but you will be able to order it again beginning August 4.
To finish off the card, I added some ribbon. This is the White Crinkled Seam Binding that I colored with the dark Poppy Parade Stampin' blend. Because it's a circle, the piece of ribbon isn't actually tied around the front. Instead, I laid a shorter piece across the front and then taped the ends to the back of the circle. Then, I took another piece, tied a bow, and adhered it to the front with mini glue dots.
Thanks for looking at my projects today! I hope you'll take a moment to hop through the whole blog hop and check out all of the amazing designers from around the globe. The complete list of designers is below. After that, you'll find links to the supplies I used today.

Do you need a Stampin' Up! Demonstrator? I would love to help you out. Click any of the products below to link to my online shop. Be sure to grab the host code and start earning free stamps (see the more info under the Shopping Rewards tab). And of course, if you need any help, feel free to send me an email ([email protected]) or leave your questions in the comments.
Product List


I love blog hop week! Today, I am excited to be hopping with the talented designers of the Stampin' Friends Blog Hop. If you're already going through the hop, you've joined me from Kim Lamos's awesome site. The theme this month is "Anything Goes," so there is a variety of awesome projects on everyone's site. At the bottom of my post is the complete list of designers and links to all of their blogs. Next in line is designer Maureen Rauchfuss. I hope when you're done here, you'll check out all of the projects for the hop. Ok, on y go! Let's get stamping.
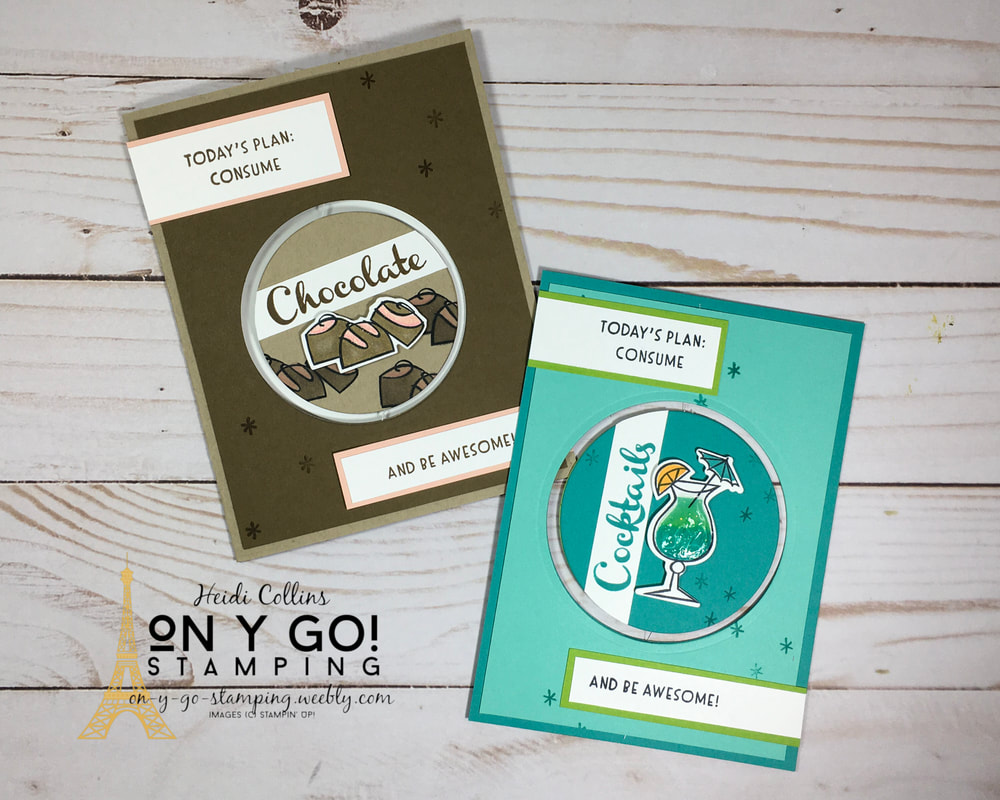
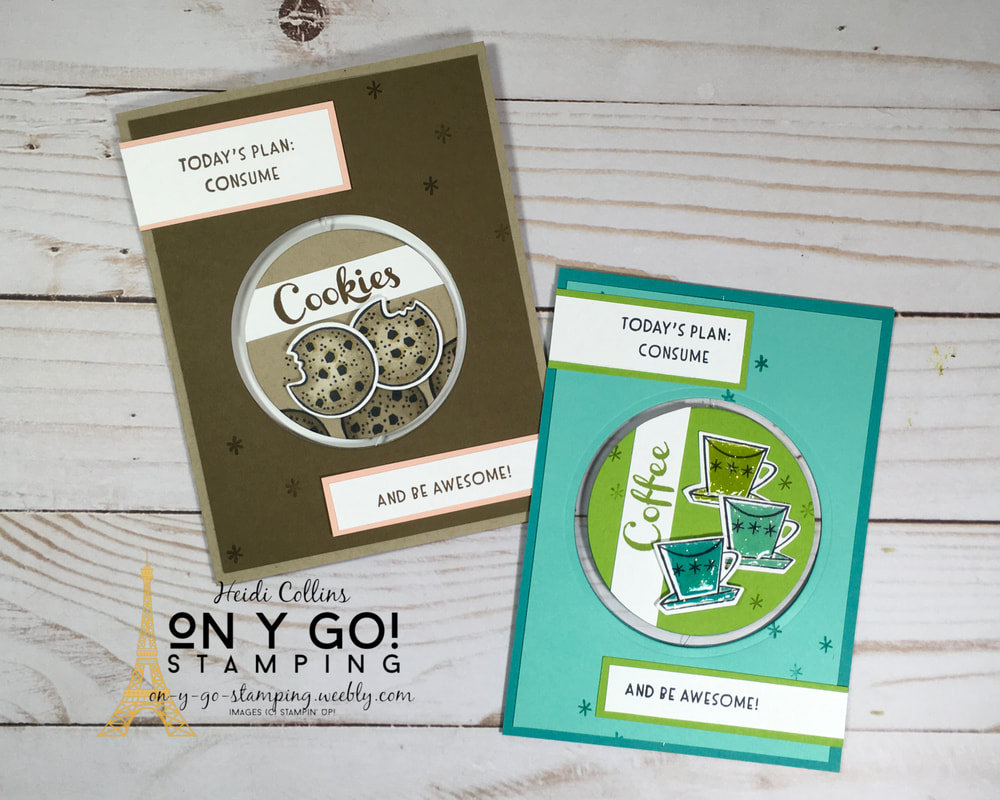
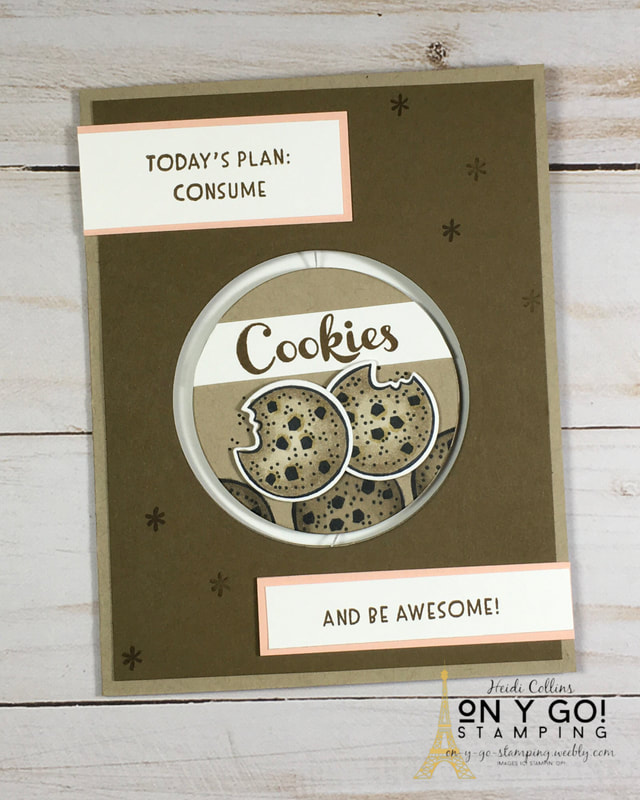
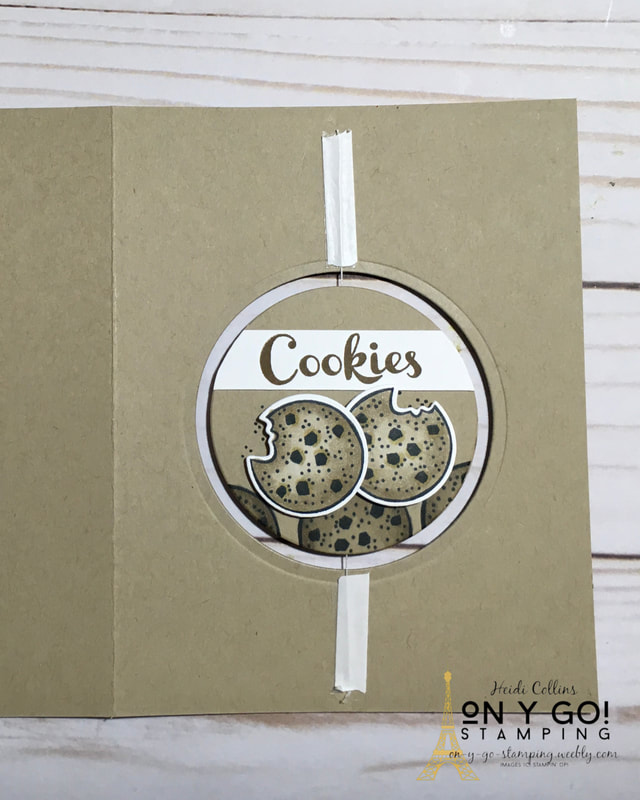
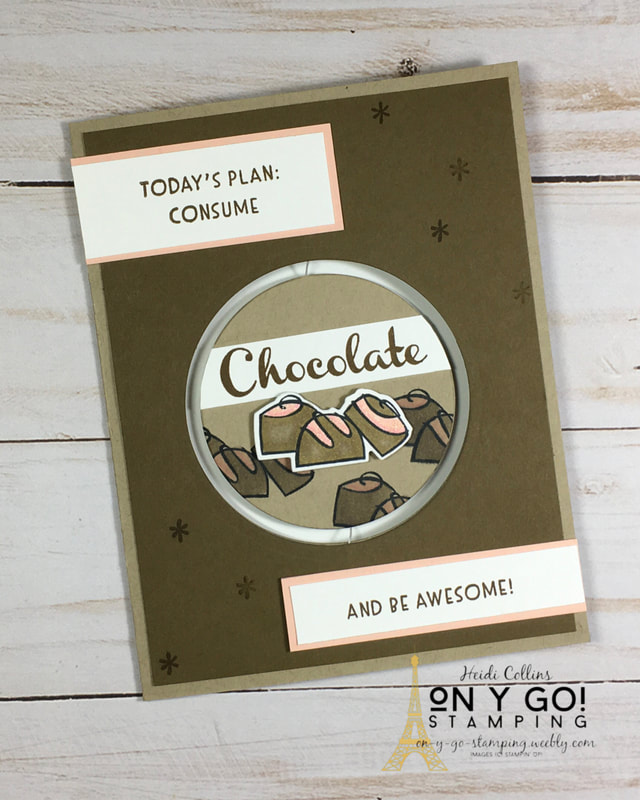
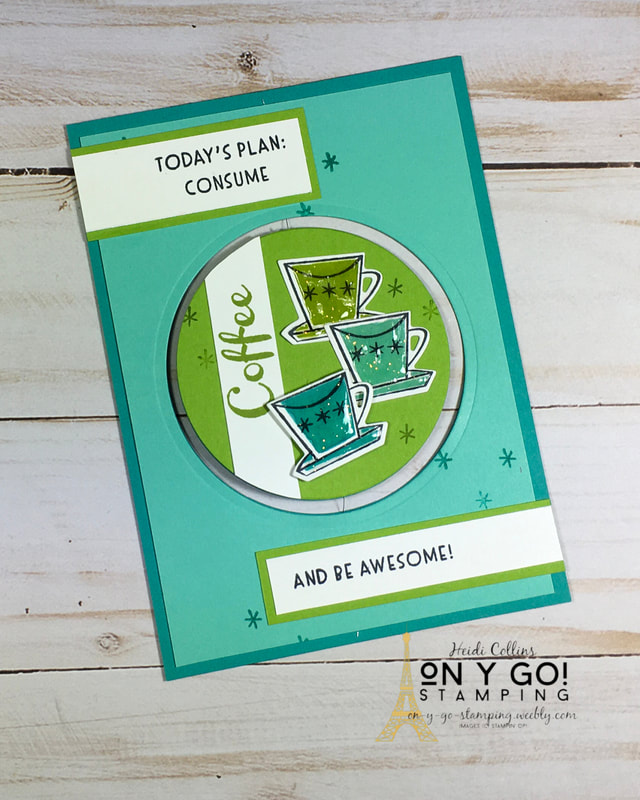
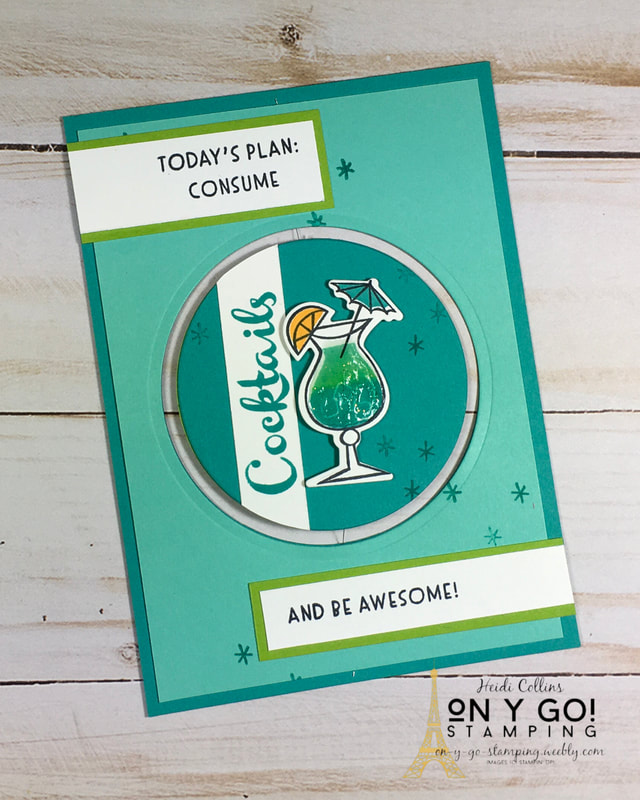
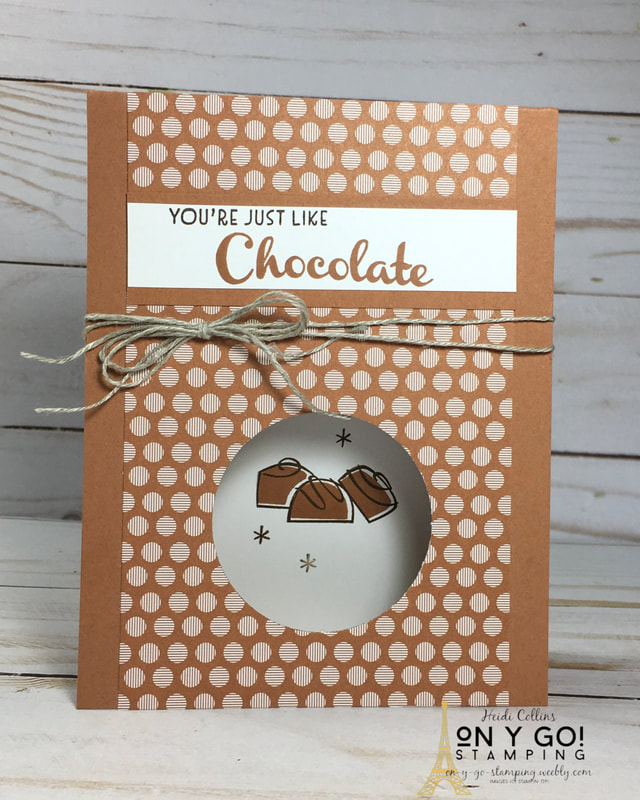
I love the new Nothing's Better Than stamp set, but it's so hard to choose whether to use coffee, chocolate, cocktails, or cookies for my cards. So, I made a spinner card so I could use both chocolate and cookies on one card. Then, I decided to make an awesome fridge magnet using the same design. This way, you can choose whether it's time for coffee or time for cocktails!
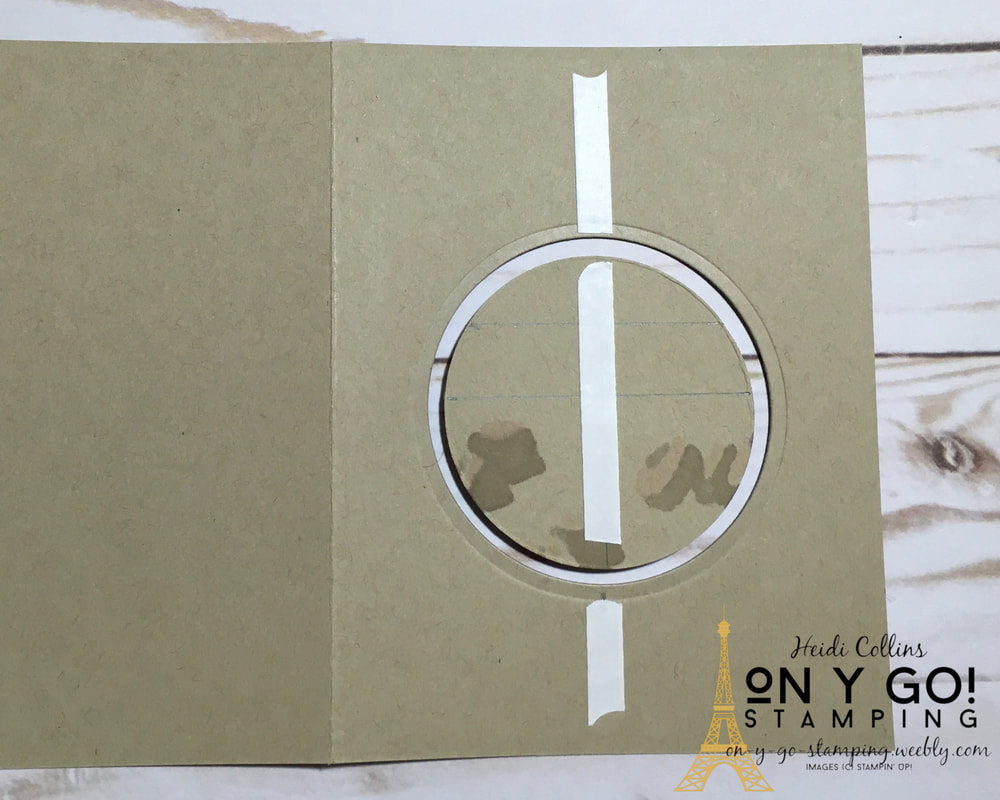
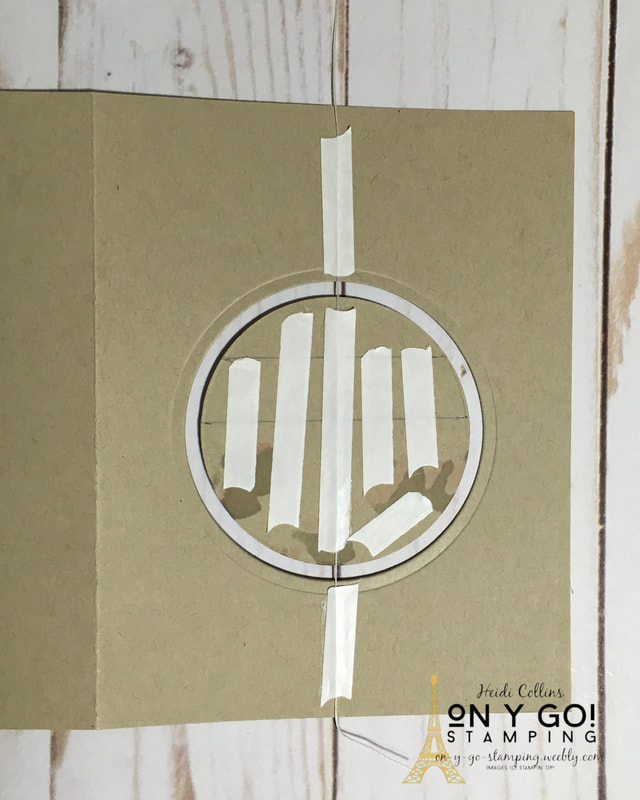
Add more tape to the back of the circle and add the other circle on top of it. Then add additional tape to the front of the card base. Be sure to keep the tape away from the edges where the Crumb Cake will show. Then, adhere the Soft Suede card front.
Stampin' Friends Designers:
Do you need a Stampin' Up! Demonstrator? I would love to help you out. Click any of the products below to link to my online shop. Be sure to grab the host code and start earning free stamps (see the more info under the Shopping Rewards tab). And of course, if you need any help, feel free to send me an email ([email protected]) or leave your questions in the comments.
Product List


For last night's Mystery Stamping, we created an easy peek-a-boo card. If you haven't joined us for Mystery Stamping yet, I hope you'll pop in next week Tuesday night at 8:00 PM Eastern. It's always a fun time and it's so much fun seeing how different everyone's card turns out. Be sure to join the On Y Go! Stamping Facebook Group and watch for the first clue next Monday. So, back to the peek-a-boo card - on y go! Let's get stamping.
Product List
 Circle Punch")


Product List


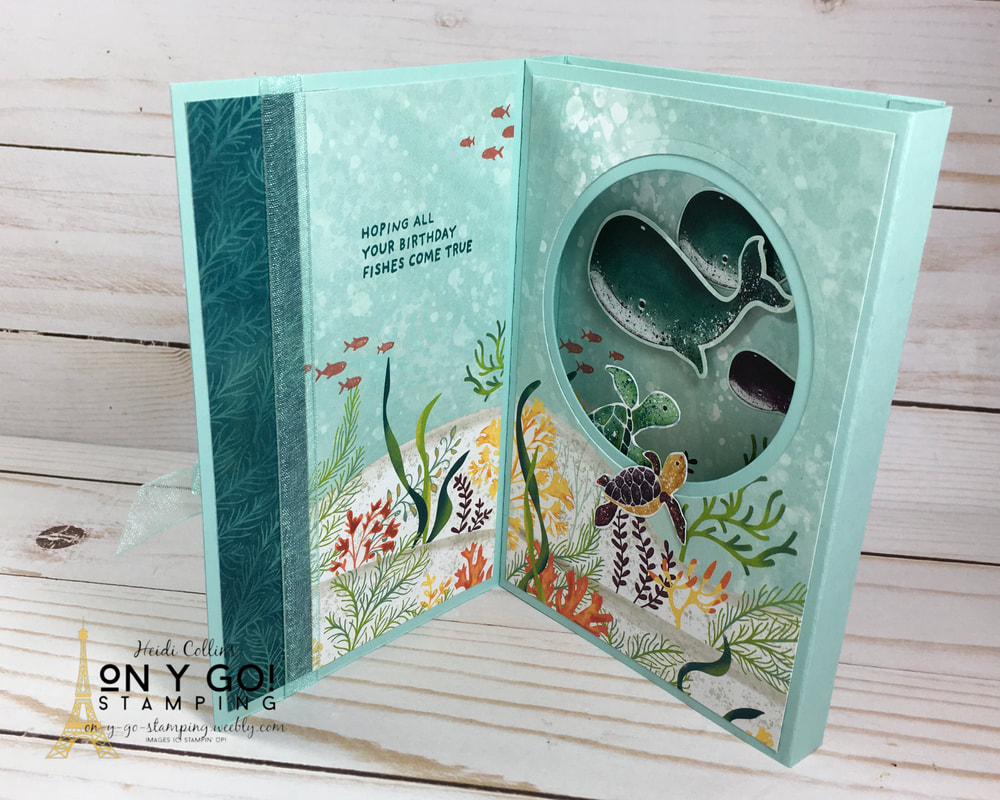
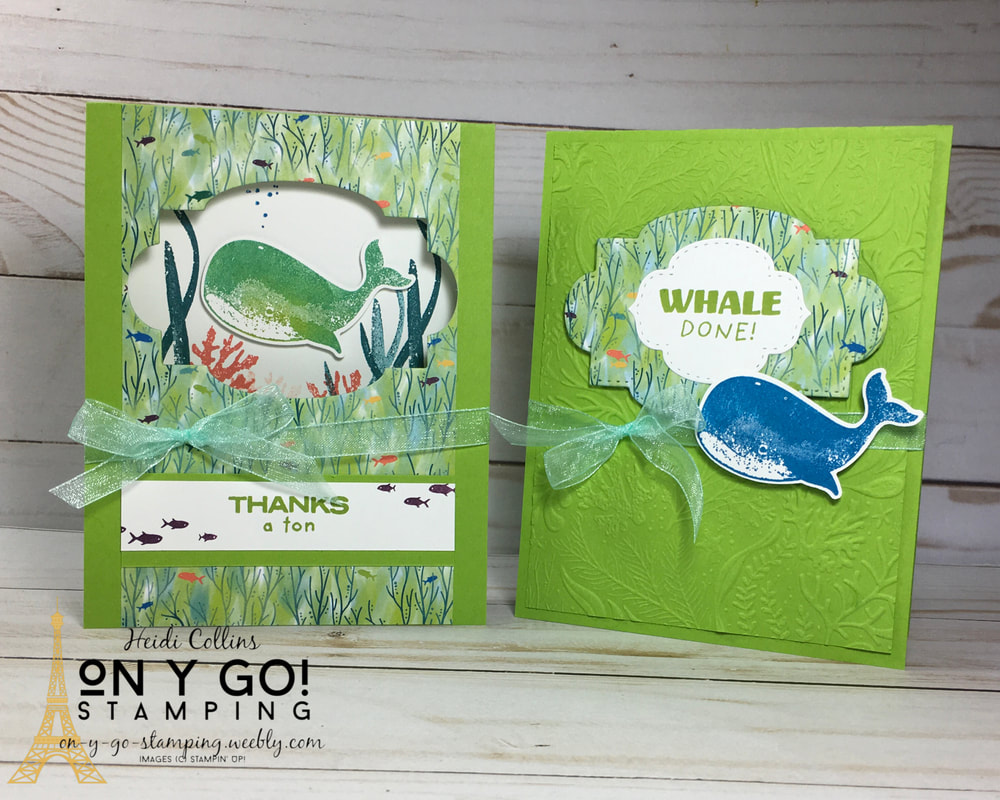
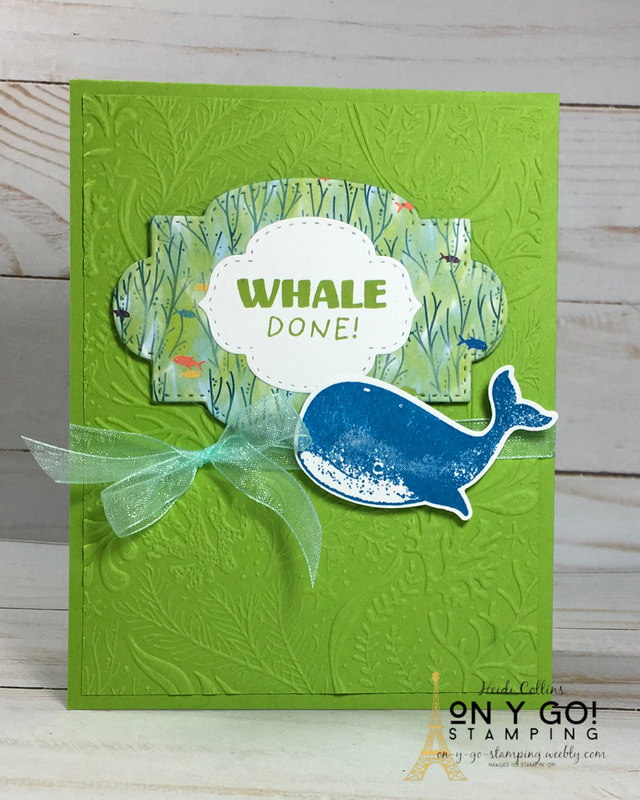
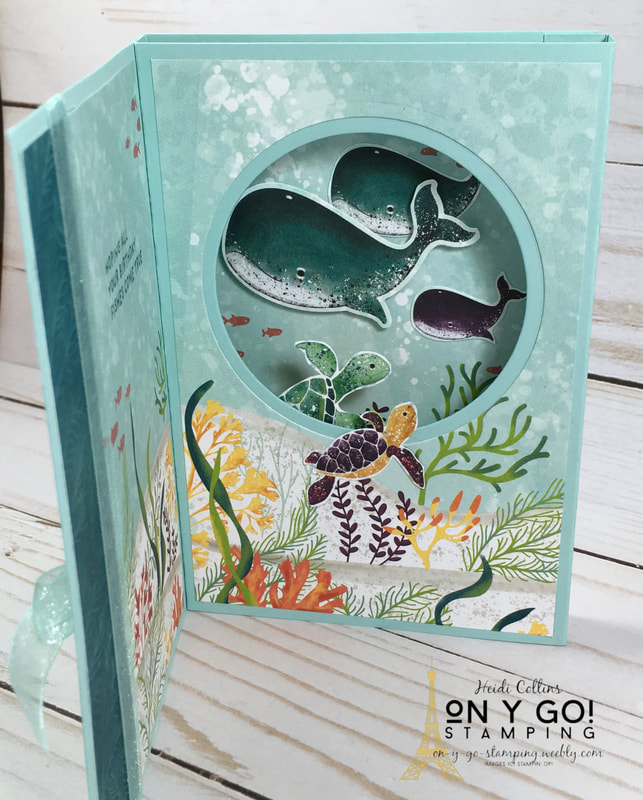
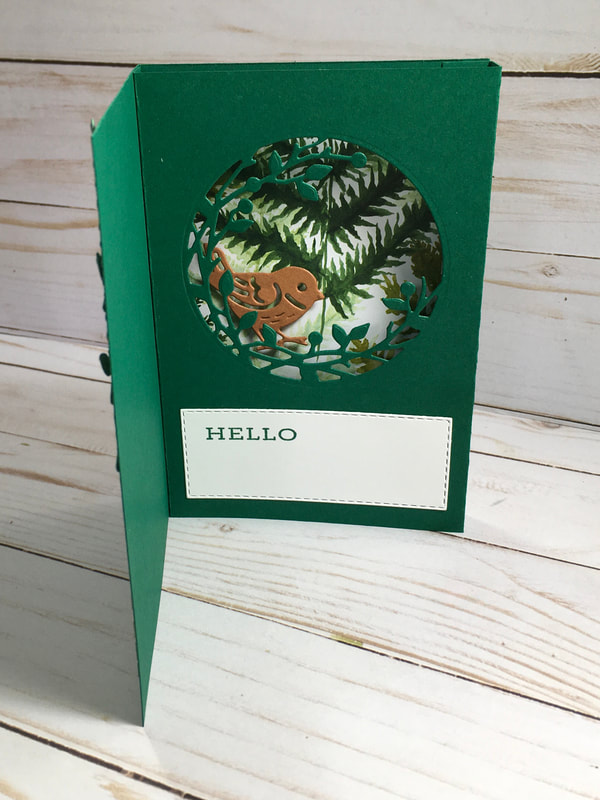
Shadow box cards are so much fun to look at and much easier than it seems! I used the Whale of a Time suite for this card and I have another sample below with the Forever Fern and Birds & Branches stamp sets. Be sure to scroll all the way through the post to see all of the samples. I love how you peer in through the window when you open the card. There is so much depth! So, on y go! Let's get stamping.
Whisper White cut with the Stitched Shapes Dies
Additional images cut from the Whale of a Time DSP.
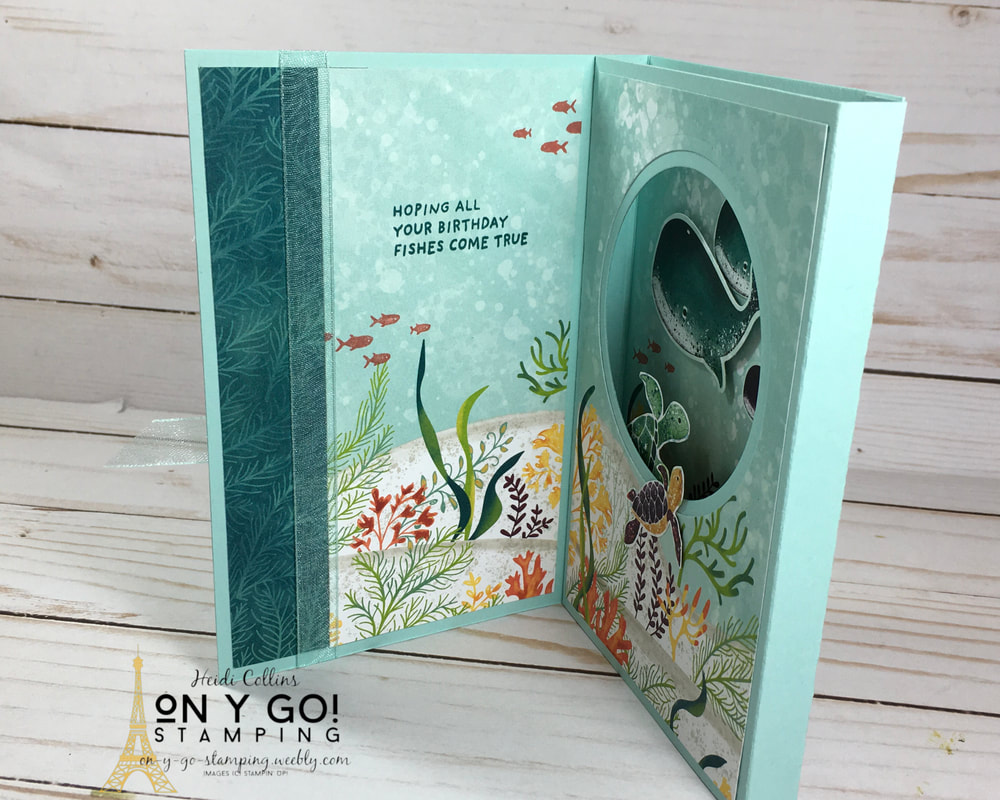
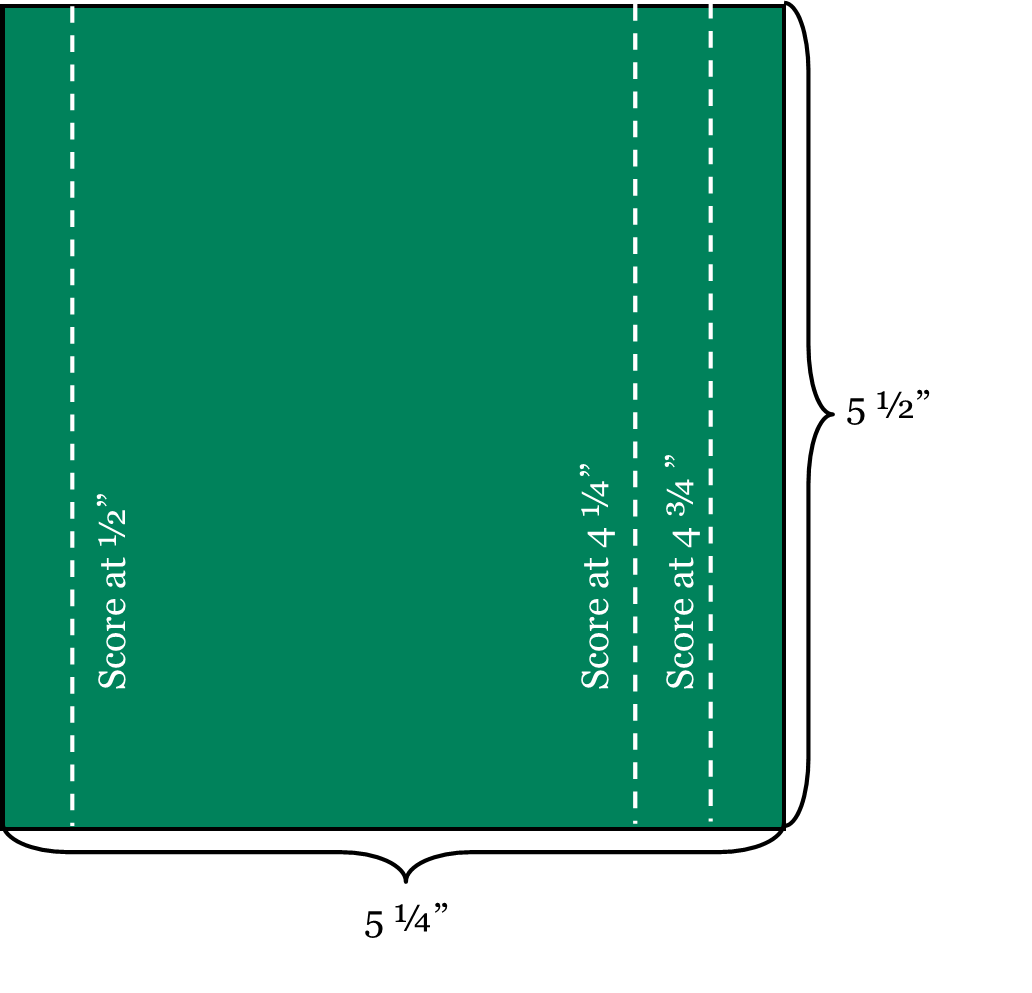
1. Score your pieces of Pool Party cardstock. The 5 1/2" x 8" piece is your card base. Unlike regular card bases, the sides of this one are not the same size. The smaller half is the back and the larger is your card front.
2. Put Tear & Tape or another strong adhesive along the outer two 1/2" sections of the other piece of Pool Party Cardstock. 3. Take one piece of 3 1/2" x 5 1/4" Whale of a Time DSP and cut a circle out of it using the largest circle from the Layering Circles dies. Adhere this piece to the center of your piece of 5 1/2" x 5 1/4" Pool Party cardstock. 4. Using the next smaller-sized circle, cut a hole in the Pool Party cardstock in the center of the hole that you already cut from the DSP. 5. Lay your card base out flat with the smaller side to your right. Lay the 5 1/2" x 5 1/4" piece of Pool Party cardstock in front of you so that one 1/2 strip is on the left and the other two are on the right. Fold the two right sections under. To adhere this to your card base, line up the left side with the fold and glue down the right side with the two right flaps folded under. (I highly recommend watching the video for this!) 6. Open up your card all the way and adhere the other piece of 3 1/2" x 5 1/4" DSP to your card back. Part of it will cover the edge that you just glued down. 7. To adhere the other side of your card, fold it over again so that the left side lines up just inside the fold of your card base. Remove the backing to the Tear & Tape and close your card. When you open it again, you should have a shadow box. 8. Decorate as shown using fussy cut pieces from the Whale of a Time DSP.
Product List


Product List


|


Archives
July 2024
|
")


 Designer Series Paper")


")


 Crinkled Seam Binding Ribbon")

")


 Designer Series Paper")

")
")
 Designer Series Paper")


 Sheer Ribbon")


")


